|

Reference Guide
|
|
Problem Solver
Clearing Jammed Paper
 Precautions for clearing jammed paper
Paper jam-paper cassette
Paper jam-MP tray
Paper jam-inside the printer
Paper jam-4-Bin Mailbox
Paper jam-Duplex Unit
If paper becomes jammed in the printer, the printer's LCD panel and EPSON Status Monitor 3 provide alert messages.
Precautions for clearing jammed paper
Be sure to observe the following points when you clear jammed paper.
-
Do not remove jammed paper by force. Torn paper can be difficult to remove and might cause other paper jams. Pull it gently in order to avoid tearing.
-
Always try to remove jammed paper with both hands to avoid tearing it.
-
If jammed paper is torn and remains in the printer, or if paper is jammed in a place not mentioned in this manual, contact your dealer.
-
Make sure that the paper type that is loaded is the same as the Paper Type setting in the printer driver.
 |
Warning:
|
 | -
Be careful not to touch the fuser or the surrounding areas. If the printer has been in use, the fuser and the surrounding areas may be very hot.
|
|
| -
Do not insert your hand deep into the fuser unit as some components are sharp and may cause injury.
|
|

[Top]
Paper jam-paper cassette
When a paper jam occurs at a location where paper feeds into the printer, or in the paper cassettes, follow these steps to clear the jammed paper:
 |
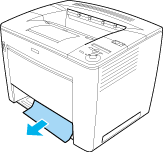
Pull out the paper cassette until it stops.
|

 |
While pressing in the gray stopper located at both sides of the paper cassette, pull out the cassette from the printer.
|
|  |
Note:
|
| | |
If one or more optional 500-Sheet Universal Paper Cassette Units are installed, repeat steps 1 and 2 to pull out all paper cassettes.
|
|
 |
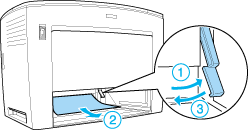
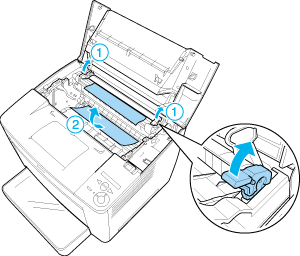
Remove the jammed paper from inside the printer, as shown below.
|
| |
Note:
|
| | -
Do not try to pull out jammed paper with force when you cannot remove the paper easily.
Release the paper feed roller by pulling the green lever located inside the printer, as shown below, and then remove the jammed paper. Make sure to push the green lever back to its original position.
|
|
| | -
If there is a paper jam inside the 500-Sheet Universal Paper Cassette Unit, it may occur deep inside the unit because the paper path is located in the rear part of the unit. Check the inside of the unit carefully from the opening on the front side.
|
|
 |
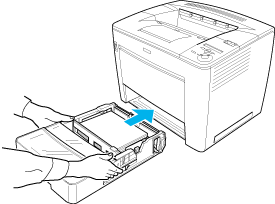
Reinsert the paper cassette. Make sure to push in the cassette as far as it will go inside the printer.
If you have optional cassette units installed, reinsert all the cassettes into the units.
|
| |
Note:
|
| | |
Make sure that paper is loaded properly in the paper cassettes before reinserting them.
|
|
A paper jam error is cleared when the paper cassettes are reinserted properly. Check the current status of the printer on the LCD panel of the printer's control panel, or from the EPSON Status Monitor 3 utility. If the paper jam error is not yet cleared, check inside the printer. See Paper jam-inside the printer for instructions.
[Top]
Paper jam-MP tray
When a paper jam occurs in the MP tray, follow these steps to clear the jammed paper:
|
|
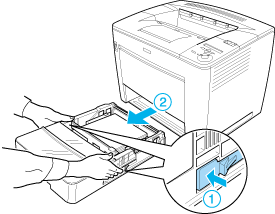
Remove paper loaded in the MP tray.
|
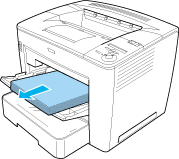
|
|
Pull out the paper jammed inside the tray.
|
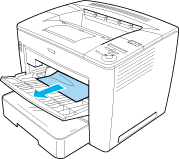
|
|
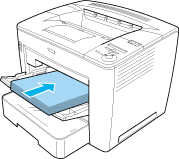
Load paper into the tray.
|
| |
Note:
|
| | |
Make sure that paper is loaded properly into the MP tray.
|
|
|
|
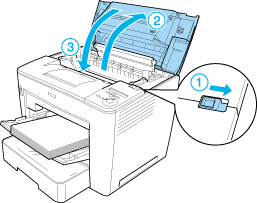
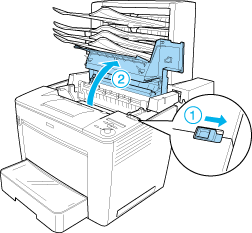
Slide the lock lever to the right, and then open and close the front cover, as shown below.
|
Check the current status of the printer on the LCD panel of the printer's control panel, or from the EPSON Status Monitor 3 utility. If the paper jam error is not yet cleared, check inside the printer. See Paper jam-inside the printer for instructions.
[Top]
Paper jam-inside the printer
When a paper jam occurs inside the printer, the location is either at the fuser unit or paper feeding roller.
Follow these steps to clear the jammed paper:
|
|
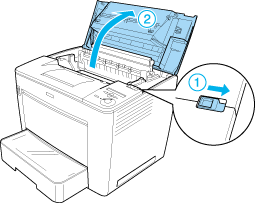
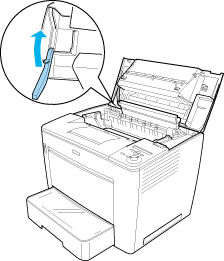
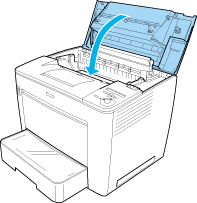
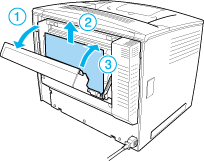
Slide the lock lever to the right, and then open the front cover.
|
|
|
Pull out the stopper of the front cover to secure the cover.
|
|  |
Caution:
|
| | -
Be careful not to touch the fuser unit, which is marked CAUTION HIGH TEMPERATURE, or the surrounding areas. If the printer has been in use, the fuser unit and the surrounding areas may be very hot.
|
|
| | -
You should avoid touching the transfer roller. Otherwise, the print quality may decline.
|
|
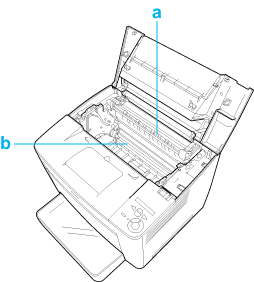
a. Fuser unit
b. Transfer roller
|
|
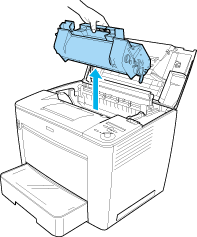
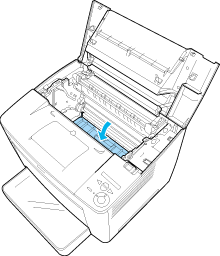
Hold the handle of the imaging cartridge, and lift it out of the printer.
|
| |
Note:
|
| | |
Place the imaging cartridge on a clean, flat surface.
|
|
|
|
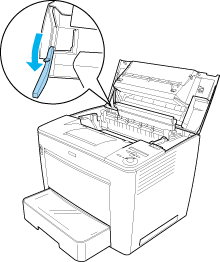
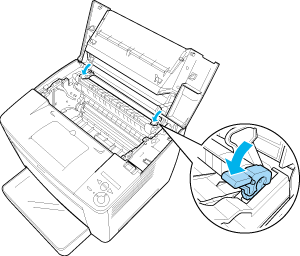
If paper is jammed at the fuser unit, pull up the green lever at both ends of the fuser unit. Then pull the paper out slowly from beneath the fuser unit.
|
| |
Caution:
|
| | |
Do not pull out the jammed paper from the top of the fuser unit. Doing so may cause dirty printouts.
|
|
 |
Push the green levers back down to their original position, as shown below.
|
If you cannot find jammed paper at the fuser unit, proceed to the next step.
If paper is jammed at the fuser unit, check to see if paper jams have occurred at two locations at the same time, in the following steps.
 |
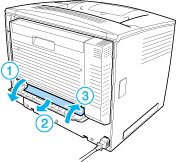
Open the black cover located inside the printer, as shown below.
|
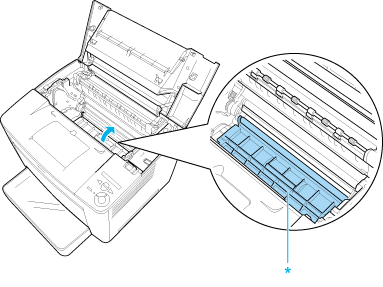
* Black cover
 |
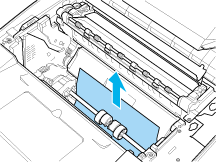
Pull out any jammed paper.
|
 |
Replace the black cover.
|
 |
Carefully insert the imaging cartridge into the printer, making sure that the pins on both sides of the cartridge are aligned with the grooves inside the printer.
Make sure to push the cartridge into the printer until it is firmly seated in its proper position.
|

| |
Caution:
|
| | |
Do not touch the roller or other parts inside the printer. Doing so may cause the printer to malfunction.
|
|
 |
Push the stopper of the front cover back to its original position.
|
 |
Close the front cover by pressing it firmly until it clicks into place.
|
Check the current status of the printer on the LCD panel of the printer's control panel, or from the EPSON Status Monitor 3 utility.
[Top]
Paper jam-4-Bin Mailbox
Paper jam inside the printer
If a paper jam occurs inside the printer when the optional 4-Bin Mailbox is installed, follow these steps to clear the jammed paper:
|
|
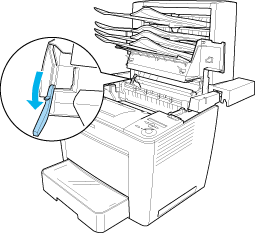
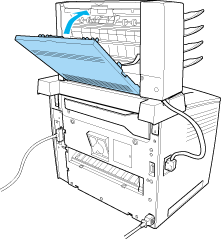
Move the main unit of the 4-Bin Mailbox toward the rear of the printer until it stops.
|

|
|
Slide the lock lever to the right, and then open the front cover.
|
|
|
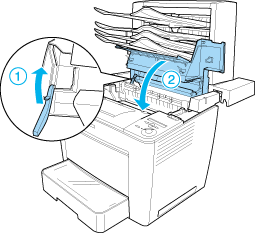
Pull out the stopper of the front cover to secure the cover.
|
|
|
Push the stopper of the front cover back to its original position, and then close the front cover by pressing it firmly until it clicks into place.
|
|
|
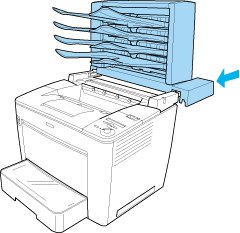
Pull the main unit of the 4-Bin Mailbox back to its original position, so that it sits on the rear part of the printer.
|
Check the current status of the printer on the LCD panel of the printer's control panel, or from the EPSON Status Monitor 3 utility.
Paper jam inside the output unit
Follow these steps to clear jammed paper inside the output unit of the optional 4-Bin Mailbox:
|
|
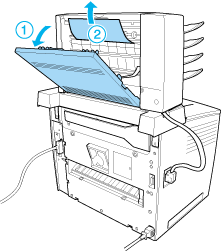
Open the rear cover of the 4-Bin Mailbox by pulling at the top of the cover, and then remove the jammed paper.
|
|
|
Replace the rear cover.
|
Check the current status of the printer on the LCD panel of the printer's control panel, or from the EPSON Status Monitor 3 utility.
[Top]
Paper jam-Duplex Unit
If a paper jam occurs in the optional Duplex Unit, follow these steps to clear the jammed paper:
|
|
Open the upper cover of the Duplex Unit and remove any jammed paper. Then replace the cover.
|
| |
Note:
|
| | |
Make sure to close the upper cover properly.
|
|
|
|
Open the lower cover, and remove any jammed paper. Then replace the lower cover.
|
| |
Note:
|
| | |
Make sure to close the lower cover properly.
|
|
Check the current status of the printer on the LCD panel of the printer's control panel, or from the EPSON Status Monitor 3 utility.
|
Note:
|
| |
If the paper jam error is not cleared after removing jammed paper as described in the previous steps, remove the Duplex Unit from the printer. Then check if paper is jammed at the opening on the rear side of the printer.
|
|
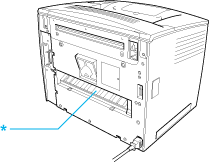
* Opening
| |
If you find any jammed paper, remove it. Then reinstall the Duplex Unit. See Duplex Unit for instructions.
|
|
[Top]
| Version NPD0173-00, Copyright © 2003, SEIKO EPSON CORPORATION |
