|

Reference Guide
|
|
Paper Handling
Loading Paper
 MP tray
Standard and optional paper cassettes
Output tray
This section describes how to load paper into the MP tray and the paper cassettes. If you use special media such as transparencies or envelopes, see also Printing on Special Media.
MP tray
Follow these steps to load paper into the MP tray:
 |
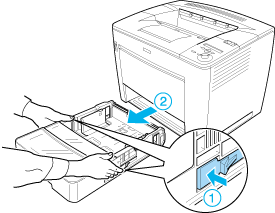
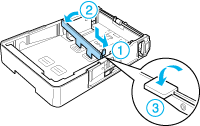
Open the MP tray.
|

 |
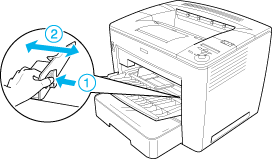
While squeezing the guide lock on the right side of the paper guide, slide the paper guide to accommodate the paper you are loading.
|
 |
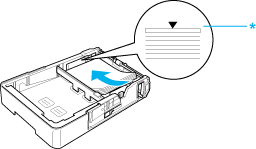
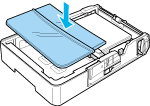
Fan a stack of paper and tap it on a flat surface to even the edges, and then set the paper into the MP tray with the printable surface facing up.
|
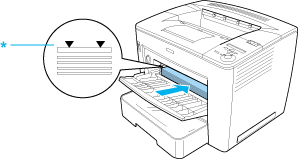
* Limit mark
 |  |
Note:
|
| | -
You can load up to 200 sheets of plain paper (75 g/m2, 20 lb).
|
|
| | -
Make sure to load the paper as far as it will go inside the MP tray.
|
|
| | -
Make sure that you do not load paper beyond the limit mark.
|
|
 |
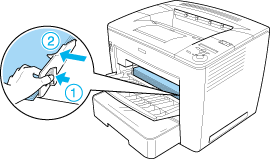
While squeezing the guide lock on the right side of the paper guide, adjust the paper guide to the size of the paper.
|
| |
Note:
|
| | |
Make sure to load the paper as far as it will go inside the MP tray.
|
|

[Top]
Standard and optional paper cassettes
The paper-loading procedure is the same for the standard paper cassette and the optional 500-Sheet Universal Paper Cassette Unit A3.
The paper sizes and types supported by the optional 500-Sheet Universal Paper Cassette Unit A3 are the same as the standard paper cassette. For more information, see Optional 500-Sheet Universal Paper Cassette Unit A3.
Follow these steps to load paper into the standard and optional paper cassettes. The illustrations show the standard cassette.
|
|
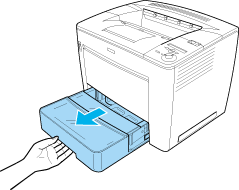
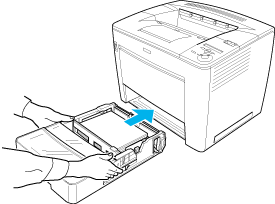
Pull the paper cassette out until it stops.
|
|
|
While pressing the gray stoppers on both sides of the paper cassette, pull the cassette out of the printer.
|
|
|
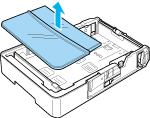
Remove the cassette cover.
|
|
|
Check if the paper size detector is set to the size of the paper you are loading.
|
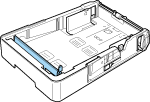
In the illustration above, the paper size detector is set to A3. If your paper cassette is in the same condition and you are loading A3 paper, proceed to step 7.
To set the paper size detector to other sizes, proceed to the next step.
 |
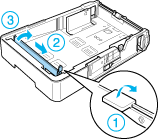
Raise the gray stopper located at the right end of the paper size detector, and push the detector to the right. Then, pull up the left end of the paper size detector to remove it from the paper cassette.
|
 |
Insert the paper size detector at the location of the desired paper size. Push the paper size detector to the left, and then push down the gray stopper to secure the detector, as shown below.
|
| |
Note:
|
| | |
In the illustration above, the paper size detector is inserted at the location for A4 size.
|
|
 |
Fan a stack of paper and tap it on a flat surface to even the edges. Then load it into the paper cassette with the printable surface facing up.
|
When loading A4 size or smaller
* Limit mark
Make sure that you do not load paper beyond this mark.
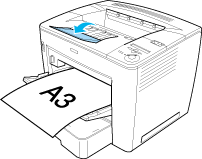
When loading A3, B4, or Ledger size
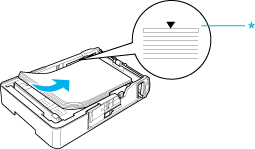
* Limit mark
Make sure that you do not load paper beyond this mark.
| |
Note:
|
| | |
You can load up to 500 sheets of plain paper (75 g/m2, 20 lb).
|
|
 |
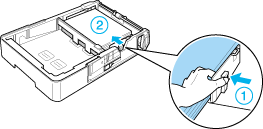
While squeezing the guide lock, adjust the paper guide to the size of the loaded paper, as shown below.
|
 |
Replace the cassette cover.
|
 |
Carefully insert the paper cassette into the printer.
|
| |
Note:
|
| | |
Make sure to push in the cassette as far as it will go inside the printer.
|
|
[Top]
Output tray
The output tray is located on the top of the printer. Since printouts are output face-down, this tray is also referred to as the face-down tray. This tray can hold up to 500 sheets. Raise the output paper extending tray to prevent your printouts from slipping off the printer when printing on B4 paper or larger.
Outputting to the 4-Bin Mailbox
You can specify a different output tray for each print job if the optional 4-Bin Mailbox is installed on the printer.
This feature is useful when the printer is connected to more than one computer. You can avoid mixing up printouts by assigning a different output tray to each user. See Using the 4-Bin Mailbox for instructions on how to specify an output tray for a print job.
|
Note:
|
| -
See 4-Bin Mailbox for instructions on installing the 4-Bin Mailbox.
|
|
| -
See 4-Bin Mailbox for information on paper that you can output to the 4-Bin Mailbox.
|
|
[Top]
| Version NPD0173-00, Copyright © 2003, SEIKO EPSON CORPORATION |

