|

Reference Guide
|
|
Setup & Maintenance / Installing Options
4-Bin Mailbox
Installing the 4-Bin Mailbox
Follow these steps to install the optional 4-Bin Mailbox:
 |
Note:
|
 | -
If you are installing the optional Duplex Unit at the same time, install the 4-Bin Mailbox before installing the Duplex Unit.
|
|
 | -
If your printer already has the optional Duplex Unit installed, remove the Duplex Unit first, install the 4-Bin Mailbox, and then reinstall the Duplex Unit.
|
|
 |
Turn the printer off and unplug the power cord. Then remove all interface cables from the interface connectors.
|
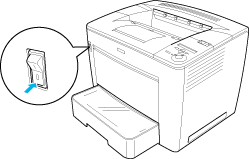
 |
Slide the lock lever to the right, and then open the front cover.
|
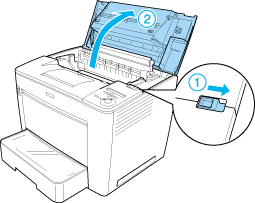
 |
Remove the rear part of the front cover by pulling the four stopper outward and lifting up the rear part, as shown below.
|
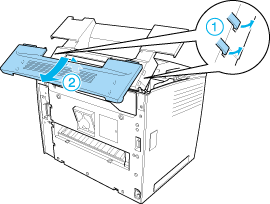
 |  |
Note:
|
 |  | -
Make sure to pull the stoppers carefully. They may be damaged if you apply too much force.
|
|
 |  | -
After removing the rear part of the front cover, keep it in a safe place.
|
|
 |
Remove the two securing parts located at the back of the front cover.
|
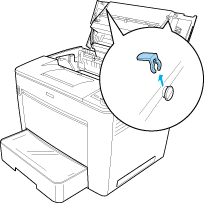
 |  |
Note:
|
 |  | |
After removing the two securing parts, keep them in a safe place.
|
|
 |
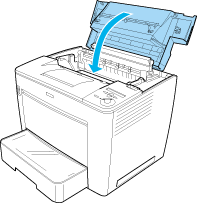
Close the front cover by pressing it firmly until it clicks into place.
|
 |
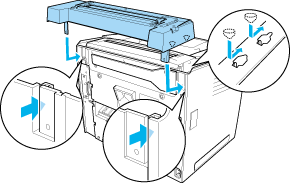
Install the base unit of the 4-Bin Mailbox.
Make sure to align the metal pins located at both sides of the unit to the matching holes on the printer. Then pull the unit to the front so that it securely sits on top of the printer.
|
 |
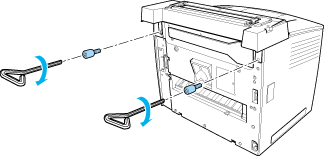
Secure the base unit with two screws at the back of the printer by using the wrench that comes with the unit, as shown below.
|
 |  |
Note:
|
 |  | |
Keep the wrench in a safe place after use.
|
|
 |
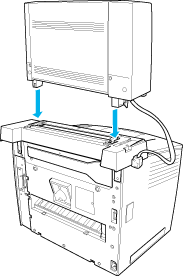
Install the main unit of the 4-Bin Mailbox onto the base unit.
Make sure that the two pins at the bottom of the main unit go into the holes on the base unit and the unit clicks into place.
|
 |
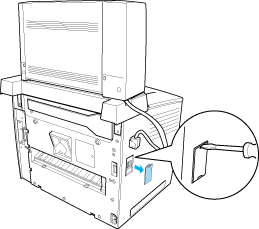
Remove the connector cover located on the left side of the printer, as shown below.
|
 |  |
Note:
|
 |  | |
After removing the connector cover, keep it in a safe place.
|
|
 |
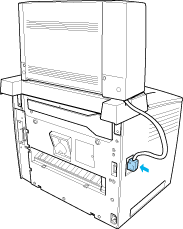
Plug in the main unit cable into the connector located on the left side of the printer.
Make sure to push in the plug until you hear a clicking sound.
|
 |
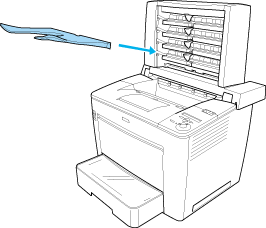
Attach four output trays to the main unit by inserting the pins on both sides of the trays into the grooves on the main unit.
|
 |  |
Note:
|
 |  | |
Attach the bottom tray first. Then proceed to attach the one above it, until you reach the top tray.
|
|
 |
Reconnect all interface cables and the power cord.
|
 |
Plug the printer's power cord into an electrical outlet.
|
 |
Turn on the printer.
|
To confirm that the 4-Bin Mailbox is installed correctly, use the printer's control panel menus to print a status sheet. See Printing a Status Sheet for instructions. If the 4-Bin Mailbox is not listed on the status sheet, try reinstalling the device. Make sure that the connector on the 4-Bin Mailbox is securely connected to the connector on the printer.
 |
Note:
|
 | |
If you are using Windows, and EPSON Status Monitor 3 is not installed, you have to make settings manually in the printer driver. Click the Update the Printer Option Info Manually button on the Optional Settings menu, and then click Settings. Then select 4-Bin Mailbox in the Optional Output Trays list in the Optional Settings dialog box and click OK.
|
|
After completing the installation procedure, you need to make the setting for the output tray in the printer driver in order to use the 4-Bin Mailbox. See Using the 4-Bin Mailbox for instructions.
 |
Caution:
|
 | -
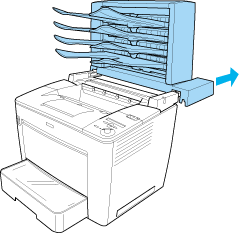
Make sure to move the main unit of the 4-Bin Mailbox toward the rear of the printer before opening the front cover.
And make sure to pull the unit back to the original position after closing the front cover, so that the unit sits on the rear half of the printer.
|
|
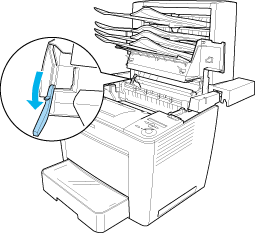
 | -
Make sure to pull out the stopper after opening the front cover to secure it, as shown below.
|
|
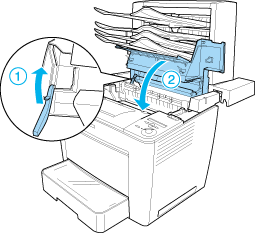
 | -
Make sure to push the stopper back to the original position before closing the front cover.
|
|
 | -
Make sure to unplug the connecting cable and remove the main unit of the 4-Bin Mailbox from the printer when you move the printer, regardless of the distance to the new location.
|
|
Removing the 4-Bin Mailbox
Follow these steps to remove the 4-Bin Mailbox from the printer:
 |
Turn the printer off and unplug the power cord. Then remove all interface cables from the interface connectors.
|
 |
Remove all output trays from the main unit.
|
 |
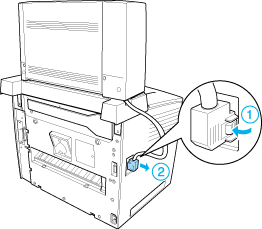
Unplug the connecting cable from the printer.
|
 |
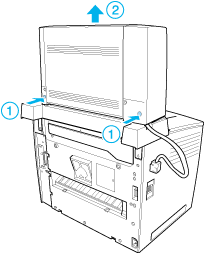
Push the buttons located at the bottom of both sides of the main unit, as shown below. Then lift the unit up to remove it from the printer.
|
 |
Remove the two screws that secure the base unit, and remove the unit from the printer.
|
 |
Push the stopper of the front cover back to its original position.
|
 |
Reattach the two securing parts, the rear part of the front cover, and the connector cover.
|
 |
Reconnect all interface cables and the power cord.
|
 |
Plug the printer's power cord into an electrical outlet.
|

[Top]
| Version NPD0173-00, Copyright © 2003, SEIKO EPSON CORPORATION |