|

Administrator's Guide
|
|
Connecting to the Network
Setting the IP Address Using EpsonNet WinAssist/MacAssist
After connecting the printer to the network, you need to set the IP address for the Internal Print Server.
To set the IP address, Subnet Mask, and Gateway using EpsonNet WinAssist/MacAssist, follow the steps below.
 |
Note:
|
 | -
TCP/IP must be installed in your computer.
|
| -
The example screens are from the Windows 95 operating system using EpsonNet WinAssist. Other systems' displays may differ.
|
 |
Confirm that the necessary protocols are installed in the computer.
|
If you are using Windows 98/95 or Windows NT, TCP/IP must be installed. If you are using Macintosh, AppleTalk must be installed.
 |
Turn on the printer.
|
 |
Start EpsonNet WinAssist or MacAssist.
|
Windows 98/95/NT 4.0: Click Start, point to Programs, EpsonNet WinAssist, then click EpsonNet WinAssist.
Windows NT 3.51: Double-click the EpsonNet WinAssist icon in the Epson WinAssist group.
Macintosh: Double-click the EpsonNet MacAssist icon.
 |
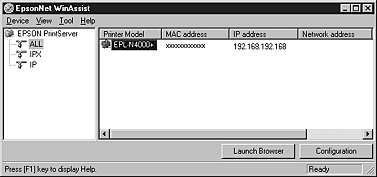
Select the printer, then click the Configuration button or double-click the printer.
|
| |
Note:
|
| | -
If you have connected more than one printer with the same type of print server to the network, you can distinguish between the printers by the MAC address on the status sheet.
|
| | -
You can search printers in other segments by setting the Search Options in the Tool menu in EpsonNet WinAssist. See Optional settings for more information.
|
| | -
The network administrator must confirm any changes made to the IP address settings.
|
 |
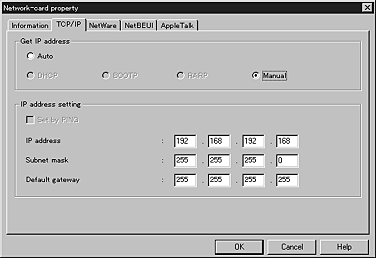
Click the TCP/IP tab to display the TCP/IP menu.
|
 |
Select the "Get IP address" method, either Auto or Manual.
|
| |
Note:
|
| | -
When using Auto, the DHCP server must be installed in your computer and must be correctly configured. See the online help of your operating system for detailed instructions.
|
| | -
Whenever the printer is turned on, you need to change the printer port setting if Auto is selected for Get IP address. For TCP/IP printing, we recommend you select Manual and set the IP address manually.
|
 |
When you select Manual, assign the IP address, the subnet mask, and the default gateway. Be sure to give an IP address which does not conflict with any other device on the network.
|
| |
Note:
|
| | -
The default value for the IP address, subnet mask, and default gateway are 192.168.192.168, 255.255.255.0, and 255.255.255.255 respectively.
|
| | -
If there is a server or a router which functions as a gateway, type the IP address of the server or router for the gateway address. If there is no gateway, leave the default values.
|
| | -
The Set by PING check box is not available. If you want to set the IP address using arp/ping commands, use printer's control panel to select PING for Get IP Address in Network Menu.
|
 |
After making the settings, click OK (for WinAssist) or Send (for MacAssist). The Password dialog box appears.
|
 |
Type your password (up to 20 characters) and click OK to save settings. If you are entering a password for the first time, click Change and set the password. For more information about passwords, see About passwords for EpsonNet WinAssist or About passwords for EpsonNet MacAssist.
|
Follow the on-screen instructions. After updating is complete, refresh the configuration by selecting Refresh from the Tool menu (for WinAssist), or by quitting MacAssist and then restarting it (for MacAssist).
|  |
Caution:
|
| |
Since it takes 2 or 3 minutes to send new settings to the Internal Print Server, you must wait to turn off your printer after the on-screen message appears.
|
 |
Be sure to print a network status sheet to confirm the new IP address.
|

[Top]
| Version 1.00E, Copyright © 2002, SEIKO EPSON CORPORATION |

