|

Reference Guide
|
|
How to / Using Options
Optional Interfaces
 Installing an interface card
Removing an interface card
This section describes how to install the optional interface cards listed below:
-
To add a direct connection to an Ethernet system, use an optional Ethernet Card (C82362
 /C82363).
-
To add a serial or parallel interface to your printer, use one of the following:
32KB Serial Interface Card (C82307)
32KB Parallel Interface Card (C82310)
-
To add a direct connection to an IBM mini or mainframe system, use one of the following:
Coax Interface Card (C82314)
Twinax Interface Card (C82315)
The coaxial and twinaxial connectors each contain a parallel interface. Since the printer's built-in parallel interface remains active, this gives you two parallel interfaces and a coaxial or twinaxial interface. Print jobs can be sent to any connection, and the printer automatically switches between the active ports.
The twinaxial interface is compatible with the following IBM systems: AS-400, System 36, 5251 (model 12), System 34, System 38, and 5294. When equipped with the EPSON twinaxial interface, the printer can be used in place of the following IBM system printers: 4210, 5224 (models 1 and 2), 5256 (models 1, 2, and 3), 3218 (non IPDS), 4214 (model 2), 5225 (models 1, 2, 3, and 4), and 5219 D01 and D02.
The coaxial interface allows the printer to be connected to the following IBM control units and mainframe systems: 3174, 3276, 4274, and 3270.
-
To add a direct connection to your GPIB network, use the GPIB Interface Card (C82313).
Installing an interface card
Follow these steps to install an optional interface card:
 |
Turn off the printer.
|
 |  |
Warning:
|
| |
To avoid electrical shock, do not attempt to install an interface card unless the printer is turned off.
|
 |
Unplug the printer's power cord from the electrical outlet.
|
 |
Face the back of the printer.
|
 |
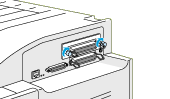
Remove all interface cables from the interface connectors.
|
 |
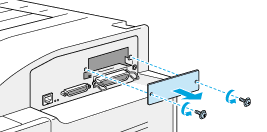
Remove the two screws that secure the interface slot cover and remove the cover.
|
 |
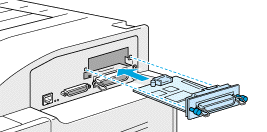
With the component side of the optional interface card facing up, slide the interface card into the grooves of the interface slot as shown below. Push the card firmly to lock it into place.
|
 |
Secure the interface card by fastening the two retaining screws.
|
 |
Reconnect all interface cables.
|
 |
Plug the power cord into an electrical outlet.
|
 |
Turn on the printer.
|
To confirm that the interface card is installed correctly, print a status sheet. If the interface is not listed on the status sheet, try reinstalling the card making sure the card is securely fastened to the socket on the printer.

[Top]
Removing an interface card
Follow these steps to remove an interface card:
|
|
Turn off the printer.
|
|
|
Unplug the printer's power cord from the electrical outlet.
|
|
|
Face the back of the printer.
|
|
|
Remove all interface cables from the interface connectors.
|
|
|
Remove the two retaining screws that fasten the interface card to the printer.
|
|
|
Pull the interface card out.
|
|
|
Replace the original interface slot cover and secure it with the two retaining screws.
|
|
|
Reconnect all interface cables.
|
|
|
Plug the power cord into an electrical outlet.
|
|
|
Turn on the printer.
|
[Top]
| Version 1.00E, Copyright © 2001, SEIKO EPSON CORPORATION |

