|

Reference Guide
|
|
How To / Installing and Removing Options
Interface Card
 Installing an interface card
 Removing an interface card
Your printer comes with a Type B interface slot. Various optional interface cards are available to expand your printer's interface options.
 |
Caution:
|
 |
Before you install the interface card, be sure to discharge any static electricity by touching a grounded piece of metal. Otherwise, you may damage static-sensitive components.
|
Installing an interface card
 |
Make sure the printer is turned off and unplug the power cord.
|
 |
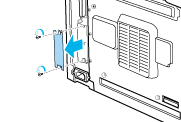
Remove the two screws that secure the Type-B interface slot cover and remove the cover.
|

 |
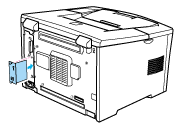
Slide the interface card into the grooves in the interface slot. Push it in firmly to lock the card into place.
|
 |  |
Note:
|
 |  |
When inserting the interface card, make sure that the component side of the card is on the left.
|

 |
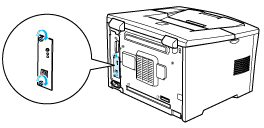
Secure the interface card with the two retaining screws.
|

To verify that the interface card is correctly installed, print a status sheet. For instructions on how to print a status sheet, see the Setup Guide.
If the interface is not listed on the status sheet, try reinstalling the card making sure the card is securely fastened to the socket inside the printer.

[Top]
Removing an interface card
To remove the unit, do the installation procedure in reverse order.

[Top]
| Version 1.00E, Copyright © 2002, SEIKO EPSON CORPORATION |
Installing an interface card
Removing an interface card