![]()
Reference Guide
|
|
Index |
|
Search |
|
Glossary | |||||
|
|
Contents |
|
Help |
|
||||||
|
|
|
|||||||||||||||||||||||||||||||||
How to / Controlling the Printer
About the EPSON Status Monitor 3 Utility
EPSON Status Monitor 3 is a utility program that monitors your printer and gives you information about its current status, including the amount of remaining toner. If a print error occurs, the Status Monitor 3 also provides you with a message describing the error. The Status Monitor 3 utility is accessed from within the printer driver after it is installed into your computer. See the following section for more information.
Before using Status Monitor 3, be sure to read the printer driver's README file. This file contains the latest information on the printer driver and Status Monitor 3.
EPSON Status Monitor 3 supports Windows 95/98/2000/Me, and Windows NT 4.0.
The protocols that must be installed to run EPSON Status Monitor 3 vary depending on your operating system and printer type. The following table divides printers into four categories: Local printers; LPR printers, which use TCP/IP (generally in a Windows NT network environment); NetWare printers, which use Novell's IPX/SPX protocol in a NetWare environment; and Windows shared printers.
Use this table to determine what protocols you need to install according to your operating system and printer type, then see the corresponding section for your operating system.
|
|
Local Printer |
LPR Printer (TCP/IP) |
NetWare Printer (IPX/SPX) |
Windows Shared Printers |
|
Windows Me/98/95 |
LPT |
EPSON LPR1 |
NetWare3 |
LPT |
|
Windows 2000/NT 4.0 |
LPT |
TCP/IP & LPR2 |
NetWare3 |
LPR2 & LPT |
| EPSON LPR1 = EpsonNet Direct Print |
| LPR2 = Windows NT LPR protocol |
| NetWare3 = Necessary protocols already installed |
 | Note: |
|
|
|
Follow these steps to install the EPSON Status Monitor 3 utility program:
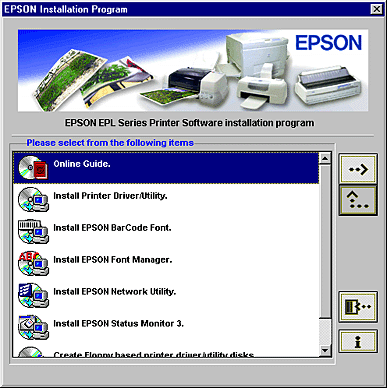
 | Insert the printer software CD-ROM in the CD-ROM drive. The Installation Program screen appears as shown below: |
If it does not, double-click the My Computer icon. Click the CD-ROM icon, then select Open from the file menu.Then double-click Epsetup.exe.
 | In the Installation Program screen, double-click Install EPSON Status Monitor 3. Alternatively, you can install by selecting Install EPSON Status Monitor 3 and then clicking the arrow at the top right. |
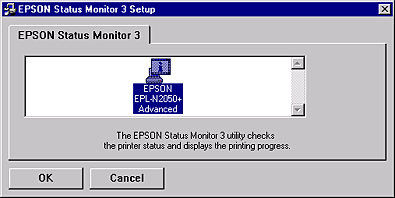
 | In the dialog box that appears, make sure that your printer's icon is selected, and click OK. This automatically installs the utility program. |
 | When the installation is complete, click OK. |
EPSON Status Monitor 3 monitors the printer during printing and while the EPSON Status Monitor 3 dialog box is open.
Follow these steps to access the EPSON Status Monitor 3:
|
| Double-click the My Computer icon. |
|
| Double-click the Printers folder. |
|
| Right-click the icon for your printer, and click Properties (Windows Me/98/95) or Printing Preference (Windows 2000). If you are using Windows NT 4.0, you can choose either Document Defaults or Properties. |
|
| Click the Utility tab. |
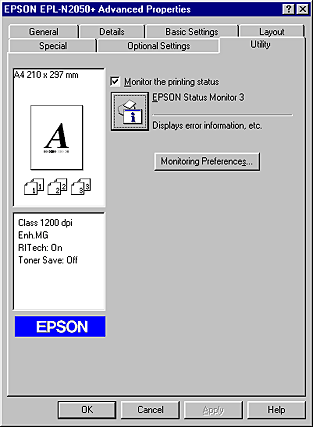
 | Click the EPSON Status Monitor 3 icon to start the EPSON Status Monitor 3 utility. |
| Note: |
| Clearing the Monitor the printing status check box during normal operation causes the Status Alert window to stop monitoring some errors. See Status Alert window for more information on this function. |
You can monitor printer status and obtain information on consumable products on the Consumables menu on the EPSON Status Monitor 3 dialog box.

|
Printer image: |
The image at the upper left shows the printer status graphically. |
|
Text box: |
The text box next to the printer image displays the current status of the printer. When a problem occurs, the most probable solution is displayed. |
|
OK button: |
Clicking this button closes the dialog box. |
|
Paper: |
Displays the paper size, paper type, and the approximate amount of paper remaining in the paper source. Information for the optional cassettes are displayed only if they are installed. |
|
Toner: |
Indicates the amount of remaining toner. The toner icon flashes if toner is low (10 percent or less). |
You can obtain information on the Multibin Unit on the Multibin Unit menu on the EPSON Status Monitor 3 dialog box.

|
Printer image: |
The image at the upper left shows the printer status graphically. |
|
Text box: |
The text box next to the printer image displays the current status of the printer. When a problem occurs, the most probable solution is displayed. |
|
OK button: |
Clicking this button closes the dialog box. |
|
Mail Box: |
Displays the Mail Box names and status. |
|
Mail Box name: |
If the Mail Box name is not registered or the Status Monitor 3 cannot get the Mail Box information, the default name is displayed. |
|
Mail Box status: |
When the Multibin is full, "Paper Full" is displayed and flashes. |
|
Password lock: |
The key mark appears in the box under the Mail Box name if you have set a password for the Mail Box. |
To make specific monitoring settings, click the Monitoring Preferences button in the Utility tab of the printer driver. The Monitoring Preferences dialog box appears.

The following settings and buttons appear in the dialog box:
|
Select Notification: |
Use the check boxes in this area to select the types of error that you wish to be notified about. |
|
Default button: |
Restores default settings. |
|
Select Shortcut Icon: |
To use the shortcut icon, select the Shortcut Icon check box and choose an icon. The icon you select appears on the right side of the task bar. |
|
Allow monitoring of shared printers check box: |
To monitor a shared printer, check this box. You need to make this setting on the server machine. |
|
OK button: |
Saves new changes. |
|
Cancel button: |
Cancels any changes. |
|
Help button: |
Opens online help for the Monitoring Preferences dialog box. |
The EPSON Status Monitor 3 monitors the printer during printing and while the EPSON Status Monitor 3 dialog box is open.
To monitor during printing only, close the EPSON Status Monitor 3 dialog box.
To stop all monitoring completely, clear the Monitor the Printing Status check box in the printer driver's Utility tab. You may want to do this to speed up printing or if you don't need to monitor the printer at all.
If you clear the Monitor the Printing Status check box, the Status Alert window no longer comes up to notify you when an error occurs. However, you can still find out the current printer status by clicking the EPSON Status Monitor 3 icon in the printer driver's Utility tab.
| Note: |
| The Monitor the Printing Status check box is displayed in the Utility tab of Document Defaults in Windows NT 4.0, or in the Utility tab of Printing Preference in Windows 2000. |
This window indicates what type of error has occurred and offers you a possible solution. It closes automatically once the problem is cleared.
The Status Alert window opens under the conditions you select in the Monitoring Preferences dialog box.
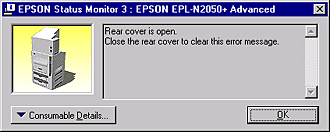
If you wish to see information about printer consumables, click the Consumable Details button. Once this button is clicked, the Status Alert window will not disappear even after a problem is cleared. To close the box you need to click the OK button.
Follow these steps to uninstall the EPSON Status Monitor 3 utility software:
|
| Exit all application programs currently running on your computer. |
|
| Click the Windows' Start button. Go to Settings menu, and click Control Panel. |
|
| Double click the Add/Remove Programs icon. |
|
|
Select EPSON Printer Driver/Utility and click the Add/Remove button. In Windows 2000, first click Change or Remove Programs, and select EPSON Printer Driver/Utility. Then, click the Change/Remove button. |
|
| In the window that appears, click the Printer Model tab. |

 | Click any empty space next to the printer model icons so that none of the models is selected. Then, click the Utility tab. |
 | In the Utility tab, select the check box for EPSON Status Monitor 3 (for EPSON EPL-N2050+ Advanced), and click OK. |

 | When the dialog box for uninstalling Status Monitor 3 appears, click OK. This automatically uninstalls Status Monitor 3. |
 | When the uninstallation is complete, click OK. |
 Previous |
 Next |
| Version 1.00E, Copyright © 2001, SEIKO EPSON CORPORATION |