|

Administrator's Guide
|
|
Connecting to the Network
Setting the IP Address Using the EpsonNet Easy Setup
 Starting Easy Setup from the CD-ROM
Starting Easy Setup from the Start menu
You can use EpsonNet WinAssist Easy Setup to configure the printer for use on a network using either the TCP/IP protocol or the NetBEUI protocol.
If EpsonNet WinAssist is installed on your computer, you can access EpsonNet WinAssist Easy Setup from the Start menu. If EpsonNet WinAssist is not installed on your computer, you can access EpsonNet WinAssist Easy Setup directly from the CD-ROM. Refer to the appropriate section below.
 |
Note:
|
 | -
Make sure that the TCP/IP protocol is installed in your computer. To print using NetBEUI, make sure that the NetBEUI protocol is installed on your computer.
|
| -
Before proceeding to the appropriate section below, you must set the IP address for the Internal Print Server or log on to the NetWare server.
|
Starting Easy Setup from the CD-ROM
Follow the steps below to start EpsonNet WinAssist Easy Setup from the CD-ROM.
 |
Insert the software CD in the CD-ROM drive.
|
 |
The EPSON Installation Program starts automatically.
|
If the EPSON Installation Program does not start automatically, click Start and then Run. Type D:\EPSETUP and click OK. (Substitute the appropriate letter for your CD-ROM drive if necessary.)
 |
Double-click Run EpsonNet WinAssist Easy Setup.
|
The EpsonNet WinAssist Easy Setup dialog box appears. Click Next.
 |
Read the Usage Agreement and click Next.
|
 |
Select the target printer and click Next.
|

 |
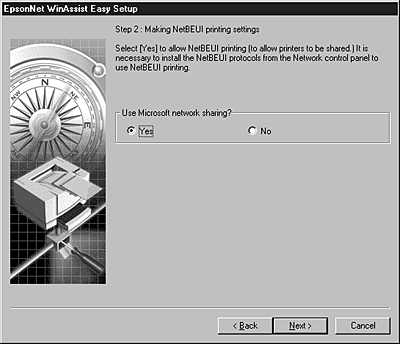
Specify whether or not to use the Microsoft network sharing service and click Next. If you select No, proceed to step 8.
|
 |
Confirm the host name (NetBIOS name). Change it if necessary. Click Next to proceed.
|

 |
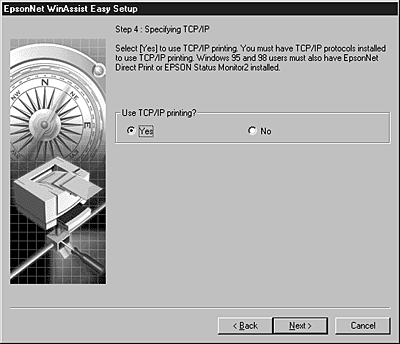
Specify whether or not to use TCP/IP printing and click Next. If you select No, proceed to step 10.
|
 |
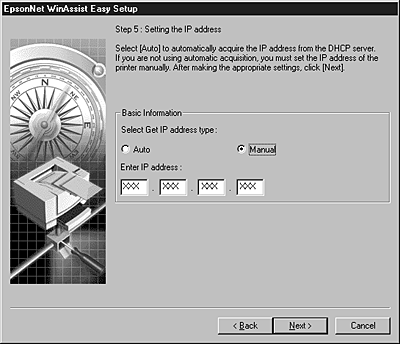
Select Auto or Manual. If you select Auto, DHCP becomes available. If you want to set the IP address manually, select Manual and enter the IP address. Click Next.
|
| |
Note:
|
| |
To use the DHCP server, it must be installed on your computer and configured correctly. See your operating system's online help for detailed instructions.
|
 |
Confirm your settings and click Send.
|
If you have set a password for the Internal Print Server, the Password dialog box appears. Enter your password (up to 20 characters) and click OK to save your settings. Follow the on-screen instructions.
|  |
Caution:
|
| |
It takes two or three minutes to send new settings to the Internal Print Server. Do not turn off your printer until an on-screen message appears instructing you to do so.
|

[Top]
Starting Easy Setup from the Start menu
If you have already installed EpsonNet WinAssist on your computer, you can start EpsonNet WinAssist Easy Setup from the Start menu.
Click Start, point to Programs and then to EpsonNet WinAssist, then click EpsonNet EasySetup. The EpsonNet WinAssist Easy Setup dialog box appears. Click Next, then go to step 4 in Starting Easy Setup from the CD-ROM for detailed instructions on using EpsonNet WinAssist Easy Setup.
[Top]
| Version 1.00E, Copyright © 2001, SEIKO EPSON CORPORATION |

