|

Reference Guide
|
|
Problem Solver
Clearing Jammed Paper
 Precautions for clearing jammed paper
Preventing paper feed and paper jam problems
Paper jam — inside the printer
Paper jam — MP tray
Paper Jam — Manual Feed slot
Paper Jam — Optional paper cassette
When paper is jammed in the printer, the EPSON Status Monitor 3 provides alert messages.
Precautions for clearing jammed paper
Be sure to observe the following points when you clear jammed paper:
-
Do not remove jammed paper by force. Torn paper can be difficult to remove and might cause other paper jams. Pull it gently in order to avoid tearing.
-
Always try to remove jammed paper with both hands to avoid tearing it.
-
If jammed paper is torn and remains in the printer, or if paper is jammed in a place not mentioned in this section, contact a qualified service representative.
 |
Warning:
|
 |
Be careful not to touch the fuser, which is marked CAUTION Hot Surface Avoid Contact, or the surrounding areas. If the printer has been in use, the fuser and the surrounding areas may be very hot.
|

[Top]
Preventing paper feed and paper jam problems
If you have frequent paper feed or paper jam problems, use this checklist of corrective measures:
-
Fan the stack of paper and then tap its edges to align it before you load it.
-
Be sure that you do not load too much paper into the tray.
-
Be sure to adjust the paper guides so that paper feeds freely.
-
Never allow more than 100 sheets to accumulate on the face-down tray, or more than 20 sheets to accumulate on the Face-up tray.
-
Try turning over the stack of paper in the paper tray. Most paper packages indicate the top side of the paper with an arrow at the side of the package.
[Top]
Paper jam — inside the printer
If the jammed sheet is inside the printer, remove the sheet as follows:
 |
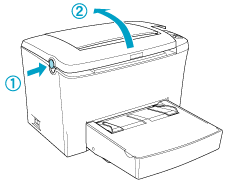
Close the output tray, and open the printer cover slowly by pressing the latch on the left side of the printer and lifting the cover up all the way.
|
| |
Warning:
|
| |
Opening the printer cover exposes the fuser, which is marked CAUTION Hot Surface Avoid Contact. Be careful not to touch the fuser. If the printer has been in use, the fuser may be very hot.
|
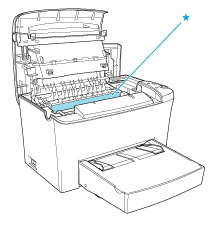
* CAUTION Hot Surface Avoid Contact
 |
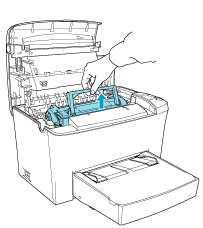
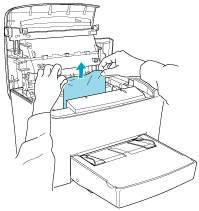
Remove the developer cartridge.
|
|  |
Caution:
|
| |
When removing the developer cartridge, never touch the developing roller under the flap; otherwise, print quality may decline.
|
 |
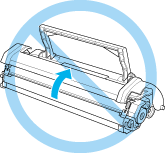
Remove the photoconductor unit.
|
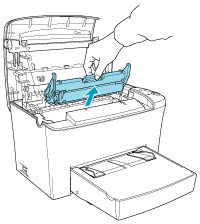
| |
Caution:
|
| |
Never touch the photoconductor unit's light-sensitive drum; otherwise, print quality may decline.
|
 |
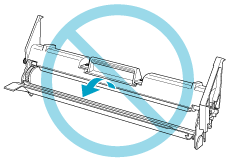
Remove the paper from the paper path.
|
|  |
Note:
|
| | -
If paper is jammed at the fuser, grasp the bottom of the paper and pull it out. Otherwise, it may reduce the printout quality.
|
| | -
Don't pull the jammed paper upward. Otherwise, it may reduce the printout quality.
|
 |
Reinstall the photoconductor unit, and then the developer cartridge.
|
 |
Close the printer cover.
|
 |
Tap the edges of the stack of paper on a flat surface and carefully reload it into the MP tray. (Do not reload curled or wrinkled sheets.)
|
Printing automatically restarts from the page that jammed. If the Error light (red) continues flashing after removing all jammed paper, open and close the printer cover to clear the error.
[Top]
Paper jam — MP tray
The following illustration shows what this type of jam looks like:
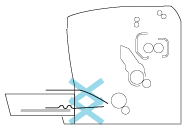
Follow the steps below to clear a feed jam at the MP tray:
|
|
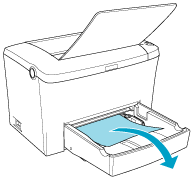
Remove the MP tray cover and any stacked paper.
|

|
|
Gently pull out any sheets that have fed part way into the printer.
|
|
|
Close the output tray, and open the printer cover. Be sure to remove any pieces of paper that may have torn off or are remaining in the printer.
|
If necessary, take out the developer cartridge and the photoconductor unit and remove any paper left in the paper feed path. Reinsert the unit and then the cartridge.
|
|
Tap the edges of the paper stack on a flat surface and carefully reload it into the MP tray. (Do not reload curled or wrinkled sheets.)
|
|
|
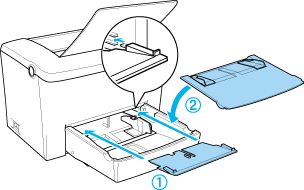
Reinstall the MP tray cover.
|
|
|
Open the printer cover, and then close the printer cover until it clicks shut. The jammed page's print data is automatically reprinted.
|
[Top]
Paper Jam — Manual Feed slot
When a small piece of paper is jammed at the inside of the Manual Feed slot, follow the instructions below to clear the jammed paper.
|
|
If the paper is jammed at the inside of the Manual Feed tray, remove the paper guides and remove the jammed paper.
|

|
|
Replace the paper guides.
|
|
|
Open the printer cover, and then close the printer cover until it clicks shut. The jammed page's print data is automatically reprinted.
|
[Top]
Paper Jam — Optional paper cassette
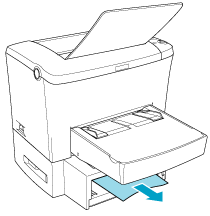
The following illustration shows what this type of jam looks like:
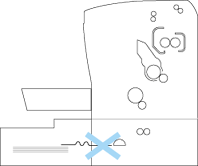
Follow the steps below to clear a feed jam in the 500-Sheet Lower Paper Cassette Unit A4.
|
|
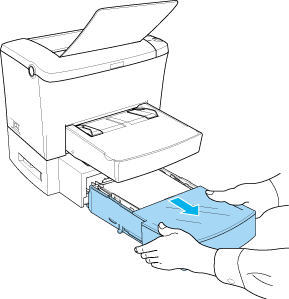
Remove the paper-tray from the 500-Sheet Lower Paper Cassette Unit A4.
|
|
|
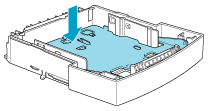
Remove any folded or jammed paper from the paper-tray and from the inside of the cassette unit, and discard any curled or wrinkled sheets.
|
|
|
Remove all paper from the paper-tray and press down on the plate until it locks into position.
|
|
|
Tap the edges of the paper stack, then set it back into the paper-tray making sure the paper is evenly aligned and that the top sheet is below the maximum paper mark.
|
|
|
Make sure you are using the correct paper size. The tray can accommodate only A4 size paper. Also make sure you are using paper that meets the specifications for this printer.
|
|
|
Set the paper-tray back into the 500-Sheet Lower Paper Cassette Unit A4.
|
|
|
Open and then close the printer cover. The jammed page's print data is automatically reprinted.
|
[Top]
| Version 1.00E, Copyright © 2002, SEIKO EPSON CORPORATION |

