|

Reference Guide
|
|
How To / Cleaning and Transporting
Cleaning the Printer
 Cleaning the inside of the printer
Cleaning the paper path rollers
Cleaning the printer case
Removing spilled toner
The printer needs only minimal cleaning. If you notice a decline in print quality, clean the inside of the printer as described in this section.
You should also clean the MP tray and the printer case every few months.
Cleaning the inside of the printer
Fine particles of dust can collect inside the printer, affecting print quality. Follow the steps below to clean the inside of the printer and the paper feeder:
 |
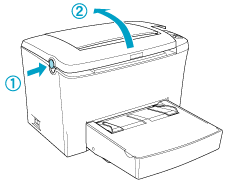
Make sure the printer is turned off.
|
 |
Open the printer cover by pressing the latch on the left side of the printer and lifting the cover up all the way.
|
 |  |
Warning:
|
| |
Opening the printer exposes the fuser, which is marked CAUTION Hot Surface Avoid Contact. Be careful not to touch the fuser. If the printer has been in use, the fuser may be very hot.
|
 |
Remove any dirt inside the printer with a clean, dry, lint-free cloth. Do not use compressed air. If you have paper feed problems, clean the paper roller by wiping the roller with a clean, dry, lint-free cloth.
|
 |
Reinstall the photoconductor unit, and then the developer cartridge.
|
 |
Close the printer cover. Press it gently until it clicks shut.
|
 |
Remove all paper from the MP tray and clean the tray with a clean, dry, lint-free cloth.
|

[Top]
Cleaning the paper path rollers
Paper is sometimes dusted with a powder to keep the image on one sheet from bleeding over to the back of the sheet stacked on top of it. When feeding such paper from the MP tray, the dust tends to get onto the paper roller and eventually causes misfeeds to occur. Use the following procedure to clean the paper roller when you start having feed problems from the MP tray.
Follow these steps to clean the paper roller:
|
|
Make sure the printer is turned off.
|
|
|
Open the printer cover by pressing the latch.
|
| |
Warning:
|
| |
Be careful not to touch the fuser, which is marked CAUTION Hot Surface Avoid Contact, or the surrounding areas. If the printer has been in use, the fuser and the surrounding areas may be very hot.
|
|
|
Gently wipe the rubber part of the paper roller with a well-wrung cloth.
|
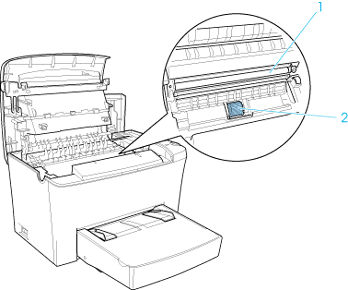
1. Transfer roller
2. Paper roller
|  |
Caution:
|
| |
Do not touch the transfer roller to avoid the degradation of the print quality.
|
|
|
Close the printer cover until it clicks shut.
|
[Top]
Cleaning the printer case
If the printer's outer case is dirty or dusty, turn off the printer and clean it with a soft, clean cloth dampened with a mild detergent.
|
Caution:
|
|
Never use alcohol or thinner to clean the printer cover; these chemicals can damage the components and the case. Be careful not to get water on the printer mechanism or any electronic components.
|
[Top]
Removing spilled toner
If toner spills inside the printer, do not use the printer until you remove all the spilled toner.
If only a small amount of toner is present, carefully wipe out the inside of the printer with a clean, dry, lint-free cloth.
If a large amount of toner is present, use a small vacuum-cleaning device (available from computer supply stores) to remove it. Then carefully wipe with a clean, dry, lint-free cloth.
|
Caution:
|
|
Toner and other fine powders can damage some vacuum cleaners. Be sure to read the instructions for your vacuum cleaner before you use it on spilled toner.
|
 |
Note:
|
|
If you spill toner on your clothing, rinse it off with cold water. Do not use hot water as this may cause the toner to leave a permanent stain.
|
[Top]
| Version 1.00E, Copyright © 2002, SEIKO EPSON CORPORATION |


