|

Reference Guide
|
|
How To / Replacing Consumable Products
Replacing the Developer Cartridge
The developer cartridge prints up to 6,000 pages, depending on the complexity of your print jobs. (The developer cartridge included with the printer prints up to 3,000 pages. This cartridge is not for sale.)
You need to replace the developer cartridge when a notice message is displayed on the window of the EPSON Status Monitor 3.
When the Toner light is on and the Error light is flashing slowly, or a message is displayed on the EPSON Status Monitor 3 screen, follow these steps to replace the developer cartridge:
 |
Make sure the printer is turned off.
|
 |
Make sure the output tray on top of the printer is lowered.
|
 |
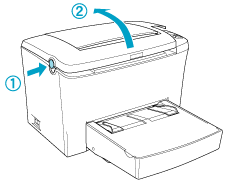
Open the printer cover by pressing the latch on the left side of the printer and lifting the cover up all the way.
|
 |  |
Caution:
|
 |  |
You must completely open the printer cover when replacing the developer cartridge; otherwise, you may damage the printer.
|
 |
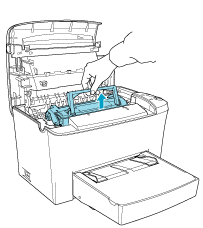
Hold the cartridge by the handle and pull it straight up and out of the printer.
|
 |  |
Warning:
|
 |  |
Do not touch the fuser, which is marked CAUTION Hot Surface Avoid Contact. If the printer has been in use, the fuser may be very hot.
|
 |  |
Caution:
|
 |  |
Be careful not to spill any remaining toner from the used developer cartridge. If toner is spilled inside the printer, clean it with a clean, dry, lint-free cloth or with a vacuum-cleaning device.
|
 |
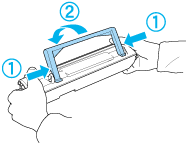
Press the marked position on the left side of the handle to fold the handle. Dispose of the used developer cartridge properly.
|
 |
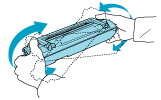
Remove the new developer cartridge from its bag. While holding the cartridge horizontally, gently shake it a few times from side to side and then from front to back to distribute the toner evenly.
|
 |
Remove the protective tape seal from the developer cartridge completely, then raise up the handle.
|

 |  |
Caution:
|
 |  |
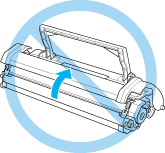
Never touch the developing roller under the flap; otherwise, print quality may decline.
|
 |
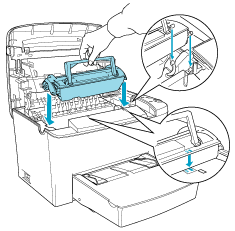
Hold the cartridge by its handle and lower it into the printer, making sure that the pins on both sides of the cartridge fit into the grooves inside the printer. Slide the cartridge gently into the opening until it locks into place.
|
 |
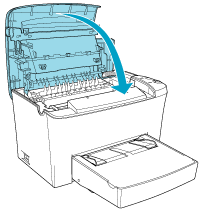
Close the printer cover until it clicks shut.
|
 |
Hold down the  Start/Stop button and the Start/Stop button and the  Job Cancel button on the control panel simultaneously while turning on the printer. Continue holding down these buttons until the Ready (green) and Error (red) lights turn on. Job Cancel button on the control panel simultaneously while turning on the printer. Continue holding down these buttons until the Ready (green) and Error (red) lights turn on.
The toner counter is cleared.
|
 |  |
Note:
|
Whenever you replace the developer cartridge, you should clean the paper roller as described in Cleaning the paper path rollers.

[Top]
| Version 1.00E, Copyright © 2002, SEIKO EPSON CORPORATION |