 |
Sharing the Printer on a Network
 Sharing the printer Sharing the printer
 Setting up your printer as a shared printer Setting up your printer as a shared printer
 Using an additional driver Using an additional driver
 Setting up clients Setting up clients
 Installing the printer driver from the CD-ROM Installing the printer driver from the CD-ROM
This section describes how to share the printer on a standard Windows network.
The computers on a network can share a printer that is directly connected to one of them. The computer that is directly connected to the printer is the print server, and the other computers are the clients which need permission to share the printer with the print server. The clients share the printer via the print server.
According to the versions of Windows OS and your access rights on the network, perform the appropriate settings of the print server and clients.
Setting the print server
Setting the clients
 |
Note: |
 |
-
When you are using shared printer in a Windows Me or 98 environment, on the server, double-click the Network icon in Control panel and make sure that the “File and printer sharing for Microsoft Networks” component is installed, then on the server and clients, make sure that the “IPX/SPX-compatible Protocol” or the “TCP/IP Protocol” is installed.
|
|
Setting up your printer as a shared printer
When the print server’s OS is Windows Me or 98 follow the steps below to set the print server.
 |
Click Start, point to Settings, then click Control Panel.
|
 |
Double-click the Network icon.
|
 |
Click File and Print Sharing on the Configuration menu.
|
 |
Select the I want to be able to allow others to print to my printer(s). check box, then click OK.
|
 |
Click OK to apply the settings.
|
 |  |
Note: |
 |
Double-click the Printers icon on the control panel.
|
 |
Right-click your printer’s icon, then click Sharing in the menu that appears.
|
 |
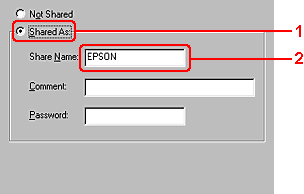
Select Shared As, type the name in the Share Name box, then click OK. Type a Comment and Password if needed.
|
 |  |
Note: |
You need to set the client computers so that they can use the printer on a network. See the following pages for details:
Using an additional driver
When the print server’s OS is Windows XP, 2000, or Server 2003, you can install the additional drivers on the server. The additional drivers are for client computers that have different OS from the server.
Follow the steps below to set a Windows XP, 2000, or Server 2003, as a print server, then install the additional drivers.
 |
Note: |
 |
|
You must access Windows XP, 2000, or Server 2003, as the Administrators of the local machine.
|
|
 |
For a Windows 2000 print server, click Start, point to Settings, then click Printers.
For a Windows XP or Server 2003 print server, click Start, point to Printers and Faxes.
|
 |
Right-click your printer’s icon, then click Sharing in the menu that appears.
|
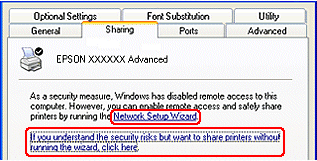
For Windows XP or Server 2003, if the following menu appears, click either Network Setup Wizard or If you understand the security risks but want to share printers without running the wizard, click here.
In either case, follow the on-screen instructions.
 |
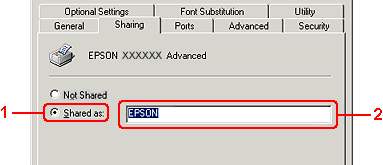
For a Windows 2000 print server, select Shared as, then type the name in the Share Name box.
|
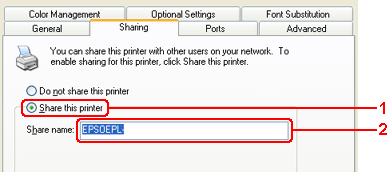
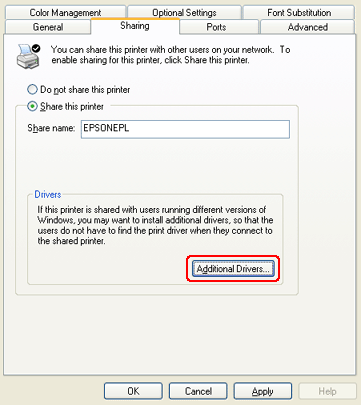
For a Windows XP or Server 2003 print server, select Share this printer, then type the name in the Share name box.
 |  |
Note: |
 |  |
|
Do not use spaces or hyphens for the Share name, or an error may occur.
|
|
 |
Click Additional Drivers.
|
 |  |
Note: |
 |  |
|
If the computers of the server and clients use the same OS, you do not have to install the additional drivers. Just click OK after step3.
|
|
 |
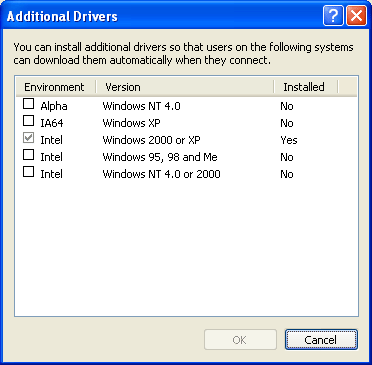
Select Windows being used for clients, then click OK.
|
|
For Windows Me or 98 clients
|
Select Intel Windows 95 or 98 (Windows 2000),
Select Intel Windows 95, 98 and Me (Windows XP),
Select x86 Windows 95, WIndows 98 and Windows Millennium Edition (Windows Server 2003)
|
|
For Windows XP or 2000 clients
|
Intel Windows 2000 (Windows 2000), Intel Windows 2000 or XP (Windows XP), x86 Windows 2000, Windows XP and Windows Server 2003 (Windows Server 2003)
|
 |  |
Note: |
 |  |
-
You do not have to install the additional drivers noted below, because these drivers are preinstalled.
Intel Windows 2000 (for Windows 2000)
Intel Windows 2000 or XP (for Windows XP)
x86 Windows 2000, Windows XP and Windows Server 2003 (for Windows Server 2003)
|
|
 |
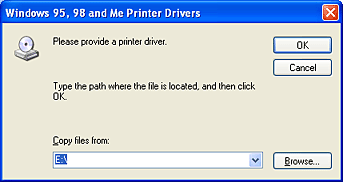
When a prompt appears, insert the CD-ROM that comes with your printer in your CD-ROM drive, then click OK.
|
 |
According to the message, type the appropriate drive and folder names in which the printer driver for clients is located, then click OK.
Depending on the client’s OS, the displayed message may differ.
|
|
Client’s OS
|
Folder Name
|
|
Windows Me or 98
|
\<Language>\WIN9X
|
When installing drivers in Windows XP, 2000, or Server 2003, “Digital Signature is not found.” may appear. Click Yes (for Windows 2000) or Continue Anyway (for Windows XP or Server 2003) and continue installing.
 |
Click Close.
|
 |  |
Note: |
 |  |
|
Confirm the following items when sharing the printer:
|
|
You need to set the client computers so that they can use the printer on a network. See the following pages for details:
This section describes how to install the printer driver by accessing the shared printer on a network.
 |
Note: |
Follow the steps below to set Windows Me or 98 clients.
 |
Click Start, point to Settings, then click Printers.
|
 |
Double-click the Add Printer icon, then click Next.
|
 |
Select Network printer, then click Next.
|
 |
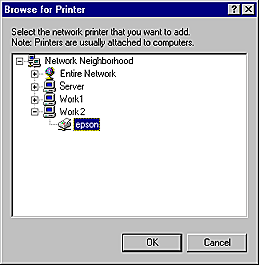
Click Browse, and the Browse for Printer dialog box appears.
|
 |  |
Note: |
 |  |
|
You can also type “\\(the name of the computer that is locally connected to the shared printer)\(the shared printer’s name)” in the network path or queue name.
|
|
 |
Click the computer or server that is connected to the shared printer, and the name of the shared printer, then click OK.
|
 |  |
Note: |
 |  |
|
The name of the shared printer may be changed by the computer or server that is connected to the shared printer. To make sure of the name of the shared printer, ask the administrator of the network.
|
|
 |
Click Next.
|
 |  |
Note: |
 |  |
-
If the printer driver is installed in the client beforehand, you need to select the new printer driver or the current printer driver. When the prompt to select the printer driver appears, select the printer driver according to the message.
-
If the print server’s OS is Windows Me or 98 or the additional driver for Windows Me or 98 is installed in the Windows XP, 2000, or Server 2003 print server, go to the next step.
|
|
 |
Make sure of the name of the shared printer, then select whether to use the printer as the default printer or not. Click Next, then follow the on-screen instructions.
|
 |  |
Note: |
 |  |
|
You can change the shared printer’s name so that it appears only on the client computer.
|
|
Follow the steps below to set Windows XP or 2000 clients.
You can install the printer driver for the shared printer, if you have Power Users or more powerful access rights even if you are not the Administrator.
 |
For Windows 2000 clients, click Start, point to Settings, and click Printers.
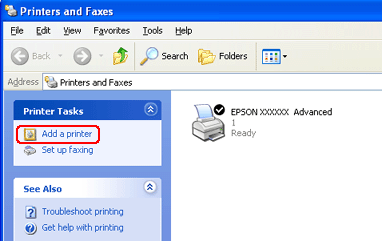
For Windows XP clients, click Start, point to Printers and Faxes.
|
 |
For Window 2000, double-click the Add Printer icon, then click Next.
For Windows XP, click Add a printer in the Printer Tasks menu.
|
 |
For Windows 2000, select Network printer, then click Next. For Windows XP, select A network printer, or a printer attached to another computer, then click Next.
|
 |
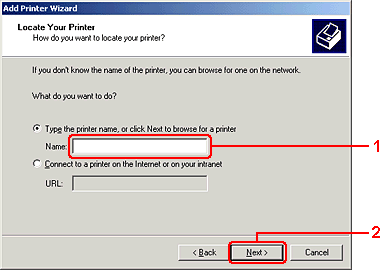
For Windows 2000, type the name of the shared printer, then click Next.
|
 |  |
Note: |
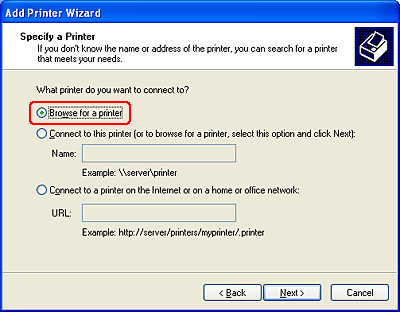
For Windows XP, select Browse for a printer.
 |
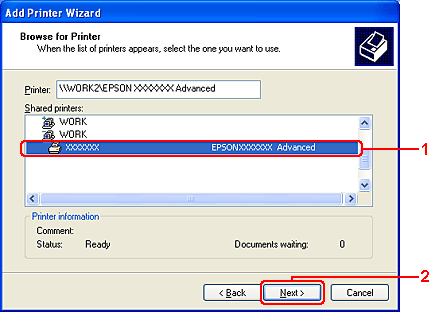
Click the icon of the computer or server that is connected to the shared printer, and the name of the shared printer, then click Next.
|
 |  |
Note: |
 |  |
-
If the printer driver is installed in the client beforehand, you need to select either the new printer driver or the current printer driver. When the prompt to select the printer driver appears, select the printer driver according to the message.
-
If the additional driver for Windows XP or 2000 is installed in the Windows XP, 2000, or Server 2003 print server, go to the next step.
|
|
 |
For Windows 2000, select whether to use the printer as the default printer or not, then click Next.
|
 |
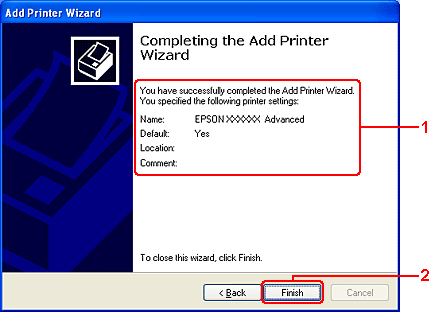
Make sure of the settings, then click Finish.
|
Installing the printer driver from the CD-ROM
This section describes how to install the printer driver in the clients when setting the network system as follows:
The on-screen displays on the following pages may differ depending on the version of Windows OS.
 |
Note: |
 |
Access the shared printer and a prompt may appear. Click OK, then follow the on-screen instructions to install the printer driver from the CD-ROM.
|
 |
Insert the CD-ROM, type the appropriate drive and folder names in which the printer driver for clients is located, then click OK.
|
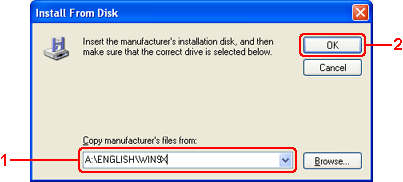
When installing drivers in Windows XP, 2000, or Server 2003, “Digital Signature is not found.” may appear. Click Yes (for Windows 2000) or Continue Anyway (for Windows XP or Server 2003) and continue installing.
|
Client’s OS
|
Folder Name
|
|
Windows Me or 98
|
\<Language>\WIN9X
|
|
Windows 2000 or XP
|
\<Language>\WINXP_2K
|
 |
Select the name of the printer, click OK, then follow the on-screen instructions.
|
|  |


 Sharing the printer
 Top
Top


