![]()
Reference Guide
|
|
Index |
|
Search |
|
Glossary | |||||
|
|
Contents |
|
Help |
|
Safety | |||||
|
|
|
|||||||||||||||||||||||||||||||||
Setup & Maintenance / Installing Options
Installing the optional paper cassette unit
The following table summarizes the paper types and sizes that you can use with the optional paper cassette unit.
|
Paper Type |
Paper Size |
Capacity |
|
Plain paper |
A4, A5, B5 |
Up to 500 sheets in each cassette |
|
EPSON Color Laser Paper |
A4, Letter (LT) |
Up to 500 sheets in each cassette |
| Note: |
|
Always pay attention to the following handling precautions before installing the option.
* Do not lift the printer by these areas.
| Warning: |
|
Follow these steps to install the optional paper cassette unit.
 | Turn the printer off and unplug the power cord and interface cable. |
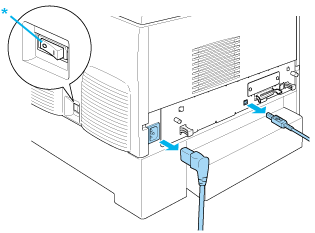
* OFF
| Caution: |
|
 | Carefully remove the optional paper cassette unit from its carton and place it on the floor. |
| Note: |
|
|
|
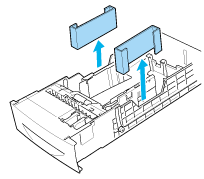
 | Remove the protective materials inside of the cassette trays. |
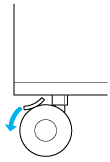
 | For 1000-Sheet Paper Cassette Unit users, lock the two casters at the front of the unit. |
| Warning: |
|
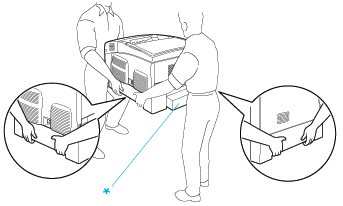
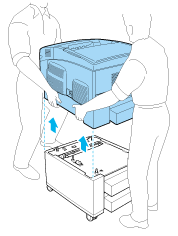
 | Carefully, grasp the printer at the positions indicated below and lift it carefully with two or more people. |
| Warning: |
|
* Do not lift the printer by these areas.
 | Align the corners of the printer and the unit, then lower the printer gently onto the unit so that the five pins on top of the unit fit into the holes on the bottom of the printer. |

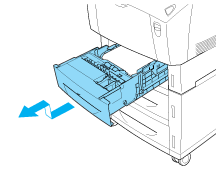
 | Remove the standard lower cassette from the printer. |
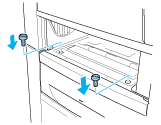
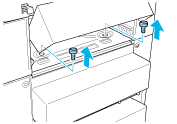
 | Fasten the front of the optional paper cassette unit to the printer with two of the provided screws. |
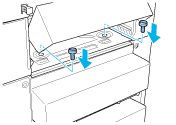
 | Remove the cover on the back of the standard lower cassette, and secure the back of the unit to the printer with the remaining two screws. Then reattach the cover. |
 | Reinsert the standard lower cassette into the printer. |
 | Reconnect all interface cables and the power cord. |
 | Plug the printer's power cord into an electrical outlet. |
 | Turn on the printer. |
To confirm that the option is installed correctly, print a Status Sheet. See Printing a Status Sheet.
| Note: |
|
Follow these steps to remove the optional paper cassette unit.
|
| Turn the printer off and unplug the power cord. |
|
| Remove all interface cables from the interface connectors. |
|
| For 1000-Sheet Paper Cassette Unit users, lock the two casters at the bottom of the unit. |
| Warning: |
|
|
| Remove the standard lower cassette from the printer. |
|
| Remove the two screws securing the front of the unit to the printer. |
| Warning: |
|
|
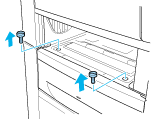
| Remove the cover on the back of the standard lower cassette, and remove the two screws securing the back of the unit. Then reattach the cover. |
| Warning: |
|
|
| Insert the standard lower cassette into the printer. |

|
| Carefully lift up the printer with two or more people until the holes on the bottom of the printer are free from the five pins on the top of the unit, and place it on a flat stable surface. |
|
| Repack the optional paper cassette unit in its original carton. |
|
| Reconnect all interface cables and the power cord. |
|
| Plug the printer's power cord into an electrical outlet. |
|
| Turn on the printer. |
 Previous |
 Next |
| Version NPD0167-01, Copyright © 2003, SEIKO EPSON CORPORATION |