|

Network Guide
|
|
Network Software / EpsonNet Direct Print
Setting Up Your Printer Using EpsonNet Direct Print
 Adding a printer located in the same segment
 Adding a printer beyond a router
 Adding a printer from the Printers folder
 Installing the printer driver
When setting up a printer to print with LPR, you can add both a printer located in the same segment and one located beyond a router.
 |
Note:
|
 | -
Be sure that the computer is connected to the network and TCP/IP is correctly set.
|
|
 | -
The valid IP address must be set; otherwise the printer does not appear under the Epson_lpr group icon.
|
|
 | -
The EPSON Status Monitor 2 utility shipped with the interface card models C82362
 /C82363 /C82363 /C82364 /C82364 with software version 1.x and EPL-N2700/N4000 printers enables EPSON TCP/IP printers. These EPSON TCP/IP printers can coexist with lpr printers added by EpsonNet Direct Print. with software version 1.x and EPL-N2700/N4000 printers enables EPSON TCP/IP printers. These EPSON TCP/IP printers can coexist with lpr printers added by EpsonNet Direct Print.
|
|
 | -
The job control functions such as Cancel Printing and Purge Print Jobs are available when you double-click the target printer icon in the Printers folder. However, if the printer has already started printing a document, the print job may not be cancelled completely.
|
|
Adding a printer located in the same segment
Follow the steps below to add a printer located in the same segment.
 |
Windows Me: Double-click the My Network Places icon.
|
Windows 98/95/NT 4.0: Double-click the Network Neighborhood icon.
Windows XP: Click Start and then My Network Places. Under Network Tasks, click View workgroup computers. Under Other Places, click Microsoft Windows Network and then Entire Network. Then double-click the EpsonPeripheralNetwork icon.
Windows 2000: Double-click the My Network Places icon and then double-click the Entire Network icon. Click entire contents, and then double-click the EpsonPeripheralNetwork icon.
 |
Right-click the Epson_lpr icon and select Properties.
|
 |
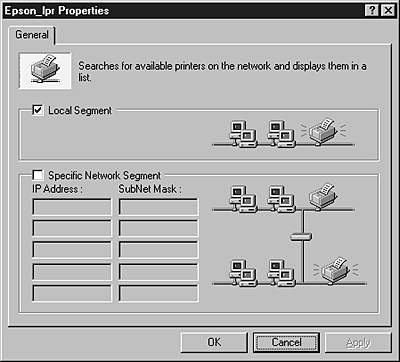
Select the Local Segment check box and click OK.
|
 |
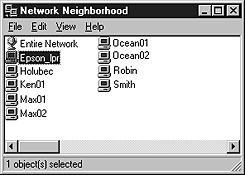
Double-click the Epson_lpr icon to display available printers in the same segment as your computer on the screen.
|
 |
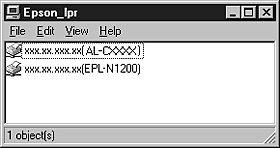
Double-click the target printer.
|
 |
Follow the on-screen instructions provided by the Add Printer wizard. If you are required to install the printer driver, see Installing the printer driver.
|

[Top]
Adding a printer beyond a router
Follow the steps below to add a printer beyond a router.
 |
Windows Me: Double-click the My Network Places icon.
|
Windows 98/95/NT 4.0: Double-click the Network Neighborhood icon.
Windows XP: Click Start and then My Network Places. Under Network Tasks, click View workgroup computers. Under Other Places, click Microsoft Windows Network and then Entire Network. Then double-click the EpsonPeripheralNetwork icon.
Windows 2000: Double-click the My Network Places icon and then double-click the Entire Network icon. Click entire contents, and then double-click the EpsonPeripheralNetwork icon.
 |
Right-click the Epson_lpr icon and select Properties.
|
 |
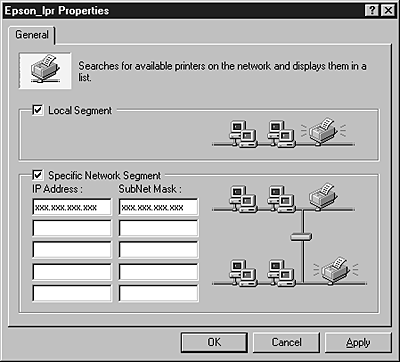
Select the Specific Network Segment check box and enter the IP address and subnet mask of the printer you want to find. Click OK.
|
 |
Double-click the Epson_lpr icon to view the available printers.
|

 |
Double-click the target printer.
|

 |
Follow the on-screen instructions provided by the Add Printer wizard. If you are required to install the printer driver, see Installing the printer driver.
|

[Top]
Adding a printer from the Printers folder
Follow the steps below to add a printer from the Printers folder.
 |
Windows Me: Double-click the My Network Places icon.
|
Windows 98/95/NT 4.0: Double-click the Network Neighborhood icon.
Windows XP: Click Start and then My Network Places. Under Network Tasks, click View workgroup computers. Under Other Places, click Microsoft Windows Network and then Entire Network. Then double-click the EpsonPeripheralNetwork icon.
Windows 2000: Double-click the My Network Places icon and then double-click the Entire Network icon. Click entire contents, and then double-click the EpsonPeripheralNetwork icon.
 |
Right-click the Epson_lpr icon and select Properties. The Epson_lpr Properties dialog box appears.
|
 |
Select Local Segment to search a printer in the same segment, or select Specific Network Segment and enter the IP address and subnet mask of the printer to find a printer located beyond the router. Click OK.
|
 |
Windows Me/98/95/2000/NT 4.0: Click Start, point to Settings, and then select Printers. Double-click Add Printer in the Printers folder to start the Add Printer Wizard.
|
Windows XP: Click Start and then Printers and Faxes. Under Printer Tasks, click Add a printer to start the Add Printer Wizard.
 |
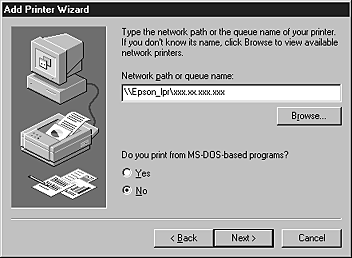
Select Network printer (Windows Me/98/95/2000), A network printer, or a printer attached to another computer (Windows XP), or Network print server (Windows NT 4.0). Then click Next.
|
 |
Windows Me/98/95: Click Browse and then double-click Epson_lpr.
|
Windows XP: Click Browse for a printer. In the Shared Printers list, double-click EpsonPeripheralNetwork.
Windows 2000: Select the Type the printer name, or click Next to browse for a printer radio button and click Next. Double-click EpsonPeripheralNetwork.
Windows NT 4.0: In the Shared Printers list, double-click EpsonPeripheralNetwork.
 |
Select the target printer listed under Epson_lpr or EpsonPeripheralNetwork and click OK.
|
 |
Click Next. Follow the on-screen instructions to install the printer driver. If you are required to install the printer driver, see Installing the printer driver.
|

[Top]
Installing the printer driver
Install the printer driver which comes with your printer.
 |
Insert the Software CD-ROM shipped with the printer.
|
 |
Close the EPSON Installation Program screen if it appears.
|
 |
Click the Have Disk button. The Install From Disk dialog box appears.
|
 |
Click Browse.
|
 |
Select the CD-ROM drive for Drives, and double-click the appropriate folder for your operating system. Click OK.
|
 |
Click OK in the Install From Disk dialog box.
|
 |
Select the model name of the printer, and click Next.
|
 |  |
Note:
|
 |  | |
If the Add Printer wizard asks you to select either Keep existing driver or Replace existing driver, be sure to select the Replace existing driver radio button.
|
|
 |
Click Finish and follow the on-screen instructions to complete setup.
|

[Top]
| Version NPD0133-03, Copyright © 2003, SEIKO EPSON CORPORATION |
Adding a printer located in the same segment
Adding a printer beyond a router
Adding a printer from the Printers folder
Installing the printer driver