|

Reference Guide
|
|
Maintenance and Transportation
Replacing Black Ink Cartridges
 Confirming the remain of the ink cartridges
 Selecting a set of ink cartridges
 Checking the maintenance tank
 Draining the Ink
 Charging ink
 Updating the printer driver information
If your printer uses EPSON UltraChrome ink, you can replace Photo Black (Photo) or Light Black (LBK) ink with Matte Black (MAT) using draining cartridge shown below.
See the explanation below to replace black ink cartridges.

 |
Caution:
|
 |
Do not turn the printer off before you finish this replacing operation.
|
 |
Note:
|
 |
If an electrical power failure occurs during this operation, turn the printer on again. You can continue your procedure at the breakpoint.
|
Confirming the remain of the ink cartridges
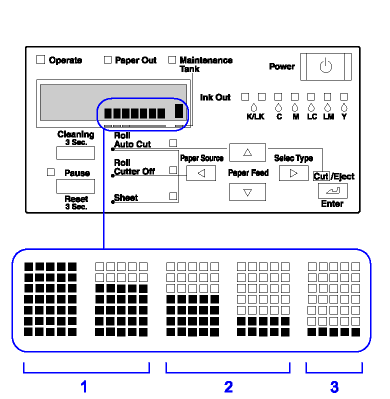
Before replacing black ink cartridges, make sure that there is enough ink in all the cartridges to ensure the completion of this work. To do so by using the LCD panel, see the figure and the explanation below.
 |
Note:
|
 |
Make sure that READY is displayed on the LCD panel.
|
|
1
|
There is enough ink in the cartridge.
|
|
2
|
The ink will be empty soon. You had better buy (a) new cartridge(s).
|
|
3
|
There is not enough ink in the cartridge. Replace the cartridge.
See your Replacing Ink Cartridges for replacing the ink cartridges.
|
 |  |
Note:
|
 |  |
This operation consumes ink in addition to the cartridges that are to be replaced. Therefore, an Ink end error may occur after the operation.
|

[Top]
Selecting a set of ink cartridges
Follow the steps below to select a set of ink cartridges.
 |
Make sure that READY is displayed on the LCD panel.
|
 |
Press the SelecType button ( ) and confirm that PRINTER SETUP is displayed on the LCD panel. ) and confirm that PRINTER SETUP is displayed on the LCD panel.
|
 |
Press the Paper Feed button ( ) or Paper Feed button ( ) or Paper Feed button ( ) to select MAINTENANCE. ) to select MAINTENANCE.
|
 |
Press the SelecType button ( ) and confirm that MAINTENANCE is displayed on the LCD panel. ) and confirm that MAINTENANCE is displayed on the LCD panel.
|
 |
Press the Paper Feed button ( ) or Paper Feed button ( ) or Paper Feed button ( ) to select BK INK CHANGE. ) to select BK INK CHANGE.
|
 |
Press the SelecType button ( ). BK INK CHANGE is displayed on the LCD panel. ). BK INK CHANGE is displayed on the LCD panel.
|
 |
Press the Enter button.
|
 |
After SELECT INK SET is displayed on the LCD panel, a pattern that can be selected for replacement is shown automatically, as follows. Press the Paper Feed button ( ) or Paper Feed button ( ) or Paper Feed button ( ) to select a set of ink cartridges, and then press the Enter button. ) to select a set of ink cartridges, and then press the Enter button.
|
|
Ink set in use
|
Selectable set 1
|
Selectable set 2
|
|
PHOTO (#1 SLOT) + LBK (#2 SLOT)
|
#1 MAT
#2 LBK
|
#1 MAT
#2 MAT*
|
|
MAT (#1 SLOT) + MAT (#2 SLOT)
|
#1 MAT
#2 LBK
|
#1 PHOTO
#2 LBK*
|
|
MAT (#1 SLOT) + LBK (#2 SLOT)
|
#1 PHOTO
#2 LBK
|
#1 MAT
#2 MAT
|
 |  |
Note:
|
 |  |
If you select #1 MAT: #2 MAT or #1 PHOTO: #2 LBK, replace the ink slots of #1 and #2.
|
 |
If enough ink remains in the ink cartridge(s), go to next section. If not, NOT ENOUGH INK and RELEASE INK LEVER are displayed on the LCD panel. In that case, follow the steps below to replace the ink cartridges.
|
|
a)
|
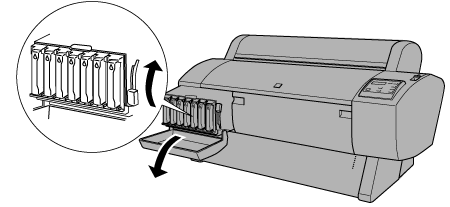
Open the ink compartment cover and set the ink lever in the up position.
|
|
b)
|
Open the package of the new ink cartridge and insert it into the slot of the ink compartment.
|
|
c)
|
After confirming SET INK LEVER is displayd on the LCD panel, set the ink lever in the down position.
|
|
d)
|
Make sure that no error messages are displayed on the LCD panel.
|
 |  |
Note:
|
 |  |
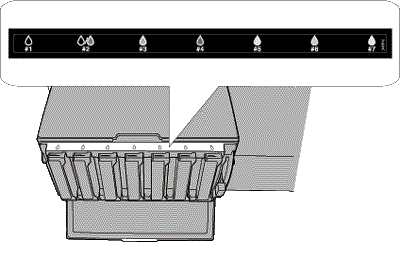
See the illustration below for the arrangement of ink cartridges.
|
 |
After confirming that REMOVE ALL INK CARTRIDGES is displayed on the LCD panel, remove all the cartridges from the ink slots.
|
 |  |
Note:
|
 |  |
Do not insert the cartridges again until instructed to do so in this manual. Otherwise, you cannot get the best results and a malfunction may occur.
|
This finishes the selecting a set of ink cartridges. Now you are going to check the free space in the Maintenance Tank.

[Top]
Checking the maintenance tank
If NOT ENOUGH SPACE IN MAINTE TANK and REPLACE WITH NEW MAINTENANCE TANK are displayed on the LCD panel, replace the Maintenance Tank with a new one.
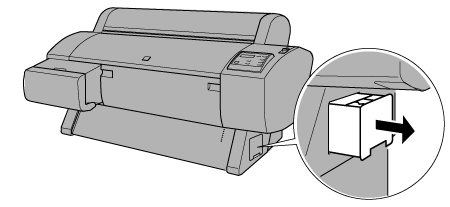
This completes the check of the Maintenance Tank. Now you are going to drain the ink

[Top]
Draining the Ink
 |
Set the ink lever in the upper position after confirming that READY FOR DRAINING is displayed on the LCD panel.
|
 |
After confirming that INSERT DRAINING CARTRIDGE IN #X is displayed on the LCD panel, insert the Draining cartridge into the ink slot indicated by the blinking LED on the control panel. Then SET INK LEVER is displayed on the LCD panel.
|
 |
Set the ink lever in the down position.
|
DRAINING xxx% is displayed on the LCD panel, and the printer drains the remaining ink to the Maintenance tank.
 |  |
Note:
|
 |  | -
If WRONG CARTRIDGE is displayed on the LCD panal, insert the cleaning cartridge into the slot.
|
 |  | -
If INSERT CARTRIDGE IN CORRECT SLOT is displayed on the LCD panel, insert the draining cartridge into the slot #X.
|
 |
After confirming that REMOVE DRAINING CARTRIDGE is displayed on the LCD panel, set the ink lever in the up position and remove the Draining cartridge.
|
This completes the draining of the ink. Now you are going to charge the new ink.
 |
Note:
|

[Top]
Charging ink
Follow the steps below to insert the set of black ink cartridges you selected in step 8 of Selecting a set of ink cartridges and the other cartridges.
 |
After confirming that INSERT ALL INK CARTRIDGES is displayed on the LCD panel, insert all cartridges into their specified slots, then set the ink lever in the down position.
|
The printer starts ink charging and INK CHARGING xxx% is displayed on the LCD panel.
 |  |
Note:
|
 |  | -
All ink lamps on the control panel light until all the cartridges are inserted into the ink slot.
|
 |  | -
WRONG CARTRIDGE is displayed on the LCD panel if any ink cartridge is inserted in the wrong slot, or draining cartridge is inserted.
|
 |
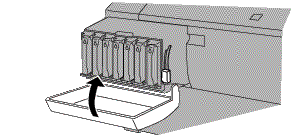
After confirming the message of ink charging completion, XX: EPSON GENUINE xxx% x/x xxxxxPG, is displayed on the LCD panel. Close the ink compartment cover.
|

[Top]
Updating the printer driver information
After the replacement operation, update the driver information following the procedure below.
For Windows users
Click the Main tab and make sure that the ink cartridge information is displayed. If not, set the information manually by clicking the Utility tab, then the Printer and Option Information button.

For Macintosh users
Select Chooser from the Apple menu and click the printer's icon and printer port.

This completes the black ink replacement.

[Top]
| Version 1.10E, Copyright © 2002, SEIKO EPSON CORPORATION |
Confirming the remain of the ink cartridges
Selecting a set of ink cartridges
Checking the maintenance tank
Draining the Ink
Charging ink
Updating the printer driver information