Settings for NetWare Users
 Overview Overview
For Users of Printers Supporting NetWare Queue-Based Printing
For Users of Printers Not Supporting NetWare Queue-Based Printing
If you are using a printer that supports NetWare queue-based printing, see For Users of Printers Supporting NetWare Queue-Based Printing for detailed information.
If you are using a printer that does not support NetWare queue-based printing, see For Users of Printers Not Supporting NetWare Queue-Based Printing for detailed information.
 |
Note: |
 |
|
To find out whether your printer supports NetWare queue-based printing, see the User’s Guide.
|
|
For Users of Printers Supporting NetWare Queue-Based Printing
This section explains how to configure the network interface for NetWare. First, you need to set up the printer in a NetWare environment, and then configure the network interface using EpsonNet Config.
Introduction to NetWare settings
The client environment must be supported by NetWare. The clients are able to use the printer driver mounted on the network interface.
The following Novell Client is supported.
You can choose either the Print Server, Remote Printer, or Standby mode. We recommend that you use the Print Server mode unless the number of users exceeds the limit.
Features of these modes are described below.
Print Server mode (NDS/Bindery Print Server):
|
Note: |
|
|
When you turn on the printer, the user account is temporarily accessed in the Remote Printer mode. If there is no user account available, turn on the printer before connecting the client to the network.
|
|
Standby mode (factory default mode):
The Standby mode is the default mode. This mode disables all NetWare related functions. Use the Standby mode when you are not using the network interface in a NetWare environment.
Instructions for using NetWare
When you print a text file using the NPRINT command of NetWare or DOS, redirection, misconversion or a gap in characters may occur depending on the client environment.
IPX routing protocol “NLSP”
It is possible to set the IPX routing protocol “NLSP” from NetWare 4.x or later; however, the network interface does not support NLSP. RIP/SAP controls the communication.
You can select the routing protocol from a) NLSP with RIP/SAP Compatibility, or b) RIP/SAP Only. If you remove the bind of RIP or SAP when NLSP with RIP/SAP Compatibility is specified, the network interface then cannot communicate with the file server and NDS. (See “Protocols” and “Bindings” in NetWare’s INETCFG utility.)
-
If the bindery context path has not been set, or if you want to use the printing environment of another context from a non-NDS client, you need to specify the context for the bindery context. Use the SET BINDERY CONTEXT command to set the context in the AUTOEXEC.NCF file.
See your NetWare documentation for more information.
Time required to recognize the network interface
It takes up to two minutes for the NetWare server to recognize the network interface, after the printer is turned on. During this start-up time, the status sheet does not show the correct information.
The same frame type should be used for the NetWare server and IPX router on the same network. If more than one frame type is used on the same network, bind all the frame types to the NetWare servers and IPX routers.
The IPX protocol must be installed (bound) on the NetWare 5.x server.
If the mode you have logged in is different from the mode you set for the network interface, a message appears when you try to configure the network interface for NetWare. If you do not want to change the current settings, click Cancel and log in again using the same mode set for the network interface.
Using Bindery Print Server (NetWare 3.x/4.x)
This section contains instructions on using the network interface in the Print Server mode on NetWare 3.x/4.x/IntranetWare with Bindery emulation.
|
Note: |
|
|
The network interface in the Print Server mode of NetWare 3.x does not allow you to use the Print Server status display control with PCONSOLE.
|
|
 |
Turn on your printer.
|
 |
From any NetWare client, log in to the target NetWare server with supervisor privileges. You must log in with the bindery connection.
|
 |
Configure the network interface using EpsonNet Config. See the EpsonNet Config User’s Guide for details.
|
If NetWare objects are already created, you can also use EpsonNet Config with Web Browser. See NetWare for details.
Using NDS Print Server (NetWare 4.x/5.x/6.0)
This section contains instructions for using the network interface in the Print Server mode on NetWare 4.x, IntranetWare, NetWare 5.x, or NetWare 6.0 with NDS mode.
|
|
Turn on your printer.
|
|
|
From any NetWare client, log in to the target context of the NDS tree as an ADMIN.
|
|
|
Configure the network interface using EpsonNet Config. See the EpsonNet Config User’s Guide for details.
|
If NetWare objects are already created, you can also use EpsonNet Config with Web Browser. See NetWare for details.
Using Remote Printer Mode (NetWare 3.x)
For NetWare 3.x users, follow the steps below to make the printer environment with PCONSOLE.
Creating print queues in a file server
|
|
From any NetWare client, log in to the network with supervisor privileges.
|
|
|
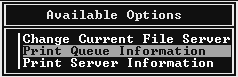
Run PCONSOLE. From the Available Options screen, select Print Queue Information and press Enter.
|
|
|
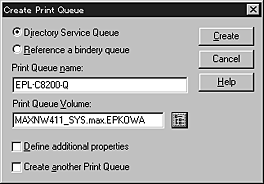
Press the Insert key on your keyboard and enter the print queue name. Press Enter.
|
| |
Note: |
| |
|
Since your clients need the print queue name you set here when they use the printer, announce the print queue name to your clients.
|
|
 |
From the Print Queue list, select the print queue name that you just entered and press Enter. From the Print Queue Information list, select Queue Users and press Enter. Next, select EVERYONE from the list. If EVERYONE is not in the list, press Insert and select EVERYONE from the queue user list.
|
|
|
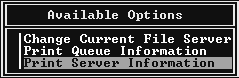
From the Available Options screen, select Print Server Information and press Enter.
|
|
|
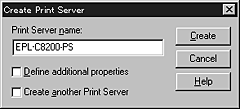
Press the Insert key on your keyboard and type the print server name. Press Enter. It is a good idea to write down the print server name for later use.
|
|
|
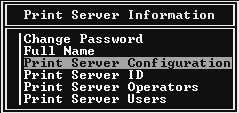
From the Print Server list, select the print server name that you just typed and press Enter. From the Print Server Information list, select Print Server Configuration and press Enter.
|
|
|
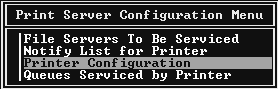
Select Printer Configuration from the Print Server Configuration Menu and press Enter.
|
 |
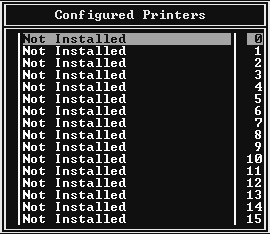
From the Configured Printers list, select Not Installed (port number = 0) and press Enter.
|
 |
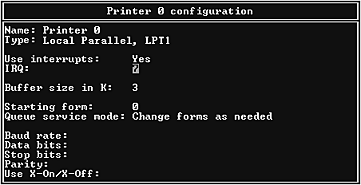
From the Printer configuration screen, type the printer name. Highlight Type and press Enter. Select Remote Parallel, LPT1 for Remote Printer mode.
|
| |
Note: |
| |
|
Be sure to select Remote Parallel, LPT1 for Remote Printer mode.
|
|
 |
Press Esc; then press Enter to save your changes.
|
 |
Press Esc.
|
 |
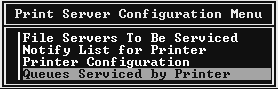
Select Queues Serviced by Printer from the Print Server Configuration menu and press Enter.
|
 |
Select the printer that you want to use from the Defined Printers list and press Enter.
|
 |
Press the Insert key and assign a queue to the print server port from the Available Queues list.
|
 |
Specify a priority level between 1 to 10. One is top priority.
|
 |
Press Esc to exit PCONSOLE.
|
Configuring for NetWare using EpsonNet Config
|
|
Turn on your printer.
|
|
|
Load the print server from the file server’s system console which the print queue volume is set.
>LOAD PSERVER print server name you set using PCONSOLE
|
|
|
Configure the network interface using EpsonNet Config. See the EpsonNet Config User’s Guide for details.
|
If NetWare objects are already created, you can also use EpsonNet Config with Web Browser. See NetWare for details.
Using Bindery Remote Printer Mode (NetWare 4.x)
Follow the steps below to make the printer environment on NetWare 4.x and IntranetWare with Bindery emulation.
|
Note: |
|
|
From any NetWare client, log in to the server as an ADMIN. Make sure to log in with Bindery connection.
|
| |
Note: |
| |
|
If the client using for this setting has been logged in with NDS mode, press F4 key while PCONSOLE is starting to switch to the bindery mode.
|
|
|
|
Run PCONSOLE. From the Available Options screen, select Print Queues and press Enter. Press Insert and type the print queue name. Press Enter.
|
| |
Note: |
| |
|
Since your clients need the print queue name you set here when they use the printer, announce the print queue name to your clients.
|
|
|
|
From the Print Queue list, select the print queue name that you just entered and press Enter. From the Print Queue Information list, select Queue Users and press Enter. Next, select EVERYONE from the list. If EVERYONE is not in the list, press Insert and select EVERYONE from the queue user list.
|
|
|
From the Available Options screen, select Print Servers and press Enter. Press Insert and type the print server name. Press Enter.
|
|
|
Press Esc to exit PCONSOLE, and log out from the server.
|
|
|
Log in to the server as an ADMIN. Be sure to log in with NDS connection.
|
|
|
Start NWAdmin.
|
|
|
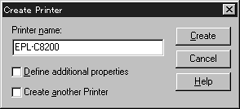
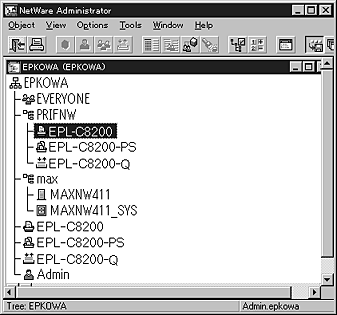
To create the Printer Object, click the container specified as the Bindery context and select Create from the Object menu, then Printer. Type the printer name and click Create.
|
|
|
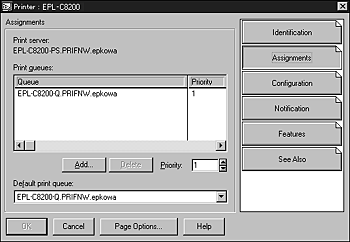
To assign the print queue, double-click the Printer object icon (created in step 8). The Printer dialog box appears.
|
|
|
Click Assignments and then click Add. From the print queue list, select the queue (created in step 2) and click OK.
|
|
|
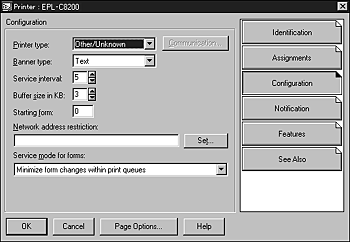
Click Configuration in the Printer dialog box, and select Parallel from the Printer type pull-down menu.
|
|
|
Click Communication. The Parallel Communication dialog box appears.
|
|
|
Select LPT1 for Port; check Polled for Interrupts; and check Manual load (Remote from Print Server) for Connection type, then click OK.
|
 |
Click OK in the Printer dialog box.
|
 |
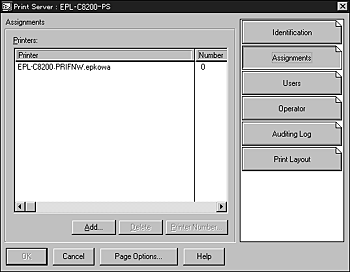
To assign the printer, double-click the Print Server object icon (created in step 4). The Print Server dialog box appears.
|
 |
Click Assignments and then click Add. From the printer object list, select the printer object (created in step 8) and click OK.
|
 |
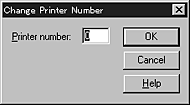
In the Print Server dialog box, select the assigned printer from the printer object list, and click the Printer Number button to set the printer number from 0 to 15, then click OK.
|
 |
To confirm the objects you have assigned, double-click the Print Server object icon. Click Print Layout, and check that the print server, printer, and print queue are connected.
|
Configuring for NetWare using EpsonNet Config
|
|
Turn on your printer.
|
|
|
Load the print server from the file server’s system console which the print queue volume is set.
>LOAD PSERVER print server name you set using PCONSOLE
|
|
|
Configure the network interface using EpsonNet Config. See the EpsonNet Config User’s Guide for details.
|
If NetWare objects are already created, you can also use EpsonNet Config with Web Browser. See NetWare for details.
Using NDS Remote Printer Mode (NetWare 4.x/5.x/6.0)
Follow the steps below to make the printer environment using NWAdmin under NetWare 4.x, IntranetWare, NetWare 5.x, or NetWare 6.0 with NDS mode.
|
|
From any NetWare client, log in to the target context of the NDS tree as an ADMIN.
|
|
|
Run the Administrator tool (NWAdmin).
|
|
|
Create a printer:
|
Click the directory context icon, and select Create from the Object menu, then Printer. Type the Printer name and click Create.
|
|
Create a print server:
|
Click the directory context icon, and select Create from the Object menu, then Print Server. Type the Print Server name and click Create.
|
|
Create a print queue:
|
Click the directory context icon, and select Create from the Object menu, then Print Queue. Type the Print Queue name and select the Print Queue Volume, then click Create. Double-click the print queue object, and register the user.
| |
Note: |
| |
|
Since your clients need the print queue name you set here when they use the printer, announce the print queue name to your clients.
|
|
|
|
Double-click the Printer Object icon in the NetWare Administrator screen.
|
|
|
In the Printer dialog box appears, click Assignments and then click Add.
|
|
|
From the print queue list, select the queue you created in step 5 and click OK.
|
|
|
Click Configuration, and select Other/Unknown for the Printer type list box and click OK.
|
|
|
Double-click the Print Server Object icon in the NetWare Administrator screen.
|
|
|
In the Print Server dialog box that appears, click Assignments and then click Add.
|
|
|
From the printer object list, select the printer object you want to assign and click OK.
|
|
|
Go back to the screen in step 11, and click the Printer Number button to set the printer number from 0 to 254.
|
|
|
To confirm the objects you have assigned, double-click the Print Server object icon. Click Print Layout, and check that the print server, printer, and print queue are connected.
|
Configuring for NetWare using EpsonNet Config
|
|
Turn on your printer.
|
|
|
Load the print server from the file server’s system console which the print queue volume is set.
>LOAD PSERVER print server name you set using NWAdmin
|
|
|
Configure the network interface using EpsonNet Config. See the EpsonNet Config User’s Guide for details.
|
If you use the NetWare objects that are already created, you can use EpsonNet Config with Web Browser too. See NetWare for details.
Using the EpsonNet NDPS Gateway
This section contains instructions on printing using Novell Distributed Print Services® (NDPS®) with Novell® NetWare® 5.x/6.0. Novell Distributed Print Services (NDPS) is the new generation print services of NetWare.
|
Note: |
Check the following points before starting.
-
Install the appropriate client software, such as Novell Client for Windows 95/98 version 3.4, Novell Client for Windows NT/2000 version 4.8, or Novell Client for Windows XP version 4.9 on client workstations. Make sure they install NDPS.
-
When you use the network interface with Bindery (either in the Print Server mode or the Remote Printer mode), you need PCONSOLE.EXE to create bindery objects such as Print Server and Print Queue objects. Since PCONSOLE.EXE does not come with NetWare 5.x/6.0, you need to get the file from Novell.
The followings are basic steps to use the network interface with the NDPS printing system. Detailed procedures are described in the subsequent sections.
|
|
Install EpsonNet NDPS Gateway.
|
|
|
Upload printer driver files to the NDPS RMS server.
|
|
|
Create an NDPS Manager object in NetWare Administrator.
|
|
|
Create a Printer Agent in NetWare Administrator.
|
|
|
Configure the network interface using EpsonNet Config.
|
|
|
Set the printer on the client workstations.
|
The environment to use, the settings you make, and the tools to use differ depending on the printer type and connection type you choose. You can create an NDPS Manager and Printer Agent in NetWare Administrator or partially via the Server Console. See the Novell online documentation for more details.
Installing EpsonNet NDPS Gateway on your NetWare server
You can install EpsonNet NDPS Gateway from the Software CD-ROM.
|
Note: |
|
|
If an older version of EpsonNet NDPS Gateway is already installed, be sure to unload the NDPS Manager before installing a new version of EpsonNet NDPS Gateway.
|
|
|
|
Open the NETUTIL folder.
|
|
|
Open the ENGW folder.
|
|
|
Double-click EDPS2***.EXE.
|
| |
Note: |
| |
|
The last three characters of the file name, represented by asterisks, vary depending on the place of purchase.
|
|
For detailed information on EpsonNet NDPS Gateway, see the online guide on the Software CD-ROM.
To view the online guide, follow the steps below.
|
|
Open the NETUTIL folder.
|
|
|
Open the ENGW folder.
|
|
|
Double-click index.htm.
|
Uploading printer driver files to the RMS
After installing EpsonNet NDPS Gateway, you need to upload the printer driver to the Resource Management Service (RMS).
Upload the printer driver to the NetWare server using NDPS Broker. For details on the procedure, refer to the section of NDPS or iPRINT in the NetWare documentation.
|
|
Run NetWare Administrator (NWADMN32.EXE) on the client machine. The main browser window appears.
|
|
|
To create an NDPS Manager, click the Directory context icon, and then select Create from the Object menu.
|
|
|
Select NDPS Manager from the list.
|
|
|
Enter the NDPS Manager name in the NDPS Manager Name field.
|
|
|
Browse the Resident Server and select where you want the NDPS Manager assigned.
|
|
|
Browse the Database Volume and select where you want the NDPS Manager database assigned.
|
|
|
Click Create. The NDPS Manager icon appears in the main browser window.
|
|
|
Type LOAD NDPSM at the server console, and then select the NDPS Manager you have created.
|
After creating an NDPS Manager, you can create Printer Agents, either public access printers or controlled access printers. The following are the features of public access printers and controlled access printers.
-
Public Access Printers:
NDPS printers that are available to all network users and not associated with an NDS object. Users can select and print to any public access printer they can view from their workstations. However, these printers do not take full advantage of services such as security and job event notification.
|
Note on using the Adobe PostScript 3 Kit: |
|
|
If you want to use a printer as a PostScript and ESC/Page printer and want to install the printer driver automatically to the client computer, you must create two Printer Agents: one for the PostScript printer driver and the other for the ESC/Page printer driver. If you create one with Remote (rprinter on IPX), create the other with Remote (LPR on IP). You can create two Printer Agents with the LPR protocol (called LPR Printer Agent), but cannot create two Printer Agents with the IPX protocol (called IPX Printer Agent) for the same printer.
|
|
Creating a Printer Agent automatically
You can create a Printer Agent automatically. Only public access printers can be created in this way. See “Creating Public Access Printers Automatically” in the EpsonNet NDPS Gateway manual for detailed information.
|
Note on using the Adobe PostScript 3 Kit: |
|
-
If the NetWare server is bound with both IP and IPX protocols, two Printer Agents (one being LPR Printer Agent and the other IPX Printer Agent) are created automatically. When you select one of the Printer Agents for the PostScript printer driver, select the other for the ESC/Page printer driver. The Printer Agent name cannot be changed, so be sure to remember which Printer Agent is associated with the PostScript or ESC/Page printer driver.
-
If the NetWare server is bound with only IP protocol, only one LPR Printer Agent is created. You need to create one more LPR Printer Agent manually. Be sure to select Remote (LPR on IP) for the port handler type and set a unique Printer Agent name so you can tell which Printer Agent is associated with the PostScript or the ESC/Page printer driver.
-
If the NetWare server is bound with only IPX protocol, only one IPX Printer Agent is created. In this case, you cannot create another IPX Printer Agent manually. To avoid this, be sure to bind both the IP and IPX protocols to the NetWare server first.
|
|
Creating a Printer Agent manually
You can create Printer Agents, either public access printers or controlled access printers. The way to create a Printer Agent differs depending on the printer type you choose.
|
Note on using the Adobe PostScript 3 Kit: |
|
|
If you want to use a printer as a PostScript and ESC/Page printer and want to install the printer driver automatically to the client computer, you must create two Printer Agents: one for the PostScript printer driver and the other for the ESC/Page printer driver. If you create one with Remote (rprinter on IPX), create the other with Remote (LPR on IP). You can create two LPR Printer Agents but cannot create two IPX Printer Agents for the same printer.
|
|
|
|
Select a printer type (either public access printer or controlled access printer).
|
|
|
Create a public access printer. If you want to create a controlled access printer, go to step 3.
|
In NetWare Administrator, double-click the NDPS Manager you have created. Click Printer Agent List, and then click New. Type the Printer Agent name, and then select EpsonNet NDPS Gateway Configuration for the Gateway Type. Click OK. Then go to step 4.
| |
Note on using the Adobe PostScript 3 Kit: |
| |
|
When you create two Printer Agents for the same printer, be sure to use names related to the printer driver type so you can tell which Printer Agent is associated with the PostScript or the ESC/Page printer driver.
|
|
|
|
Create a controlled access printer.
|
In NetWare Administrator, select the Directory context icon. Select Create from the Object menu, and then select NDPS Printer. Type the Printer Agent name, and then select Create a new Printer Agent, and then click Create. Select the NDPS Manager you have created, and then select EpsonNet NDPS Gateway Configuration for the Gateway Type. Click OK.
| |
Note on using the Adobe PostScript 3 Kit: |
| |
|
When you create two Printer Agents for the same printer, be sure to use names related to the printer driver type so you can tell which Printer Agent is associated with the PostScript or the ESC/Page printer driver.
|
|
|
|
Select one of the following port handler type. Select Remote (LPR on IP) if you want to use the printer in IP network. Select Remote (rprinter on IPX) if you want to use the printer on an IPX network. Select Queue Based if you want to keep the NetWare NDS print server configuration of the network interface. Then click Next.
|
| |
Note on using the Adobe PostScript 3 Kit: |
| |
|
If you have selected Remote (rprinter on IPX) for the first Printer Agent, be sure to select Remote (LPR on IP) for the second Printer Agent.
|
|
|
|
Configure it as described below. It is a good idea to print a network status sheet of the network interface and configure the corresponding items.
|
|
-
For Remote (rpinter on IPX) connection:
You need to use the same configuration of NetWare Remote printer mode as you have set by using EpsonNet Config already.
IPX Network Number: Enter the IPX network number of the network interface.
IPX Node Number: Enter the IPX node number of the network interface.
SAP Name: Enter the Primary Print Server Name. Do not use the following characters: ~ ! @ # $ % ^ & * ( ) + ` = { } [ ] │ \ : ; " ' < , >. ? / `
Printer Number: Enter the printer port number (from 0 to 254).
-
For Queue Based connection:
NDS Context: Type the NDS context.
Print Server Name: Print server name that is already defined in NDS or Bindery. If the printer is in the Remote Printer mode, enter the print server name that is used when PSERVER.NLM is loaded.
Printer Name: Printer name that is already defined in NDS or Bindery.
NDS Volume for Print Queue: The format is as follows:
Format: NDS Volume and context
For example: NDPS_SERVER_SYS.EPSON
File Server for Print Queue: Enter the file server name for the print queue.
IPX Network Number: Enter the IPX network number of the network interface.
IPX Node Number: Enter the IPX node number of the network interface.
|
|
|
When you finish filling in the boxes, press Finish. Follow the on-screen instructions.
|
|
|
The Select Printer Drivers dialog box appears. Select an appropriate printer driver for Windows Me/98 and Windows 2000/NT 4.0. Be sure to select the correct printer driver for your printer from the appropriate menus. Windows 3.1 is not supported.
|
|
|
Click Continue.
|
|
|
Confirm the Printer Agent that you have just created.
|
In NetWare Administrator, double-click the NDPS Manager object and click Printer Agent List. Check that the status of the Printer Agent you have just created is “Idle”.
Configuring for NetWare using EpsonNet Config
Follow the steps below if you want to use the printer in IPX network.
|
Note: |
|
|
Be sure that the one of the following clients is installed on your computer: Novell Client 32, Novell IntranetWare Client, or Novell Client.
|
|
|
|
Turn on your printer.
|
|
|
From any NetWare client, log in to the target NetWare server as an ADMIN.
|
If the IP address of the printer is already assigned, you can use EpsonNet Config with Web Browser too. See NetWare for details.
Setting the printer on client workstations
After configuring the network interface, set up the printer on client workstations.
Installing printers automatically
|
|
Run the Novell Printer Manager from Windows. If you are running Windows Me/98/2000/NT, run:
\PUBLIC\WIN32\NWPMW32.EXE
|
|
|
In the Novell Printer Manager dialog, select New from the Printer menu.
|
|
|
Click Add. A list of available printers appears.
|
|
|
Select the printer you want and click Install.
|
The Novell Printers---Install dialog appears. You may modify the printer name that appears and select a pre-defined configuration.
|
|
Click OK. The printer driver for that printer model is installed automatically from the Resource Management Service.
|
|
|
Click Close. The printer appears in the main Printer Manager window and is available for print jobs.
|
Installing printers manually
|
|
Install the printer driver.
|
|
|
Change the Ports on the printer’s properties dialog box. Specify the following objects for the port.
|
See the Novell online documentation for details.
Instructions for using a dial-up network
This section explains about using a dial-up network.
|
Note: |
|
|
The primary server described in this manual indicates a primary time server which offers time to the workstations on the network.
|
|
Using a dial-up network in each mode
You must use a dedicated dial-up line.
Since polling is performed on the file server in the print server mode, no vicarious response by the router is possible. Therefore, no dial-up connection is possible in this case.
In Remote Printer mode, use of a router with a vicarious response function allows the primary server to be installed at the dial-up destination. However, an extra account might be generated when the primary server is down. To avoid that, it is recommend to use connections via a dedicated dial-up line.
Follow the instructions for using a dial-up line.
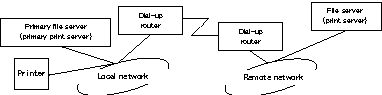
When there is a primary server at the dial-up destination
For local networks with file servers:
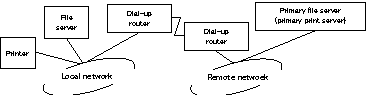
A dial-up is generated because access is made to a local file server first and then to a primary server. There is no problem since this dial-up only occurs at startup.
A dial-up is generated because access is made to a local file server first and then to a primary server. This dial-up is repeated at intervals of approximately 5 minutes. Make the network interface settings correctly to avoid this problem.
An SPX Watchdog packet is sent according to the NetWare protocol convention. Use a router with a vicarious response function to avoid a dial-up.
A dial-up is generated while the printing data is being transferred. This is not a problem because it is a dial-up specific to the dial-up network.
A dial-up is generated because a connection to the primary server is attempted periodically. Since this is attributable to the automatic re-connection function, turn off the printer once.
When there is no file server on the local network, NetWare cannot be used on the local network. In this case, the NetWare protocol for the network interface is also not available. No dial-up is generated under this condition. When the file server on the local network is restored, the network interface is also automatically restored.
For local networks with no file server:
Depending on the router settings, the NetWare protocol can be used without a file server on a local network. This setup follows the same pattern as that described above.
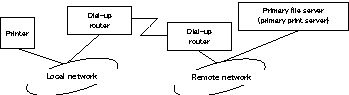
When there is a primary server in the local network
Even if a primary server is installed on the local network, an unnecessary dial-up may be generated depending on the configuration.
The following problems are common to both Print Server mode and Remote Printer mode.
Since access is made only to the primary server, no dial-up is generated.
Since access is made only to the primary server, no dial-up is generated. However, if the file server/print server of the remote network is erroneously set as the primary server, an unnecessary dial-up might be generated. Correct the settings to avoid this problem.
Since access is made only to the primary server, no dial-up is generated.
Connection to the primary server is periodically attempted, but no dial-up is generated. However, if the router is set to pass SAP packets (Find Nearest Server), an unnecessary dial-up might be generated. To avoid this, turn off the printer once, or do not allow the router to pass SAP packets (Find Nearest Server).
For Users of Printers Not Supporting NetWare Queue-Based Printing
This section explains how to configure the network interface for NetWare.
To print in a NetWare environment, you need to use NDPS. First, install EpsonNet NDPS Gateway on the NetWare server, and then set a valid IP address to the network interface using EpsonNet Config.
|
Note: |
|
|
Be sure to set a static IP address to the network interface.
|
|
Introduction to NetWare settings
The client environment must be supported by NetWare.
The clients are able to use the printer driver mounted on the network interface.
The following Novell Client is supported.
Using the EpsonNet NDPS Gateway
This section contains instructions on printing using Novell Distributed Print Services® (NDPS®) with Novell® NetWare® 5.x/6.0.
|
Note: |
Check the following points before starting.
-
Install the appropriate client software, such as Novell Client for Windows 95/98 version 3.4, Novell Client for Windows NT/2000 version 4.8, or Novell Client for Windows XP version 4.9 on client workstations. Make sure they install NDPS.
The followings are basic steps to use the network interface with the NDPS printing system. Detailed procedures are described in the subsequent sections.
|
|
Install EpsonNet NDPS Gateway.
|
|
|
Upload printer driver files to the NDPS RMS server.
|
|
|
Create an NDPS Manager object in NetWare Administrator.
|
|
|
Create a Printer Agent in NetWare Administrator.
|
|
|
Set the printer on the client workstations.
|
The environment to use, the settings you make, and the tools to use differ depending on the printer type and connection type you choose. You can create an NDPS Manager and Printer Agent in NetWare Administrator or partially via the Server Console. See the Novell online documentation for more details.
Installing EpsonNet NDPS Gateway on your NetWare server
You can install EpsonNet NDPS Gateway from the Software CD-ROM.
|
Note: |
|
|
If an older version of EpsonNet NDPS Gateway is already installed, be sure to unload the NDPS Manager before installing a new version of EpsonNet NDPS Gateway.
|
|
|
|
Open the NETUTIL folder.
|
|
|
Open the ENGW folder.
|
|
|
Double-click EDPS2***.EXE.
|
| |
Note: |
| |
|
The last three characters of the file name, represented by asterisks, vary depending on the place of purchase.
|
|
For detailed information on EpsonNet NDPS Gateway, see the online guide on the Software CD-ROM.
To view the online guide, follow the steps below.
|
|
Open the NETUTIL folder.
|
|
|
Open the ENGW folder.
|
|
|
Double-click index.htm.
|
Uploading printer driver files to the RMS
After installing EpsonNet NDPS Gateway, you need to upload the printer driver to the Resource Management Service (RMS).
Upload the printer driver to the NetWare server using NDPS Broker. For details on the procedure, refer to the section of NDPS or iPRINT in the NetWare documentation.
|
|
Run NetWare Administrator (NWADMN32.EXE) on the client machine. The main browser window appears.
|
|
|
To create an NDPS Manager, click the Directory context icon, and then select Create from the Object menu.
|
|
|
Select NDPS Manager from the list.
|
|
|
Enter the NDPS Manager name in the NDPS Manager Name field.
|
|
|
Browse the Resident Server and select where you want the NDPS Manager assigned.
|
|
|
Browse the Database Volume and select where you want the NDPS Manager database assigned.
|
|
|
Click Create. The NDPS Manager icon appears in the main browser window.
|
|
|
Type LOAD NDPSM at the server console, and then select the NDPS Manager you have created.
|
After creating an NDPS Manager, you can create Printer Agents, either public access printers or controlled access printers. The following are the features of public access printers and controlled access printers.
-
Public Access Printers:
NDPS printers that are available to all network users and not associated with an NDS object. Users can select and print to any public access printer they can view from their workstations. However, these printers do not take full advantage of services such as security and job event notification.
Creating a Printer Agent automatically
You can create a Printer Agent automatically. Only public access printers can be created in this way. See “Creating Public Access Printers Automatically” in the EpsonNet NDPS Gateway manual for detailed information.
Creating a Printer Agent manually
You can create Printer Agents, either public access printers or controlled access printers. The way to create a Printer Agent differs depending on the printer type you choose.
|
|
Select a printer type (either public access printer or controlled access printer).
|
|
|
Create a public access printer. If you want to create a controlled access printer, go to step 3.
|
In NetWare Administrator, double-click the NDPS Manager you have created. Click Printer Agent List, and then click New. Type the Printer Agent name, and then select EpsonNet NDPS Gateway Configuration for the Gateway Type. Click OK. Then go to step 4.
|
|
Create a controlled access printer.
|
In NetWare Administrator, select the Directory context icon. Select Create from the Object menu, and then select NDPS Printer. Type the Printer Agent name, and then select Create a new Printer Agent, and then click Create. Select the NDPS Manager you have created, and then select EpsonNet NDPS Gateway Configuration for the Gateway Type. Click OK.
|
|
Select Remote (LPR on IP).
|
|
|
Configure it as described below. It is a good idea to print a network status sheet of the network interface and configure the corresponding items.
|
|
IP Address: Enter the IP address of the network interface. You can confirm the IP address on the network status sheet.
|
|
|
When you finish filling in the boxes, press Finish. Follow the on-screen instructions.
|
|
|
The Select Printer Drivers dialog box appears. Select an appropriate printer driver for Windows Me/98 and Windows 2000/NT 4.0. Be sure to select the correct printer driver for your printer from the appropriate menus. Windows 3.1 is not supported.
|
|
|
Click Continue.
|
|
|
Confirm the Printer Agent that you have just created.
|
In NetWare Administrator, double-click the NDPS Manager object and click Printer Agent List. Check that the status of the Printer Agent you have just created is “Idle”.
Setting the printer on client workstations
For detailed information on setting the printer on client workstations, see the Novell online documentation.
| 

 Top
Top