|

Reference Guide
|
|
How to Print
Printing on Roll Paper
 Handling roll paper
 Driver settings for Windows
 Driver settings for Mac OS 8.6 to 9.x
 Driver settings for Mac OS X
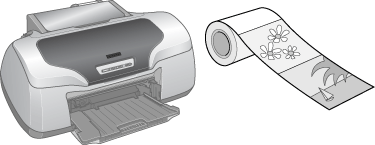
When printing on roll paper, you can print panoramic photographs or print documents continuously.
 |
Note:
|
 | |
Using EPSON PhotoQuicker which is included on the CD-ROM is the easiest and quickest way to create roll paper printouts with this printer. For more details, double-click the ESPR800 Software Guide icon on the desktop to view the Photo Print Software Setup.
|
|
Handling roll paper
Refer to the section below for loading roll paper.

[Top]
Driver settings for Windows
 |
Note:
|
 | -
You can change the margins for roll paper with the printer driver settings. Refer to the section below to print without margins on either side of your printout.
 See Borderless Printing See Borderless Printing
|
|
 | -
In this section, you will learn the procedure to print with margin on both sides of your printout.
|
|
 |
Open the file you want to print.
|
 |
Access the printer driver.
|
 |
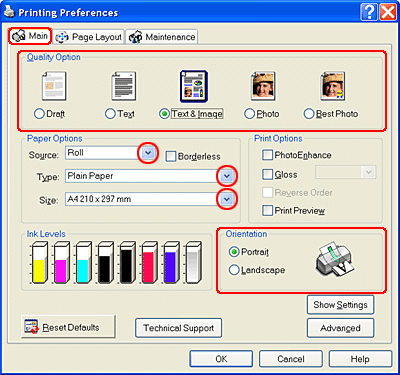
Click the Main tab, then make the Quality Option setting. See the following section for details on the Quality Option settings.
 See Quality Option See Quality Option
|
 |
Select Roll as the Source setting.
|
 |
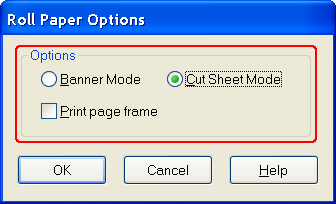
Make appropriate Options settings in the Roll Paper Options dialog box.
|
Select Cut Sheet Mode to print standard-sized data. Select Banner Mode to print longer data.
 |
Click OK to return to the Main menu.
|
 |
Select the appropriate Type setting.
|
 |
Select the appropriate Size setting.
|
 |
Select Portrait (tall) or Landscape (wide) to change the orientation of your printout.
|
 |  |
Note:
|
 |  | -
Do not select Sheet as the Source setting when roll paper is loaded in the sheet feeder. Doing so causes unnecessary paper to feed after each document. If you have already started printing, cancel printing from the printer software.
 See Canceling Printing See Canceling Printing
|
|
 |  | -
Wait until the printer stops printing and feeding paper. Cut off the paper at the back of the printer, and then turn off the printer. The remaining paper is ejected.
|
|
 |
Click OK to close the driver setting dialog box.
|
 |
Print your data.
|
 |
Cut the roll paper.
|

[Top]
Driver settings for Mac OS 8.6 to 9.x
 |
Note:
|
 | -
You can change the margins for roll paper with the printer driver settings. Refer to the section below to print without margins on either side of your printout.
 See Borderless Printing See Borderless Printing
|
|
 | -
In this section, you will learn the procedure to print with margin on both sides of your printout.
|
|
 |
Open the file you want to print.
|
 |
Access the Page Setup dialog box.
|
 |
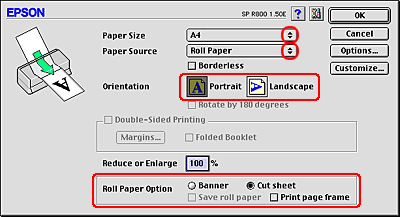
Select the appropriate Paper Size setting.
|
 |
Select Roll Paper as the Paper Source setting.
|
 |
Select Portrait (tall) or Landscape (wide) to change the orientation of your printout.
|
 |
Make appropriate Roll Paper Option settings.
|
Select Banner to print longer data. Select Cut Sheet to print standard-sized data.
 |  |
Note:
|
 |  | -
Do not select Auto Sheet Feeder as the Paper Source setting when roll paper is loaded in the sheet feeder. Doing so causes unnecessary paper to feed after each document. If you have already started printing, cancel printing from the printer software.
 See Canceling Printing See Canceling Printing
|
|
 |  | -
Wait until the printer stops printing and feeding paper. Cut off the paper at the back of the printer, and then turn off the printer. The remaining paper will be ejected.
|
|
 |
Access the Print dialog box.
|
 |
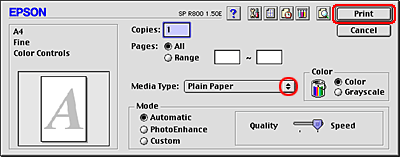
Select the appropriate Media Type setting.
|
 |  |
Note:
|
 |  | |
Do not select PhotoEnhance as the Mode setting, because it may cause gaps in your printout.
|
|
 |
Click Print to start printing.
|
 |
Cut the roll paper.
|

[Top]
Driver settings for Mac OS X
 |
Note:
|
 | -
You can change the margins for roll paper with the printer driver settings. Refer to the section below to print without margins on either side of your printout.
 See Borderless Printing See Borderless Printing
|
|
 | -
In this section, you will learn the procedure to print with margin on both sides of your printout.
|
|
 |
Open the file you want to print.
|
 |
Access the Page Setup dialog box.
|
 |
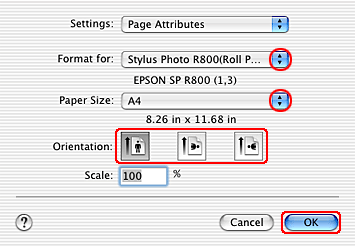
Select Stylus Photo R800(Roll Paper) as the Format setting.
|
 |
Make the appropriate Paper Size and Orientation settings.
|
 |
Click OK to close the Page Setup dialog box.
|
 |
Access the Print dialog box.
|
 |
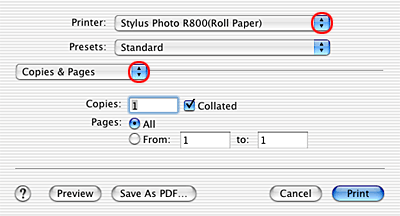
Make the Printer setting match the Format setting you made in the Page Setup dialog box in step 3. Then make the Copies & Pages settings.
|
 |  |
Note:
|
 |  | -
Always match the Format setting in the Page Setup dialog box and the Printer setting in the Print dialog box. Otherwise the data may not be printed correctly.
|
|
 |  | -
The Copies & Pages settings available are a standard feature of Mac OS X. See your operating system's documentation for details.
|
|
 |
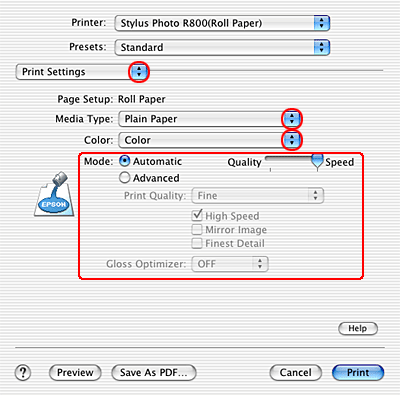
Select Print Settings from the pop-up menu.
|
 |
Make the appropriate Media Type, Color, and Mode settings.
 See Print Settings See Print Settings
|
 |
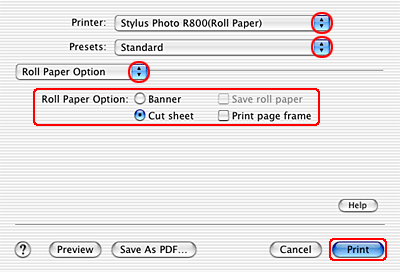
Select the Roll Paper Option from the pop-up menu.
|
 |
Select Banner to print longer data. Select Cut Sheet to print standard-sized data.
|
 |
Click Print to start printing.
|
 |
Cut the roll paper.
|

[Top]
| Version NPD0337-01, Copyright © 2004, SEIKO EPSON CORPORATION |
Handling roll paper
Driver settings for Windows
Driver settings for Mac OS 8.6 to 9.x
Driver settings for Mac OS X