|

User's Guide
|
|
Various Printing Options
Borderless Printing
 Compatible media
Preparing the print data
Printing from EPSON Easy Photo Print
Printing from the printer driver
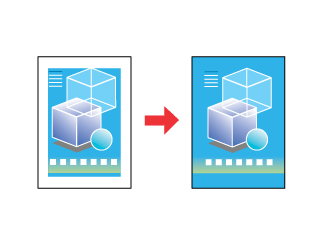
This printer allows you to print without margins on all four sides of the paper. Follow the steps described below for Borderless printing.
 |
Note:
|
 | |
This feature is not available for all media and driver settings.
|
|
Compatible media
You can use the following media with this feature:
|
Matte Paper - Heavyweight
|
A3+, A3, A4
|
|
Archival Matte Paper
|
A3+, A3, A4
|
|
Premium Glossy Photo Paper
|
A3+, A3, A4, 10 x 15 cm (4 x 6 in.), 329 mm x 10 m, 210 mm x 10 m (Roll paper)
|
|
Premium Luster Photo Paper
|
A3+, A3, 210 mm x 10 m, 329 mm x 10m (Roll paper)
|
|
Premium Semigloss Photo Paper
|
A3+, A3, A4, 329 mm x 10 m, 210 mm x 10 m, 100 mm x 8 m (Roll paper)
|
|
Watercolor Paper-Radiant White
|
A3+
|
|
UltraSmooth Fine Art Paper
|
A3+
|
|
Velvet Fine Art Paper
|
A3+
|
|
Proofing Paper Semimatte
|
A3+, 329 mm x 10 m (Roll paper)
|
|
Note:
|
| -
Printing with this feature takes longer than with normal printing.
|
|
| -
Print quality may decline in the top and bottom areas of the printout, or the area may be smeared when printing on media other than those listed above. Print a single sheet to check the quality before printing large jobs.
|
|
| -
Borderless printing is not available when Manual - Front is selected as the Source setting.
|
|

[Top]
Preparing the print data
Because this option enlarges the image to a size slightly larger than the paper size, the portion of the image that extends beyond the edges of the paper is not printed.
When creating print data in an application, note the following:
Printing on roll paper
When using this feature with roll paper and Banner Mode is selected in the Roll Paper Options dialog box (Windows) or Banner is selected as the Roll Paper Option setting in the Page Setup dialog box (Mac OS X), you need to use your image-editing software to make the Image 4mm wider than the roll paper.
If your application has margin settings, make sure they are set to zero before printing.
Printing on single sheets
You need to adjust the data to the size of the paper. If your application has margin settings, make sure they are set to zero before printing.
[Top]
Printing from EPSON Easy Photo Print
Using EPSON Easy Photo Print included on the CD-ROM is the easiest and quickest way to create borderless photos with this product. EPSON Easy Photo Print also includes a number of features that help you create outstanding photos.
|
Note:
|
| |
EPSON Easy Photo Print does not support Mac OS 9.
|
|
For Windows
 |
Access EPSON Easy Photo Print.
For Windows XP, click the Start button, point to All Programs, point to EPSON Creativity Suite, then choose EPSON Easy Photo Print.
For Windows Me, 98, and 2000, click the Start button, point to Programs, point to EPSON Creativity Suite, then choose EPSON Easy Photo Print.
|
 |
Print images from EPSON Easy Photo Print.
|
To learn how to print your photos, click the Help button to view instructions in the EPSON Easy Photo Print User's Guide.
For Mac OS X
|
|
Double-click the Applications folder in Macintosh HD, EPSON folder, then Creativity Suite. Double-click the Easy Photo Print folder, then the EPSON Easy Photo Print icon.
|
|
|
Print images from EPSON Easy Photo Print.
|
To learn how to print your photos, choose User's Guide from Help menu to view instructions in the EPSON Easy Photo Print User's Guide.
[Top]
Printing from the printer driver
Driver settings for Windows
After you have loaded the media, change your printer driver settings for Borderless printing.
|
|
Access the printer driver.
|
|
|
Click the Main tab, then make the Quality Option setting. See the following section for details on the Quality Option settings.
 See Quality Option See Quality Option
|
 |
Select the Borderless check box.
|
 |
Make the appropriate Type setting.
|
 |
Make the appropriate Size setting.
|

 |
Click OK to close the printer driver settings dialog box.
|
After finishing all steps above, start printing. Print one test copy and examine the results before printing an entire job.
|
Note:
|
| |
You can control the amount of the image that extends beyond the edges of the paper during borderless printing. When the Borderless check box is selected on the Main menu, the Borderless Expansion slider becomes available on the Page Layout menu.
|
|
Driver settings for Mac OS X
After you have loaded the media, change your printer driver settings for Borderless printing.
|
|
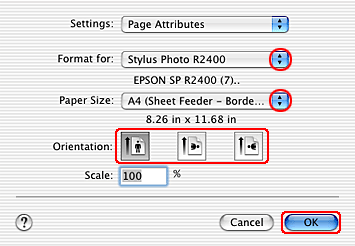
Access the Page Setup dialog box.
|
|
|
Select Stylus Photo R2400 as the Format for setting.
|
|
|
Make the appropriate Paper Size setting according to the type of borderless printing you want to perform.
|
|
|
Make the appropriate Orientation setting.
|
|
|
Click OK to close the Page Setup dialog box.
|
|
|
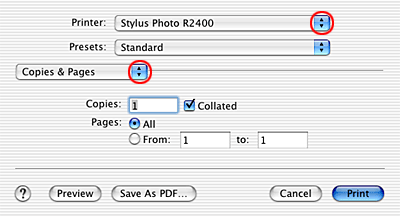
Access the Print dialog box.
|
 |
Select Stylus Photo R2400 as the Print setting, then make the Copies & Pages settings.
|
| |
Note:
|
| | |
The Copies & Pages settings available are a standard feature of Mac OS X. See your operating system's documentation for details.
|
|
 |
Select Print Settings from the pop-up menu.
|
 |
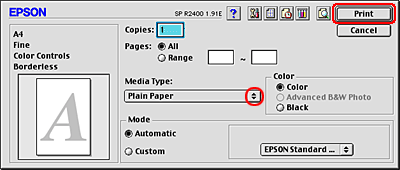
Make the appropriate Media Type, Color, and Mode settings.
See Print Settings
|
 |
Click Print to start printing.
|

|
Note:
|
| -
Print one test copy and examine the results before printing an entire job.
|
|
| -
You can control the amount of the image that extends beyond the edges of the paper during borderless printing.
See Expansion
|
|
Driver settings for Mac OS 9
After you have loaded the media, change your printer driver settings for Borderless printing.
|
|
Access the Page Setup dialog box.
|
|
|
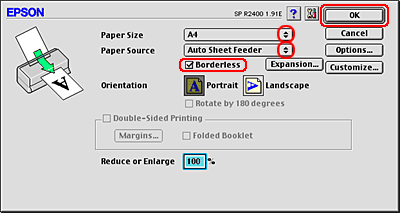
Make the appropriate Paper Size setting.
|
|
|
Select the Borderless check box.
|
|
|
Click OK to save the settings and close the Page Setup dialog box.
|
|
|
Access the Print dialog box.
|
|
|
Make the appropriate Media Type setting.
|
|
|
Click Print to start printing.
|
|
Note:
|
| -
Print one test copy and examine the results before printing an entire job.
|
|
| -
You can control the amount of the image that extends beyond the edges of the paper during borderless printing. When the Borderless check box is selected on the Page Setup dialog box, the Borderless Expansion slider becomes available.
|
|
[Top]
| Version NPD1208-00, Copyright © 2005, SEIKO EPSON CORPORATION |


