![]()
User's Guide
|
|
Index |
|
Search |
|
Glossary | |||||
|
|
Contents |
|
Help |
|
||||||
|
|
|
|||||||||||||||||||||||||||||||||
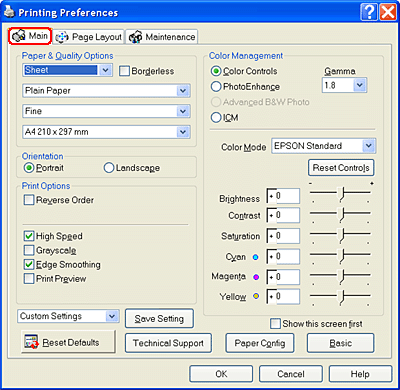
Printer Software Settings / For Windows
Making the Basic settings
You can make Quality Option, Paper Options, Print Options, Orientation, and Advanced settings, and also check the ink levels on the Main menu. Refer to the appropriate section below.
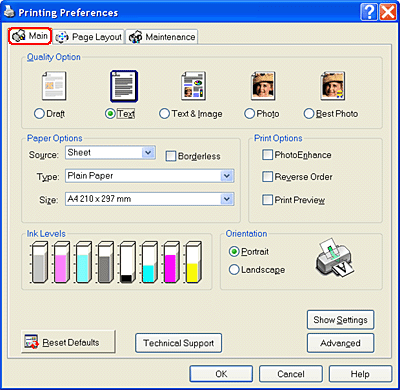
You can select one of the following quality types.
|
Draft |
For economical, high-speed printing. |
|
Text |
For medium-quality, standard text printing. |
|
Text & Image |
For high-quality, standard text and graphics printing. |
|
Photo |
For high-quality photographic printing. |
|
Best Photo |
For top-quality photographic printing. |
|
User Defined |
If you create custom settings and then select one of them on the Advanced menu, it will appear as an icon. |
|
Source |
Select Sheet to print on normal paper. Select Roll to print on roll paper. Select Manual - Roll to print single sheets fed into the rear manual feed slot. Select Manual - Front to print on Thick Paper fed into the front manual feed slot. |
||
|
Borderless |
Select this check box when you want to print without margins. With this feature, you can print to all four edges of the paper. |
||
|
Type |
Select the Type setting that matches the media loaded in the printer. The Type setting determines what other settings are available, so you should always make this setting first. To find out what media type you are using, find your media in the Media Type Settings list.
|
||
|
Size |
Select the paper size that you want to use. You can also add a custom paper size. To add your own paper size setting, see the following.
|
||
|
Banner Mode |
Select this mode when you want to print multi-page data continuously rather than as individual pages. When this is selected, the Save roll Paper check box is available. |
||
|
Cut Sheet Mode |
Select this mode when you want to print multi-page data as individual pages rather than continuously. When this is selected, the Print page frame check box is displayed. |
||
|
Save Roll Paper |
Select this check box when you want to save roll paper. When this is selected, the blank portion of the last page of your document is not fed through the printer. |
||
|
Print page frame |
Select this check box to print a line on the roll paper between pages in a multi-page document, to indicate where the paper should be cut. This feature is useful when it is unclear where the page breaks are. |
This mode applies image correction settings specially designed for scanned or digitally captured photos.
Lets you print your documents in reverse order, starting with the last page.
Lets you see a preview of your document before printing.
When you send a print job to the printer, the Print Preview window opens, allowing you to make changes before printing.
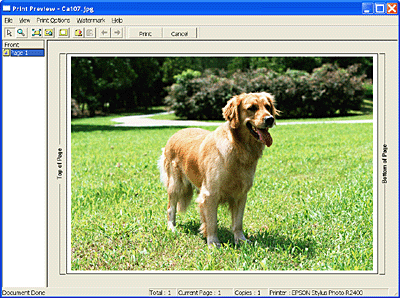
The Print Preview toolbar contains several icon buttons to perform the following functions.
|
Icon |
Button name |
Function |
|
|
Drag 'n' Drop |
Click this button to select and move watermarks. |
|
|
Zoom |
Click this button to enlarge or reduce the size of the previewed page. |
|
|
Fit To Screen |
Click this button to scale the previewed page so that it fits the size of the window. This is convenient when you want to see the entire page at one time. |
|
|
Maximum Zoom |
Click this button to display the previewed page at the maximum possible zoom ratio. |
|
|
Printable Area On/Off |
Click this button to display or hide the borderlines which indicate the printable area. The printer cannot print anything which is outside of this area. |
|
|
Watermark |
Click this button to open the Watermark dialog box, where you can add watermarks to the document and change any of the current watermark settings. |
|
|
Reset Watermark Settings |
Click this button to return all watermark settings to what they were when the EPSON Print Preview dialog box was first opened. |
|
|
Previous Page |
Click this button to display the page before the one currently being previewed. |
|
|
Next Page |
Click this button to display the next page in the document. |
You can also manipulate the document being previewed in the following ways:
 See Watermark Printing
After you have previewed the document, click Print to print the document, or click Cancel to cancel printing.
Select Portrait (tall) or Landscape (wide) to change the orientation of your printout.
The How to buy button appears when an ink cartridge is finished or nearly finished. Click the How to Buy button to access the EPSON website. Choose your country from the drop-down menu, and then follow the onscreen instructions.
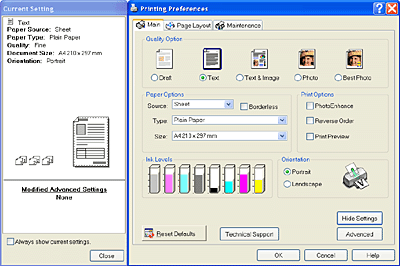
When you click Show Settings, the Current Setting window appears. To hide the window, click Hide Settings on the Main menu or Close in the Current Setting window.
Click the Reset Defaults button to return the settings to their factory default values.
Click the Technical Support button to access the EPSON website. Here you can find information covering a broad range of EPSON support.
Shows the Advanced menu.
The settings in the Advanced dialog box give you complete control over your printing environment. Use these settings to experiment with new printing ideas or to fine-tune a range of print settings to meet your individual needs. Once you are satisfied with your new settings, you can give them a name and add them to the Custom Settings.
| Note: |
|
|
|
|
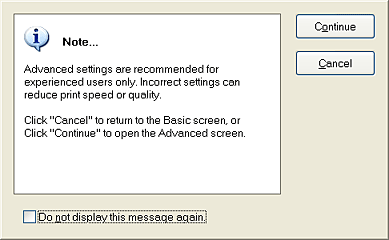
To open the Advanced menu, click Advanced on the Main menu. If the following Note dialog box appears, click Continue.
|
Source |
Select Sheet to print on normal paper. Select Roll to print on roll paper. Select Manual - Roll to print single sheets fed into the rear manual feed slot. Select Manual - Front to print on thick paper fed into the front manual feed slot. |
||
|
Borderless |
Select this check box when you want to print without margins. With this feature, you can print to all four edges of the paper. |
||
|
Type |
Select the Type setting that matches the media loaded in the printer. To find out what media type you are using, find your media in the Media Type Settings list.
Note: |
||
|
Print Quality |
Select the print quality from the list. |
||
|
Size |
Select the paper size that you want to use. You can also add a custom paper size. To add your own paper size setting, see the following.
|
Select Portrait (tall) or Landscape (wide) to change the orientation of your printout.
|
Reverse order |
Lets you print your documents in reverse order, starting with the last page. |
|
High Speed |
Activates bidirectional printing so your printer prints both left-to-right and right-to-left. High Speed mode speeds up printing, but decreases print quality. |
|
Grayscale |
Prints your printout in grayscale. |
|
Edge Smoothing |
Improves the print quality of low-resolution images by smoothing jagged edges and lines. This setting has no effect on high-resolution images or on text. |
|
Print Preview |
Shows a preview of your document before printing. |
For use with the color matching and image enhancement methods provided by the printer driver. When you select Color Controls, additional settings appear under Color Management, allowing you to select a Color Mode setting and adjust the color enhancement sliders.
|
Gamma |
To control image contrast by modifying the midtones and mid-level grays. |
|
Color Mode |
EPSON Standard: Provides output that closely matches the original data. EPSON Vivid: Based on your data, enhances color balance for optimum print results. This setting is recommended for most print jobs. Adobe RGB: Covers the full range of CMYK colors that this product can print. This setting is recommended for printing digital photos. |
|
Slide Bars |
The Color Enhancement slide bars adjust the options in a range of -25% to +25%. For details on each option, see the printer driver help. |
This mode provides a variety of image correction settings that you can apply to your photos before printing. PhotoEnhance does not affect your original data.
| Note: |
|
Selecting PhotoEnhance also makes the Digital Camera Correction check box available. Selecting this check box makes the Smooth Skin check box available. Use this when you are printing photos taken with a digital camera to give your printed images the smooth, natural appearance of photographs taken with a film camera.
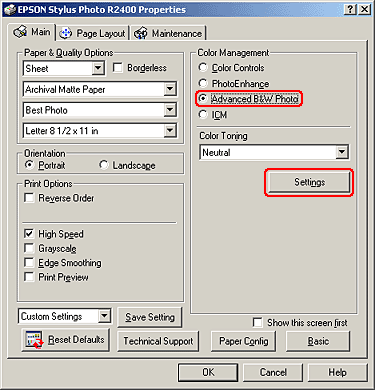
To access the Advanced B&W Photo settings dialog box, select Advanced B&W Photo as the Color Management setting, and then click Settings.
| Note: |
|
Here you can use the following tools to make detailed adjustments to your photos.
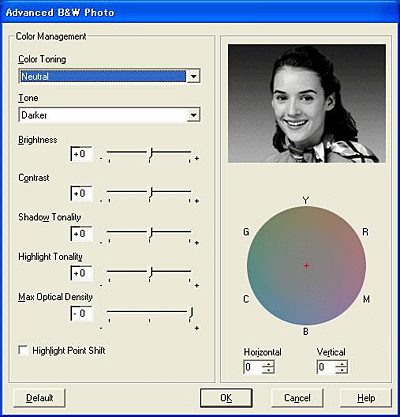
Select one of the following settings.
|
Neutral |
Applies a standard color correction to black-and-white photos. |
|
Cool |
Applies a cool tone to your photos. |
|
Warm |
Applies a warm tone to your photos. |
|
Sepia |
Applies a sepia tone to your photos. |
|
Fine Adjustment |
This appears when you change the Tone, adjust the settings using the slide bars or the color circle, or select the Highlight Point Shift check box. |
Adjusts the tone by five levels.
|
Light |
Applies a harder tone to your photos. |
|
Normal |
Applies a hard tone to your photos. |
|
Dark |
Applies a soft tone to your photos. |
|
Darker |
Applies a softer tone to your photos. |
|
Darkest |
Applies the softest tone to your photos. |
The tone enhancement slide bars adjust the following options. Drag the slide bar to the right or left to adjust the settings. You can also enter a value in the boxes next to the slide bars.
|
Brightness |
Adjusts the overall lightness and darkness within a range of -25 to +25. |
|
Contrast |
Adjusts the difference between the bright and dark parts of your image within a range of -25 to +25. |
|
Shadow Tonality |
Adjusts the shadow tonality within a range of -25 to +25. |
|
Highlight Tonality |
Adjusts the highlight tonality within a range of -25 to +25. |
|
Max Optical Density |
Adjusts the focus of the print. Create a soft focus print by setting the density to low within a range of -50 to 0. |
Select this check box to add a little more ink to white areas to give it a glossy look.
Click in the color circle to adjust the color tone of your black-and-white photo. You can also adjust the color tone by entering a value in the Horizontal and Vertical text boxes.
Click the Default button to return the settings to their default values.
This method automatically adjusts printout colors to match the colors on your screen. ICM stands for Image Color Matching.
Selecting ICM makes the ICC/ICM Profile available. Here you can choose to turn off Applied by Printer Software. Turning this setting off by selecting Off (No Color Adjustment) is generally not recommended, because it does not allow the printer driver to enhance or adjust the color. Only use this setting when you create a new color profile or if the other Mode settings do not produce satisfactory results.
From the Perceptual drop-down menu, you can choose the appropriate ICC profile from the ones that are installed on your computer.
To save your Advanced settings in the Custom Settings list, click Save Setting. The Custom Settings dialog box appears.
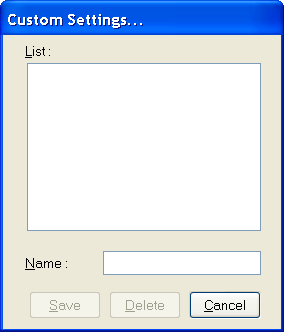
Type a unique name for your settings in the Name text box, then click Save. The name can contain a total of up to 16 letters and numerals. You can also use up to eight, double-byte characters; however, they may not be displayed correctly on the screen depending on your operating system settings. Your custom setting will be added to the Custom Settings list on the Advanced menu. You can save up to 10 custom settings.
After saving it, the latest custom setting will be selected on the Advanced menu as well as under Quality Option on the Basic menu. To change to another custom setting, simply select it from the Custom Settings list on the Advanced menu, or click the icon with the current custom setting's name under Quality Option on the Basic menu and select the custom setting you want from the list that appears.
If you change a setting while one of your custom settings is selected in the Custom Settings list, the selection in the list returns to Custom Settings and the user-defined choice under Quality Option on the Basic menu changes to User. The custom setting that was previously selected is not affected by the change and remains in the list. To return to your custom setting, simply reselect it from the Custom Settings list on the Advanced menu, or click the User icon under Quality Option on the Basic menu and select it from the list that appears.
To delete a setting from the Custom Settings list, select it in the Custom Settings dialog box, then click Delete. If the deleted custom setting was active when deleted or if it was the only custom setting, the Custom Settings list selection returns to Custom Settings and the user-defined choice under Quality Option on the Basic menu changes to User. To activate a remaining custom setting, simply select it from the Custom Settings list on the Advanced menu, or click the User icon under Quality Option on the Basic menu and select the custom setting you want from the list that appears.
Shows the Advanced menu first when accessing the Main menu in the printer software.
Click the Reset Defaults button to return the settings to their factory default values.
Click the Technical Support button to access the EPSON website.
Click the Paper Config button to access the Paper Configuration dialog box. Here you can make the following detailed paper settings.
Use this to adjust the strength of color density when printing on non-EPSON media. You can adjust the density by dragging the scroll bar to the left or right, or by entering a value between -50 and 50 in the text box.
Use this to add a waiting time when the print head reaches the end of every pass to allow the ink to dry. You can adjust the setting by dragging the scroll bar to the left or right, or by entering a value between 0 and 50 in the text box.
Shows the Basic menu.
 Previous |
 Next |
| Version NPD1208-00, Copyright © 2005, SEIKO EPSON CORPORATION |
