|

Reference Guide
|
|
Various Printing Options
Creating Panoramic Pictures
 Accessing Panorama Stitcher Light EPC and loading images
 Selecting the panorama mode and stitching images
 Saving panoramic pictures
 Printing panoramic pictures
 Quitting Panorama Stitcher Light EPC
 Uninstalling Panorama Stitcher Light EPC
 Accessing Panorama Stitcher Light EPC help
Using Panorama Stitcher Light EPC, you can stitch together images taken with a digital camera and create a panoramic picture to print.
Panorama Stitcher Light EPC is automatically installed when installing the printer software.
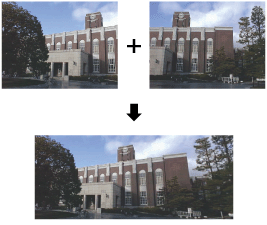
 |
Note:
|
 | -
Some types of digital cameras have a feature that makes it easier to take photos for creating panoramic pictures. For more details, refer to the digital camera's manual.
|
|
 | -
This feature is not available with Mac OS X.
|
|
For more details on using Panorama Stitcher, refer to Panorama Stitcher's online help and also refer to the Panorama Stitcher FAQ.
Accessing Panorama Stitcher Light EPC and loading images
For Windows
 |
Click Start, point to Programs (for Windows Me, 98, and 2000) or All Programs (for Windows XP), point to Panorama Stitcher Light EPC, then click Panorama Stitcher Light EPC.
|
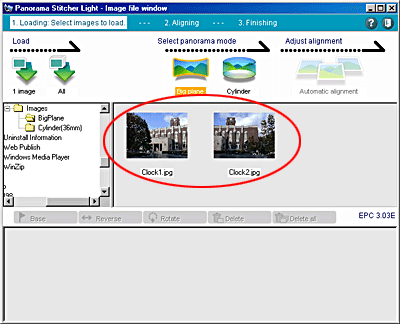
Panorama Stitcher Light EPC starts up and displays the images in the currently selected folder.
 |
Select the folder that contains the images to be stitched, then click All.
|
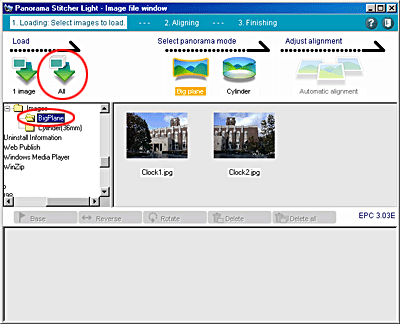
All of the images in the selected folder are loaded into the load image area.
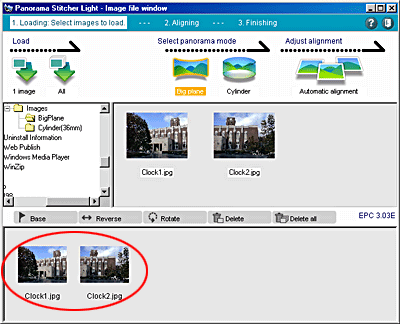
 |  |
Note:
|
 |  | -
Click 1 image to load each image one by one.
|
|
 |  | -
You can also load images by dragging them to the load image area.
|
|
 |  | -
The image files must be the same size. If the image files are of different sizes, the smallest image is used as the reference, and images of sizes up to 10% larger than the reference can be used.
|
|
 |  | -
Each of the neighboring images in the load image area must have overlapping areas of 20 or more percent of the image.
|
|
 |  | -
The resolution of an image must be 320 x 240 or more pixels.
|
|
 |  | -
The compatible file formats are JPEG, BMP, and TIFF. However, progressive-mode JPEG images, BMP images compressed with RLE, and TIFF images compressed with LZW cannot be used.
|
|
 |
In the load image area, click the image to be used as the base image, then click Base.
|
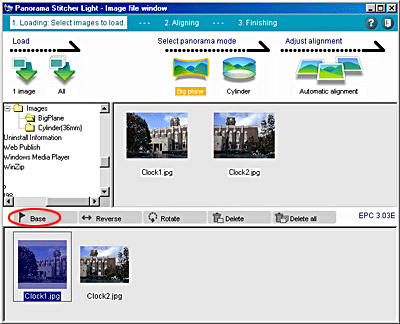
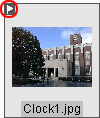
The base image flag appears on the image.
 |  |
Note:
|
 |  | -
Click Reverse to reverse the position of the images for stitching.
|
|
 |  | -
Click Rotate to rotate all of the images.
|
|
 |  | -
Click Delete to delete the selected image, and Delete all to delete all of the images.
|
|
 |  | -
If no image is set as the base image, the left image in the load image area becomes the base image when two images are loaded, or the image located in the center after stitching becomes the base image when three or more images are loaded.
|
|
 |  | -
The possible number of stitched images varies depending on the amount of computer memory and the image size.
|
|
 |  | -
Position the images in the load image area with overlapping areas side by side, otherwise you cannot stitch them correctly.
|
|
For Macintosh
 |
Double-click the Macintosh HD (the default hard disk name) icon, double-click the Panorama Stitcher Light EPC folder, then double-click the Panorama Stitcher icon.
|
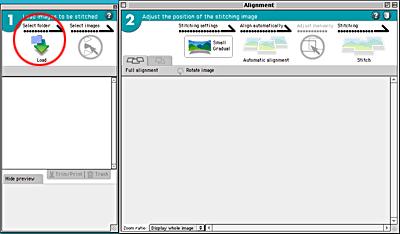
Panorama Stitcher Light EPC starts up. The file selection palette is on the left, and the Alignment area is on the right.
 |
Click Load. The Choose a Folder dialog box appears.
|
 |
Select the folder that contains the images to be stitched, then click Choose.
|
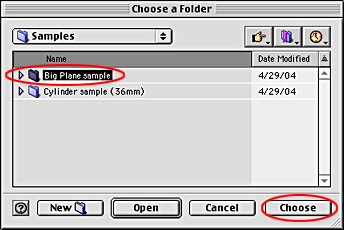
The images in the folder are loaded to the file selection palette.
 |
Click all of the  buttons to the right of the names of the files to be stitched. buttons to the right of the names of the files to be stitched.
|
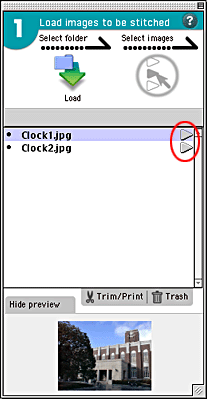
The  buttons switch to
  buttons, and the images are loaded into the Alignment area.
 |  |
Note:
|
 |  | -
To load all of the images at one time, choose Select all from the Edit menu, then click the
 button. button.
|
|
 |  | -
To delete the images loaded in the Alignment area, click the
 buttons. The buttons. The  buttons switch to buttons switch to  buttons. buttons.
|
|
 |  | -
The image files must be the same size. If the image files are of different sizes, the smallest image is used as the reference, and images of sizes up to 10% larger than the reference can be used.
|
|
 |  | -
Each of the neighboring images in the load image area must have overlapping areas of 20 or more percent of the image.
|
|
 |  | -
The resolution of an image must be 320 x 240 or more pixels.
|
|
 |  | -
The compatible file formats are JPEG, BMP and TIFF. However, progressive-mode JPEG images, BMP images compressed with RLE, and TIFF images compressed with LZW cannot be used.
|
|
 |  | -
Drag an image up or down on the file selection palette to change its position.
|
|
 |
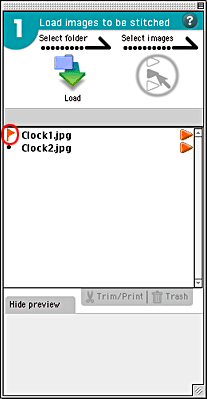
Click  to the left of the name of the file used as the base image on the file selection palette. to the left of the name of the file used as the base image on the file selection palette.
|
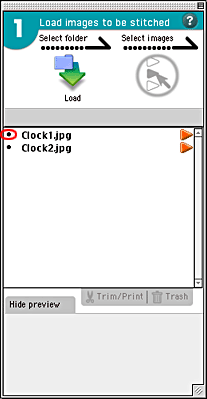
The base image flag appears to the left of the base image.
 |  |
Note:
|
 |  | -
Click Rotate to rotate all of the images.
|
|
 |  | -
If no image is set as the base image, the left image on the file selection palette becomes the base image when two images are loaded, or the image located in the center after stitching becomes the base image when three or more images are loaded.
|
|
 |  | -
The possible number of stitched images varies depending on the amount of computer memory and the image size.
|
|

[Top]
Selecting the panorama mode and stitching images
For Windows
 |
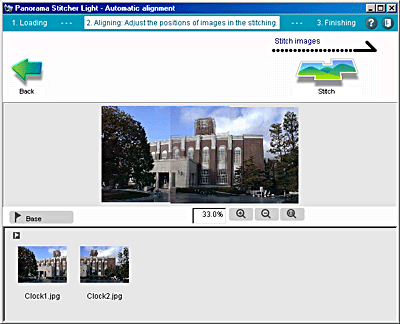
Click Big plane, then click Automatic alignment.
|
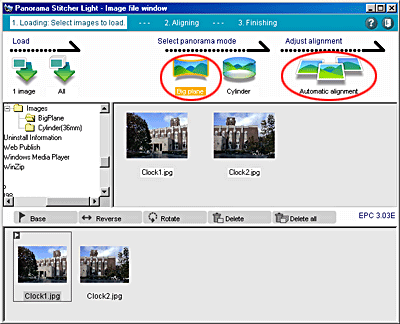
The message "If images are greatly out of alignment, adjust approximately using the mouse" appears for a few seconds, and the images are aligned automatically. Click the message window to make it disappear.
 |  |
Note:
|
 |  | |
Click Cylinder to make a panoramic picture with a wide field of vision (maximum 360 degrees).
|
|
 |
If the images are greatly out of alignment, drag them to adjust their positions.
|
 |  |
Note:
|
 |  | |
Click Back to reverse the alignment.
|
|
 |
Click Stitch.
|
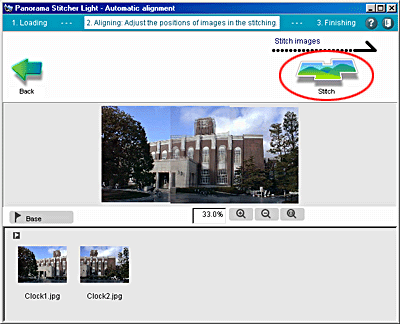
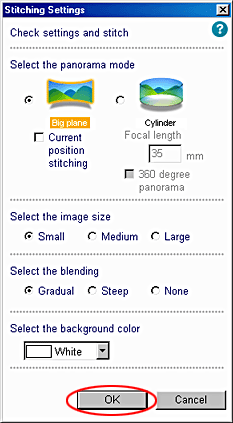
The Stitching Settings dialog box appears.
 |
Confirm the settings in the Stitching Settings dialog box, then click OK.
|
 |  |
Caution:
|
 |  | -
It takes longer to stitch if Large is selected as the Select the image size setting, because the stitched image is made at the same resolution as the images being stitched.
|
|
 |  | -
You cannot stitch with precision alignment if the Current position stitching check box is selected. Select it when an error occurs in the stitching.
|
|
 |
Click OK in the Question dialog box.
|
 |  |
Note:
|
 |  | |
The message in the Question dialog box varies depending on the settings in the Stitching Settings dialog box.
|
|

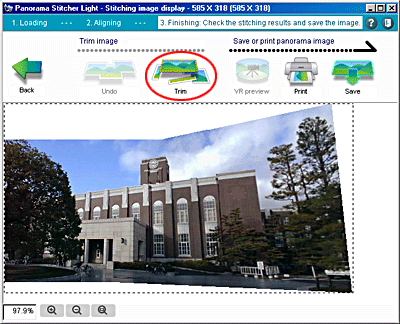
The message "Adjust the trimming position. The area inside the dotted lines will be trimmed." appears for a few seconds, and the stitched images appear with dotted lines that show the trimming area. Click the message window to make it disappear.
 |  |
Note:
|
 |  | |
The following images cannot be stitched correctly:
|
|
 |  | -
Images with a mixture of objects in the foreground and background, such as photos taken indoors
|
|
 |  | -
Images where the overlapping areas contain moving objects
|
|
 |  | -
Images with relatively few distinct features, such as open skies and sea surfaces
|
|
 |  | -
Images with brightness levels that differ markedly from photo to photo, such as midday, evening, and backlit scenes
|
|
 |  | -
Images taken using different zoom ratios
|
|
 |  | -
Images taken at different angles
|
|
 |
Drag the dotted line to adjust the trimming area, then click Trim.
|
 |  |
Note:
|
 |  | |
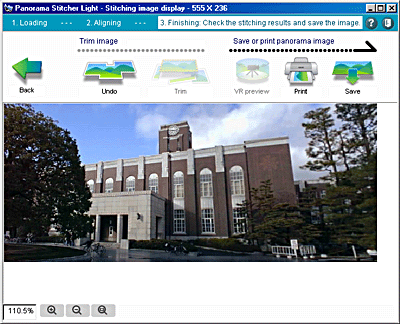
The size of the trimmed image is displayed at the top of the Stitching image display window.
|
|
The image is trimmed.
 |  |
Note:
|
 |  | |
Click Undo to revert the trimming.
|
|
For Macintosh
 |
Click Small Gradual.
|
 |  |
Note:
|
 |  | |
The name of this button describes the current image size and blending settings. Small Gradual means that Small is selected as the image size, and Gradual is selected as the blending. The name of this button varies depending on the settings.
|
|
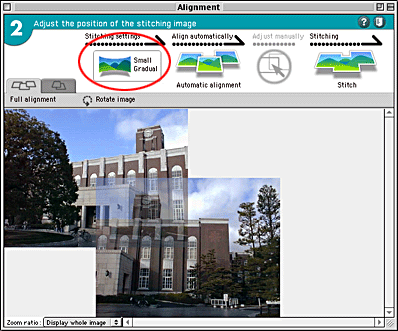
The Check settings dialog box appears.
 |
Confirm the settings in the Check settings dialog box, then click OK.
|
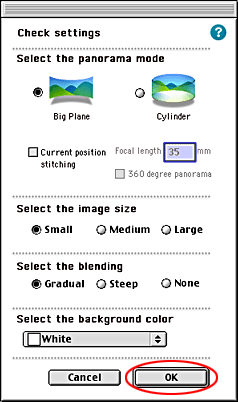
 |  |
Caution:
|
 |  | -
It takes a longer time to stitch if Large is selected as the Select the image size setting, because the stitched image is made at the same resolution as the images being stitched.
|
|
 |  | -
You cannot stitch with precision alignment if the Current position stitching check box is selected. Select it when an error occurs in the stitching.
|
|
 |  |
Note:
|
 |  | |
Click Cylinder to make a panoramic picture with a wide field of vision (maximum 360 degrees).
|
|
 |
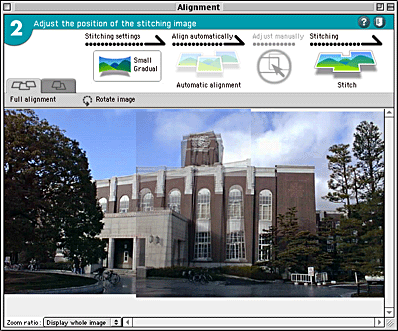
Click Automatic alignment.
|
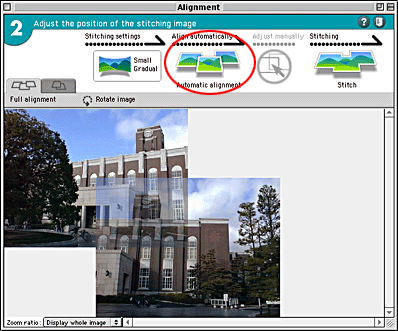
The images are aligned automatically.
 |
If the images are greatly out of alignment, drag them to adjust their positions.
|
 |  |
Note:
|
 |  | -
Click
 to align all of the images at one time. to align all of the images at one time.
|
|
 |  | -
Click
 to align the two images that are next to each other. to align the two images that are next to each other.
|
|
 |
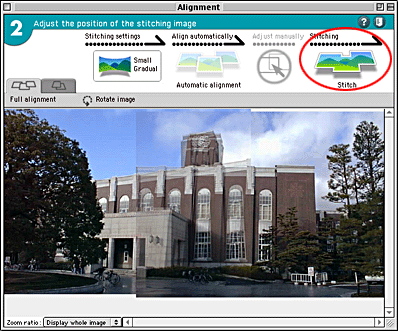
Click Stitch.
|
 |  |
Note:
|
 |  | |
The following images cannot be stitched correctly:
|
|
 |  | -
Images with a mixture of objects in the foreground and background, such as photos taken indoors
|
|
 |  | -
Images where the overlapping areas contain moving objects
|
|
 |  | -
Images with relatively few distinct features, such as open skies and sea surfaces
|
|
 |  | -
Images with brightness levels that differ markedly from photo to photo, such as midday, evening, and backlit scenes
|
|
 |  | -
Images taken using different zoom ratios
|
|
 |  | -
Images taken at different angles
|
|
 |
Click Trim.
|
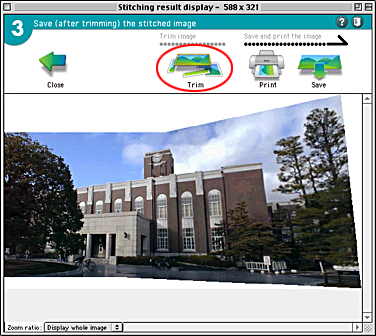
The Stitching result display dialog box and the dotted lines that show the trimming area appear.
 |
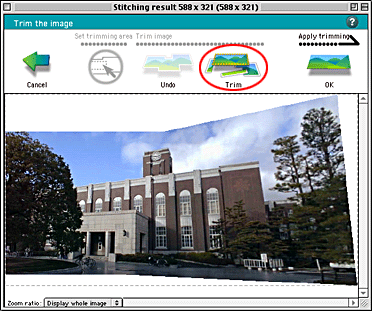
Drag the dotted line to adjust the trimming area, then click Trim.
|
 |  |
Note:
|
 |  | |
The size of the trimmed image is displayed at the top of the Stitching result dialog box.
|
|
The image is trimmed.
 |
Click OK.
|
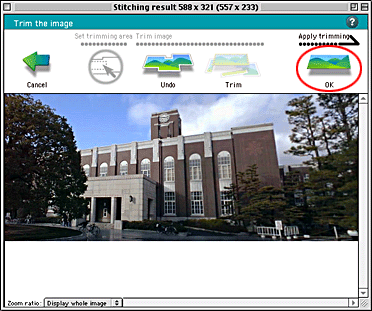
The Stitching result dialog box closes and the trimmed image appears in the Stitching result window.
 |  |
Note:
|
 |  | |
Click Undo before clicking OK to revert the trimming.
|
|

[Top]
Saving panoramic pictures
For Windows
 |
Click Save.
|
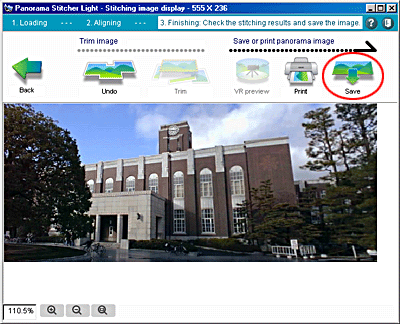
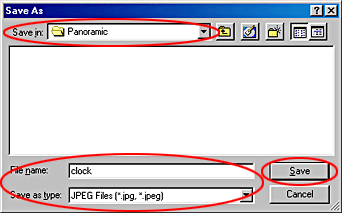
The Save As dialog box appears.
 |
Select a folder, enter a file name in the File name text box, select a file type as the Save as type setting, then click Save.
|
For Macintosh
 |
Click Save.
|
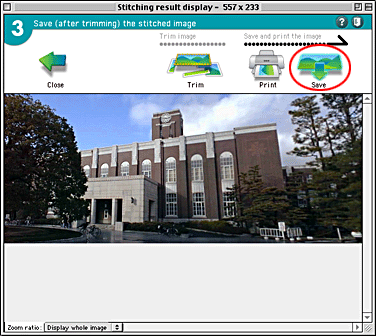
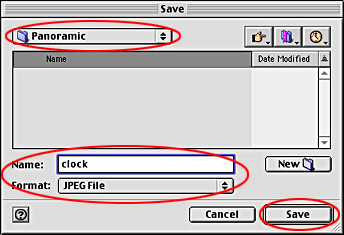
The Save dialog box appears.
 |
Select a folder, enter a file name in the Name text box, select a file format as the Format setting, then click Save.
|

[Top]
Printing panoramic pictures
 |
Click Print.
|
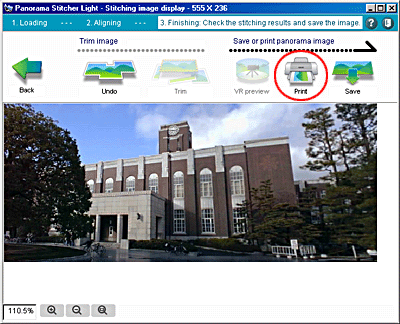
The Print dialog box appears.
 |  |
Note:
|
 |  | |
The figures used in this section are taken from Windows.
|
|
 |
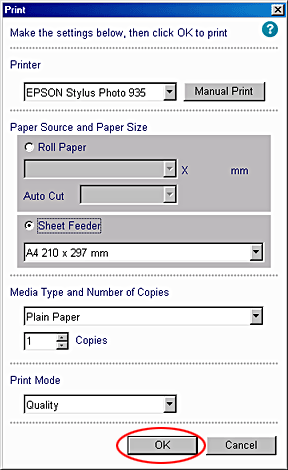
Confirm the settings in the Panorama Stitcher Print dialog box, then click OK.
|
 |
Note:
|
 | -
The figures used in this section are taken from Windows.
|
|
 | -
If Roll Paper is selected, a borderless panoramic picture is printed. The length of the roll paper to be printed is calculated automatically. Refer to Printing on Roll Paper to print on roll paper.
|
|
 | -
For Windows, a panoramic picture is printed at the center of the sheet if Sheet Feeder is selected. Each of the margins is set to 20 mm. The size of the picture is adjusted to the paper size.
|
|
 | -
For Macintosh, a panoramic picture is printed starting from the upper left corner of the sheet if Sheet Feeder is selected. Each of the margins is set to 20 mm. The size of the picture is adjusted to the paper size.
|
|
 | -
A panoramic picture made with Panorama Stitcher Light EPC can be printed with EPSON PhotoQuicker. Using EPSON PhotoQuicker, you can print with Auto Photo Fine 4!, EPSON's original feature for printing fine pictures.
|
|
 | -
Make the vertical or horizontal size of the picture 321 or more pixels to load a panoramic picture made with Panorama Stitcher Light EPC to EPSON PhotoQuicker. Refer to the EPSON PhotoQuicker User's Guide for more details on the minimum picture size requirement.
|
|

[Top]
Quitting Panorama Stitcher Light EPC
 |
Click  in the upper-right corner. The message "Are you sure you want to exit Panorama Stitcher Light?" appears. in the upper-right corner. The message "Are you sure you want to exit Panorama Stitcher Light?" appears.
|
 |
Click OK.
|

[Top]
Uninstalling Panorama Stitcher Light EPC
Access Panorama Stitcher Light EPC help to uninstall the program and follow the instructions. See Accessing Panorama Stitcher Light EPC help to access Panorama Stitcher Light EPC help.

[Top]
Accessing Panorama Stitcher Light EPC help
For Windows
From the Start menu
Click Start, point to Programs (for Windows Me, 98, and 2000) or All Programs (for Windows XP), point to Panorama Stitcher Light EPC, then click Online Help.
 |
Note:
|
 | |
The FAQ also contains information on Panorama Stitcher Light EPC. To access the FAQ, click Start, point to Programs (for Windows Me, 98, and 2000) or All Programs (for Windows XP), point to Panorama Stitcher Light EPC, then click FAQ.
|
|
From Panorama Stitcher Light EPC
Click  in the upper-right corner.
For Macintosh
From the Help menu
Choose Online Help from the Help menu.
 |
Note:
|
 | |
The FAQ also contains information on Panorama Stitcher Light EPC. To access the FAQ, double-click Macintosh HD (the default hard disk name), double-click the Panorama Stitcher Light EPC folder, then double-click the PanoramaStitcherFAQ icon.
|
|
From Panorama Stitcher Light EPC
Click  in the upper-right corner.

[Top]
| Version 1.00E, Copyright © 2003, SEIKO EPSON CORPORATION |
Accessing Panorama Stitcher Light EPC and loading images
Selecting the panorama mode and stitching images
Saving panoramic pictures
Printing panoramic pictures
Quitting Panorama Stitcher Light EPC
Uninstalling Panorama Stitcher Light EPC
Accessing Panorama Stitcher Light EPC help
buttons switch to
buttons, and the images are loaded into the Alignment area.
in the upper-right corner.
in the upper-right corner.