![]()
Reference Guide
|
|
Index |
|
Search |
|
Glossary | |||||
|
|
Contents |
|
Help |
|
||||||
|
|
|
|||||||||||||||||||||||||||||||||
Problem Solver
Preventing paper-feed and paper-jam problems
Look through this section to find the type of problem you have, and try the recommended solutions in the order they are presented. You will also be alerted to errors by the Status Alert window of the EPSON Status Monitor 3 utility according to the settings you make in the Monitoring Preferences dialog box. In addition, indicator lights on the printer's built-in control panel will light up in different combinations to inform you of basic printer status, errors and warnings. See Status and Error Lights for more information.
 | Note: |
| If the problem remains after you work through the suggestions in this section, contact your dealer for assistance. |
If you have frequent paper-feed or paper-jam problems, use this checklist of corrective measures:
If a paper jam occurs, the printer stops printing and both the Paper and Continue indicator lights come on. Follow the appropriate procedure below to clear the paper jam.
If the jammed sheet is entirely within the printer, remove the sheet as follows:
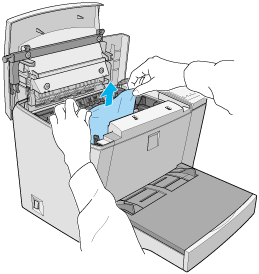
 | Make sure that the printer is turned off. |
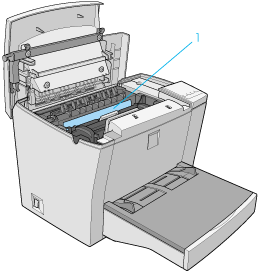
 | Open the printer cover by pressing the latch on the left side of the printer and lifting the cover up all the way. |

 | Warning: |
| Opening the printer cover exposes the fuser, which is marked CAUTION Hot Surface Avoid Contact. Be careful not to touch the fuser. If the printer has been in use, the fuser may be very hot. |
1. CAUTION Hot Surface Avoid Contact
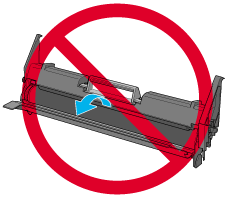
 | Remove the developer cartridge. |
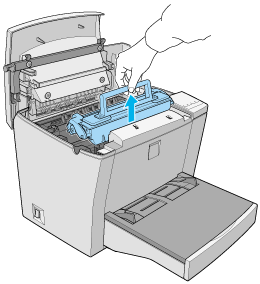
 | Caution: |
| When removing the developer cartridge, never touch the developing roller under the flap; otherwise, print quality may decline. |
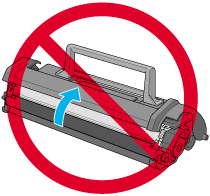
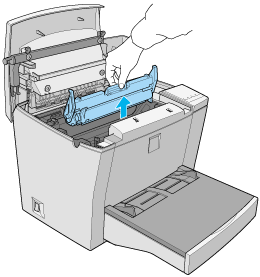
 | Remove the photoconductor unit. |
| Caution: |
| Never touch the photoconductor unit's light-sensitive drum; otherwise, print quality may decline. |
 | Remove the paper from the paper path. |
| Note: |
| If paper is jammed at the fuser, grasp the bottom of the paper and pull it out. |
 | Reinstall the photoconductor unit, and then the developer cartridge. |
 | Close the printer cover. |
 | Tap the edges of the stack of paper on a flat surface and carefully reload it into the MP tray. (Do not reload curled or wrinkled sheets.) |
Printing automatically restarts from the page that jammed. If the Paper light stays on after removing all jammed paper, open and close the printer cover to clear the error.
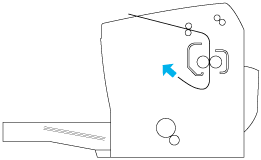
The following illustration shows what this type of jam looks like:
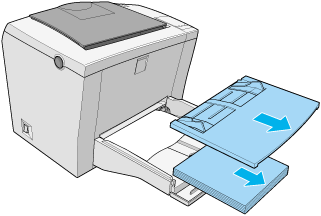
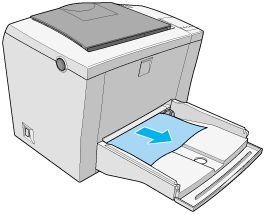
Follow the steps below to clear a feed jam at the MP tray:
|
| Remove the MP tray cover and any stacked paper. |
|
| Gently pull out any sheets that have fed part way into the printer. |
|
| Open the printer cover. Be sure to remove any pieces of paper that may have torn off or are remaining in the printer. |
If necessary, take out the developer cartridge and the photoconductor unit and remove any paper left in the paper feed path. Reinsert the unit and then the cartridge.
|
| Tap the edges of the paper stack on a flat surface and carefully reload it into the MP tray. (Do not reload curled or wrinkled sheets.) |
|
| Reinstall the MP tray cover. |
|
| Close the printer cover. The jammed page's print data is automatically reprinted. |
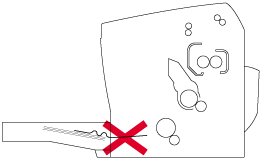
The following illustration shows what this type of jam looks like:

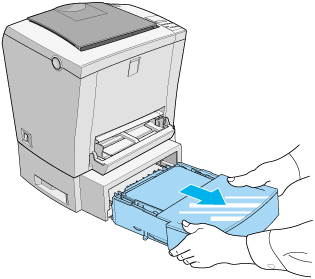
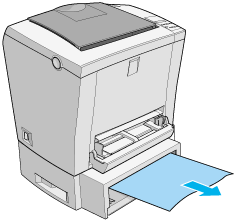
Follow the steps below to clear a feed jam in the 500-Sheet Lower Paper Cassette Unit:
|
| Remove the paper-tray from the 500-Sheet Lower Paper Cassette Unit. |
|
| Remove any folded or jammed paper from the paper-tray and from the inside of the cassette unit, and discard any curled or wrinkled sheets. |
|
| Remove all paper from the paper-tray and press down on the plate until it locks into position. |
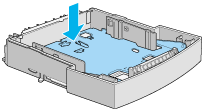
|
| Tap the edges of the paper stack, then set it back into the paper-tray, making sure the paper is evenly aligned and that the top sheet is below the maximum paper mark. |
|
| Make sure you are using the correct paper size. The tray can accommodate only A4 or Letter size paper, depending on the country where you purchased the option. Also make sure you are using paper that meets the specifications for this printer. |
|
| Set the paper-tray back into the 500-Sheet Lower Paper Cassette Unit. |
|
| Open and then close the printer cover. The jammed page's print data is automatically reprinted. |
Turn off the printer and check the power cord connection between the printer and the electrical outlet. Then turn the printer back on.
If the electrical outlet is controlled by an outside source such as a wall switch, make sure the switch is turned on. Try plugging another electrical device into the outlet to check whether the outlet is operating properly.
Press the On Line button once to put the printer online (the On Line indicator light comes on).
Your computer may not be properly connected to the printer. Perform the procedure described in "Connecting to the computer" in the Setup Guide.
The interface cable may not be plugged in securely. Check both ends of the cable between the printer and the computer. If connecting through the parallel interface, be sure to secure the connector using the wire retaining clips.
Make sure you use a double-shielded, twisted-pair interface cable no more than six feet in length.
The developer cartridge may be empty. To replace the cartridge, see Replacing the developer cartridge.
Make sure that both ends of the interface cable are plugged in securely.
If connecting through the parallel interface, make sure you use a double-shielded, twisted-pair interface cable no more than six feet in length.
If the Image Optimum setting in the Remote Control Panel utility is set to Auto or On, fonts other than you expect may be printed to increase the printing speed. Turn the Image Optimum setting to Off.
If the printer still does not print correctly, contact your dealer or a qualified service representative.
Make sure that you are using the correct page length and margin settings in your application program.
Graphics require large amounts of memory. See Memory problems.
Set Dot Correction to On in the Remote Control Panel utility. If the problem persists even after changing the Dot Correction setting, either print using a bolder line setting or decrease the resolution from 1200 dpi to 600 dpi.
If fills or light-colored text or graphics are not printed, try changing the selected color or print at 600 dpi resolution.
Lighten the Density setting in the printer driver.
Turn off the printer and clean the paper path inside the printer using a clean, dry, lint-free cloth.
Clean internal printer components by printing three pages with only one character per page.
You may not be using the correct type of paper for your printer. If the surface of your paper is too rough, printed characters may appear distorted or broken. Smooth, high-quality copier paper is recommended for best results. See Specifications for information on choosing paper.
There may be a problem with the developer cartridge. Remove the cartridge and shake it gently from side to side and then from front to back to distribute the toner evenly, then reinstall it. If the problem persists, replace the developer cartridge. For more information, see Replacing the developer cartridge.
You may need to replace the photoconductor unit. See Replacing the photoconductor unit for instructions.
Turn off the printer. Clean the paper path inside the printer using a soft, dry, lint-free cloth.
Clean internal printer components by printing three pages with only one character per page.
There may be a problem with the developer cartridge. Remove the cartridge and shake it gently from side to side and then from front to back to distribute the toner evenly, then reinstall it. If this does not solve the problem, see Replacing the developer cartridge.
You may need to replace the photoconductor unit. See Replacing the photoconductor unit for instructions.
Your paper may be moist or damp. Do not store paper in a humid or damp environment.
Make sure the paper type is correct.
Check that the Toner Save mode is turned on.
Confirm that the density setting is light.
Turn off the printer. Take out the developer cartridge, shake it gently from side to side and then from front to back to distribute the toner evenly, and then reinstall it.
If this does not solve the problem, install a new cartridge. For more information, see Replacing the developer cartridge. Then print several pages to check the print quality.
Your paper may be moist or damp. Do not store paper in a humid or damp environment.
You may not be using the correct type of paper for your printer. If the surface of your paper is too rough, printed characters may appear distorted or broken. Smooth, high-quality copier paper is recommended for best results. See Specifications for information on choosing paper.
Turn off the printer. Remove the developer cartridge, shake it from side to side to distribute the toner, and wipe the bottom of the cartridge with a clean, dry, lint-free cloth.
Clean the paper path inside the printer using a clean, dry, lint-free cloth.
Clean internal printer components by printing three pages with only one character per page.
If the problem remains, replace the developer cartridge. For more information, see Replacing the developer cartridge.
Your paper may be moist or damp. Printing is sensitive to moisture absorbed by the paper. The higher the moisture content of the paper, the lighter the printed output. Do not store paper in a humid or damp environment.
You may not be using the correct type of paper for your printer. If the surface of your paper is too rough, printed characters may appear distorted or broken. Smooth, high-quality copier paper is recommended for best results. See Specifications for information on choosing paper.
Check the toner status using the EPSON Status Monitor 3 utility. If the status monitor displays the Toner Low message, you need to replace the developer cartridge. For instructions, see Replacing the developer cartridge.
To check that the photoconductor unit and the developer cartridge are correctly installed, see Replacing Consumable Products.
The problem may be with your application program or your interface cable. Try printing a status sheet through the control panel. If blank pages continue to print, the problem may be with the printer. Turn off the printer and contact your dealer.
Your paper may be moist or damp. The higher the moisture content of the paper, the lighter the printed output. Do not store paper in a humid or damp environment.
The Toner Save mode may be on. Turn off the Toner Save mode using the printer driver.
Darken the Density setting in the printer driver.
Turn off the printer. Take out the developer cartridge, shake it gently from side to side to distribute the toner, and then reinstall it. If the problem persists, see Replacing Consumable Products.
Lighten the Density setting in the printer driver.
If the problem persists, see Replacing Consumable Products.
Toner may have spilled onto the paper feed path. Turn off the printer. Remove the developer cartridge and the photoconductor unit and then clean the paper path inside the printer using a clean, dry, lint-free cloth.
| Warning: |
| Opening the printer exposes the fuser, which is marked by a CAUTION Hot Surface Avoid Contact label. Be careful not to touch the fuser. If the printer has been in use, the fuser may be very hot. |
Printing stops due to a lack of memory. To correct the error, press the Continue button. If the problem persists, press the ALT and Form Feed buttons simultaneously to reset the printer. You can also clear this error by turning the printer off and back on again.
However, it may be necessary to reduce the number or size of fonts, reduce the number or size of graphics, lower the resolution, or add more memory to the printer.
The printer does not have sufficient memory to collate print jobs. Only one set of copies will be printed. Reduce the contents of print jobs, or add more memory. Press the Continue button to clear the warning.
The printer could not print at the required quality level due to insufficient memory and automatically reduced the print quality so that it could continue printing. Check to see if the printout is acceptable. If not, add more memory for a permanent solution or temporarily set Print Quality to 600 dpi and Page Protect to Off in the printer driver.
Make sure you have selected the correct paper source in your printer driver.
There may be no paper in the 500-Sheet Lower Paper Cassette Unit. Load it with paper.
Be sure that the 500-Sheet Lower Paper Cassette Unit is properly installed and that you have not tried to load it with too many sheets of paper. The cassette can hold a maximum of 500 sheets of 75g/m2 (20 lb) paper.
The 500-Sheet Lower Paper Cassette Unit may not be installed properly. See 500-Sheet Lower Paper Cassette Unit for instructions on installing the 500-Sheet Lower Paper Cassette Unit.
See Feed jam when using the optional 500-Sheet Lower Paper Cassette Unit.
EPSON Status Monitor 3 monitors the printer at regular intervals. You may need to wait until EPSON Status Monitor 3 monitors the printer again, and automatically updates the status.
If your computer did not have Windows 98 pre-installed, it is an upgrade from Windows 95 to 98. It may not support USB connectors, and may not print. Confirm whether your computer supports USB connectors by calling the manufacturer.
Some problem may have disrupted the plug-and-play installation of the printer driver. With the printer turned on and connected to the computer through a USB cable, right-click the My Computer icon and choose Properties. Click the Device Manager tab and check if USB printer or EPL-5800 appears under unknown device. If it does, disconnect the USB cable from the printer, reconnect it, and reinstall the printer driver.
The printer port setting may be incorrect. Confirm that the correct printer port is chosen in the Details tab of the printer driver's Properties dialog box.
The computer does not recognize the printer connection. Make sure that the printer's power is on. If you are using the USB interface and your printer does not appear in the Printers folder, try disconnecting and then reconnecting the USB cable. If this does not resolve the problem, try reinstalling the printer driver. See the Setup Guide for more information.
Check that the power cord is properly plugged into the electrical outlet and that the printer is turned on.
The printer may be initializing itself or running a self-test. Give the printer enough time to complete the initialization process.
Make sure that the printer is online and ready to print. The On Line light on the control panel is on solid when the printer is online.
Monitoring of shared printers is set internally by the EPSON Status Monitor 3 utility. To monitor Windows shared printers, right-click Network Neighborhood and then click Properties. Verify that File and printer sharing for Microsoft Networks is shown in the list of installed components.
Also, verify that EPSON Status Monitor 3 is installed in the computer hosting the Windows shared printer, and be sure that the Allow monitoring of shared printers check box is selected in the Monitoring Preferences dialog box.
| Version 1.00E, Copyright © 2001, SEIKO EPSON CORPORATION |