|

Reference Guide
|
|
How to / Using Options
Memory Modules
 Installing a memory module
Removing a memory module
Your printer comes with 64 MB of standard memory. You can increase printer memory up to 1024 MB by installing optional DIMMs (Dual In-line Memory Modules). Increasing the printer's memory is recommended if you regularly use numerous downloaded fonts or print graphics-intensive pages.
This printer has two memory slots, but one slot has a 64 MB DIMM already installed in it at the time of manufacture. To increase printer memory more than 578 MB, you have to remove the original 64 MB DIMM first and then install two optional DIMMs.
See Memory modules for details about memory module requirements.
Installing a memory module
Follow these steps to install a memory module:
 |
Caution:
|
 |
Before you install a memory module, be sure to discharge any static electricity by touching a grounded piece of metal. Otherwise, you may damage static-sensitive components.
|
 |
Warning:
|
|
Be careful when working inside the printer as some components are sharp and may cause injury.
|
 |
Turn the printer off and unplug the power cord.
|
 |
Remove all interface cables from the interface connectors.
|
 |
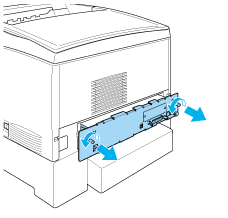
Loosen the two screws on the back of the printer.
|
| |
Warning:
|
| |
Removing other screws and covers will expose high voltage areas.
|
 |
Pull out the circuit board tray.
|

 |
Identify the memory slot. Its position is shown below.
|

1. Memory slot S0
2. Memory slot S1
 |
Hold the memory module above the memory slot and insert it into the slot until the clips come up to hold the memory module securely in place. Do not apply too much force.
|


| |
Caution:
|
| | -
Do not force the memory into the slot.
|
| | -
Be sure to insert the memory facing the correct way.
|
| | -
Do not remove any modules from the circuit board. Otherwise, the printer will not work.
|
| | -
Make sure that one module (more than 64 MB) is installed in the S0 slot.
|
 |
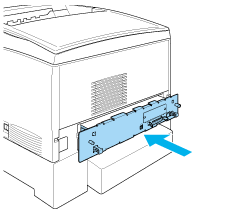
Slide the circuit board tray into the printer.
|
 |
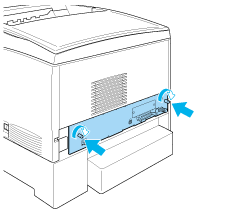
Fasten the circuit board tray with the two screws.
|
 |
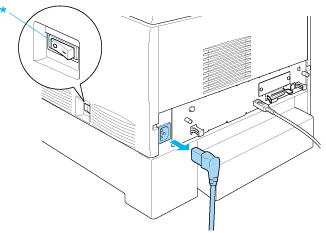
Reconnect all the interface cables and the power cord.
|
 |
Plug the printer's power cord into an electrical outlet.
|
 |
Turn on the printer.
|
To confirm that the memory module is installed correctly, print a status sheet. See Printing a Status Sheet for instructions. If the total amount of memory listed does not include the size of the optional memory module, try reinstalling the module. Make sure that the module is securely seated into the memory slot on the circuit board.
 |
Note:
|
|
If you are using Windows, and EPSON Status Monitor 3 is not installed, you have to make settings manually in the printer driver. Click the Update the Printer Option Information Manually button on the Optional Settings menu, then click Settings. Then select the number of bytes of the memory you installed from the Installed Memory drop-down list on the Optional Settings dialog box and click OK.
|

[Top]
Removing a memory module
Follow these steps to remove a memory module:
|
Caution:
|
|
Before you remove a memory module, be sure to discharge any static electricity by touching a grounded piece of metal. Otherwise, you may damage static-sensitive components.
|
|
Warning:
|
|
Be careful when working inside the printer as some components are sharp and may cause injury.
|
|
|
Turn the printer off and unplug the power cord.
|
* OFF
|
|
Remove all interface cables from the interface connectors.
|
|
|
Loosen the two screws on the back of the printer.
|
| |
Warning:
|
| |
Removing other screws and covers will expose high voltage areas.
|
|
|
Pull out the circuit board tray.
|
|
|
Identify the memory slot. Its position is shown below.
|
1. Memory slot S0
2. Memory slot S1
|
|
Grasp both sides of the memory module and pull the module out.
|
| |
Caution:
|
| | -
Do not remove any other modules from the circuit board. Otherwise, the printer will not work.
|
| | -
Make sure that the more than 64 MB memory module is installed in the S0 slot. Otherwise, the printer will not work.
|
|
|
Store the memory module in an anti-static packet such as the one it came packaged in.
|
|
|
Slide the circuit board tray into the printer.
|
|
|
Fasten the circuit board tray with the two screws.
|
|
|
Reconnect all the interface cables and the power cord.
|
|
|
Plug the printer's power cord into an electrical outlet.
|
 |
Turn on the printer.
|
[Top]
| Version 1.00E, Copyright © 2002, SEIKO EPSON CORPORATION |

