|

Administrator's Guide
|
|
Configuring the Internal Print Server / EpsonNet MacAssist Configuration Utility
Configuring Your Printer Using EpsonNet MacAssist
 About passwords
Use EpsonNet MacAssist to configure the Internal Print Server as described below.
 |
Turn on your printer.
|
 |
Double-click the EpsonNet MacAssist icon.
|
 |
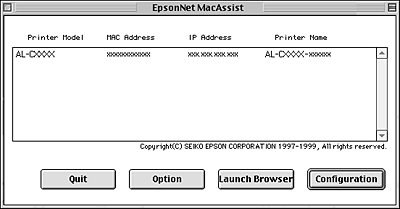
Select the printer you want to configure from the list and click Configuration.
|
 |  |
Note:
|
| | -
If the same printer model name appears multiple times in the list, you can distinguish the printers by their MAC addresses, which are found on the network status sheet.
|
|
| | -
You can search printers in other zones just like a computer by changing the Zone setting in the Option dialog box. See Options for more information.
|
|
 |
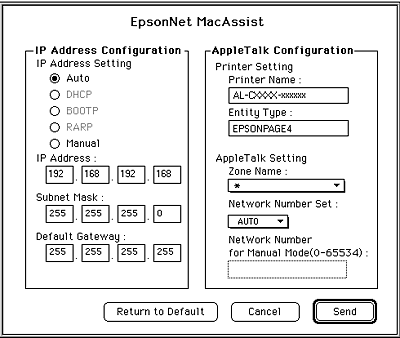
The IP Address Configuration and the AppleTalk Configuration dialog box appears.
|
 |
Set the following options in the IP Address Configuration box.
|
IP Address Setting:
When you select Auto, DHCP becomes available and assigns an IP address automatically. If you want to set the IP address manually, select Manual.
| |
Note:
|
| | |
Whenever the printer is turned on, you need to change the printer port setting if Auto is selected for Get IP address. For TCP/IP printing, we recommend selecting Manual and setting the IP address manually.
|
|
IP Address:
Enter an IP address. Be sure to give an IP address which does not conflict with any other device on the network. The default value is 192.168.192.168.
Subnet Mask:
Enter the Subnet Mask. The default value is 255.255.255.0.
Default Gateway:
Enter the default gateway address. If there is a server or a router which functions as a gateway, enter the IP address of the server or the router. If there is no gateway, leave the default values. The default value is 255.255.255.255.
 |
Set the following options in the AppleTalk Configuration box.
|
Printer Name:
Enter the printer name (up to 32 characters). The default name is shown below.
Printer product name-xxxxxx
(xxxxxx is a substitute for the last 6 digits of the MAC address)
Entity Type:
Displays the printer's entity type. Do not change the entity type unless "epson" is displayed. If "epson" is displayed, you need to enter the entity type to match the driver for the printer.
Zone Name:
Select the network zone in which you want the printer to appear. To have the zone selected automatically, select Auto as the Network number set option and enter an asterisk (*) in this box.
Network Number Set:
Select either Auto or Manual. Auto is usually preferred.
Network Number for Manual Mode:
Type a value between 0 and 65534 when Manual is selected for Network Number Set.
 |
After making settings, click Send. The Password dialog box appears.
|
 |
Enter your password (up to 20 characters) and click OK to save settings. If you are entering a password for the first time, click Change and set the password. For more information about passwords, see About passwords.
|
After updating is complete, refresh the configuration. To do this, quit and restart EpsonNet MacAssist.
|  |
Caution:
|
| | |
Since it takes 2 or 3 minutes to send new settings to the Internal Print Server, wait until an on-screen message appears to indicates that you can turn off your printer.
|
|
About passwords
The password is required to configure the Internal Print Server. When you click OK in the setting dialog box or click Return to default, the Password dialog box appears.
|
|
To set the password or to change the current password, click Change.
|
|
|
In the Administrator password dialog box, enter a password (up to 20 characters) and click OK. Passwords are case sensitive.
|
| |
Note:
|
| | -
The password is used for EpsonNet WinAssist, MacAssist, and WebAssist.
|
|
| | -
Since the new password takes effect after the data is sent to the Internal Print Server, enter the old password immediately after changing the password.
|
|
| | -
If you forget your password, you need to initialize the Internal Print Server. See Initializing Your Printer for instructions.
|
|

[Top]
| Version 1.00E, Copyright © 2002, SEIKO EPSON CORPORATION |

