![]()
Administrator's Guide
|
|
Index |
|
Search | |||||||
|
|
Contents |
|
Help | |||||||
|
|
|
|||||||||||||||||||||||||||||||||
Easy Setup for Windows Me/98/95
Installing EpsonNet WinAssist
You can set an IP address to the Internal Print Server, using EpsonNet WinAssist Easy Setup.
| Note: |
|
 | Insert the software CD-ROM shipped with the printer in the CD-ROM drive. |
 | The EPSON Installation Program starts automatically. |
If the EPSON Installation Program does not start automatically, click Start and then Run. Type D:\EPSETUP.EXE and then click OK. (Substitute the appropriate letter for your CD-ROM drive if necessary.)
 | Double-click Install EPSON Network Utility. |
 | Double-click Install EpsonNet WinAssist. |
 | Follow the on-screen instructions to complete the installation. |
| Note: |
|
|
| Click Start, point to Programs and EpsonNet WinAssist, and then select EpsonNet WinAssist EasySetup. |
|
| In the EpsonNet WinAssist Easy Setup dialog box, click Next. |
|
| Read the Usage Agreement and click Next. |
|
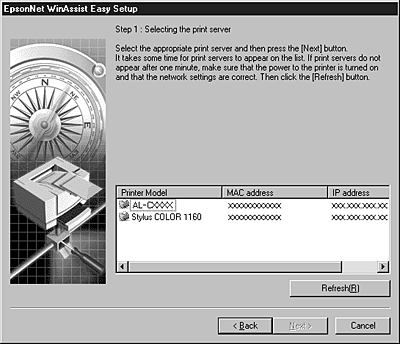
| Select the target printer and click Next. |
| Note: |
|
|
| Specify whether to use the Microsoft network sharing service, and then click Next. (If you select No, proceed to step 8.) |

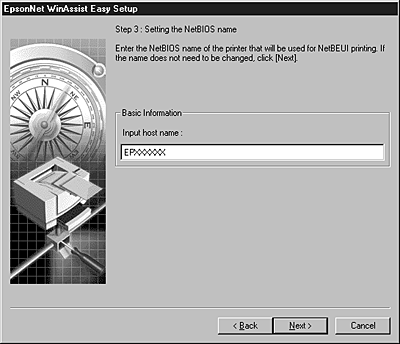
 | Check the host name (NetBIOS name) and change it if necessary. Click Next to proceed. |
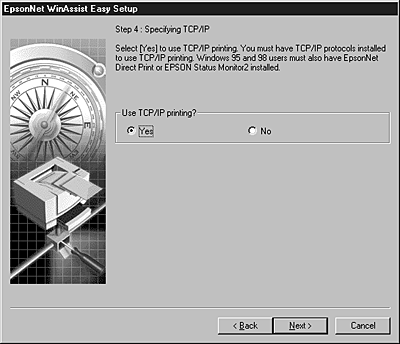
 | Select Yes and then click Next. (If you select No, proceed to step 9.) |
 | Select Auto or Manual. If you select Auto, DHCP becomes available and assigns an IP address automatically. If you select Manual, you can enter the IP address manually. Click Next. |
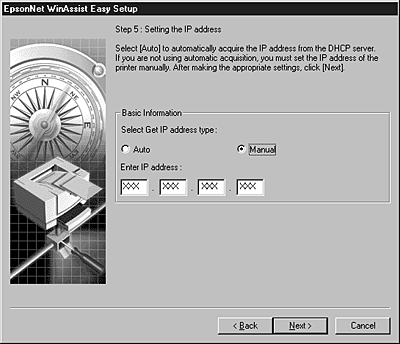
| Note: |
|
|
 | Check your settings and click Send. |
If you have set a password for the Internal Print Server, the Password dialog box appears. Enter your password (up to 20 characters) and click OK to save your settings. Follow the on-screen instructions.
| Caution: |
|
 Previous |
 Next |
| Version 1.00E, Copyright © 2002, SEIKO EPSON CORPORATION |