|

Reference Guide
|
|
Setup & Maintenance / Installing Options
Optional Paper Cassette Unit
 Handling precautions
 Installing the optional paper cassette unit
 Removing the optional paper cassette unit
For details about the paper types and sizes that you can use with the optional paper cassette unit, see Optional paper cassette unit. For specifications, see Optional 500-Sheet Paper Cassette Unit.
 |
Note:
|
 | |
Load paper with the printable surface facing up.
|
|
Handling precautions
Always pay attention to the following handling precautions before installing options:
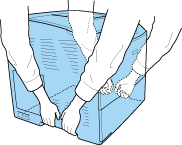
The printer weighs about 28 kg (62 lb). One person should never attempt to lift or carry it alone. Two people should carry the printer, lifting it from the positions shown below.

 |
Warning:
|
 | |
If you lift the printer incorrectly, you could drop it and cause injury.
|
|

[Top]
Installing the optional paper cassette unit
Follow the steps below to install the optional paper cassette unit.
 |
Turn the printer off and unplug the power cord and interface cable.
|
 |
Take the optional paper cassette unit out of the cardboard box, then remove the protective materials in the cassette.
|
 |
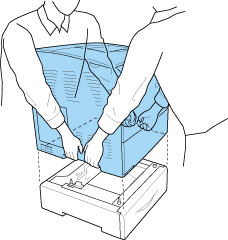
Place the optional paper cassette unit where you intend to set up the printer. Then, put the printer onto the optional paper cassette unit. Align each of the printer's corners with those of the unit, then lower the printer until it rests securely on the unit.
|

 |  |
Warning:
|
 |  | |
Two people should lift the printer by the correct positions.
|
|
 |  |
Note:
|
 |  | |
The printer and optional paper cassette unit are heavy so it is necessary to carry them separately when you transfer them.
|
|
 |
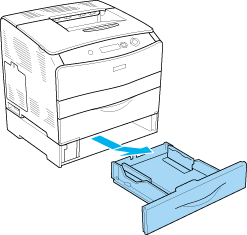
Remove the paper cassette from the optional paper cassette unit.
|

 |
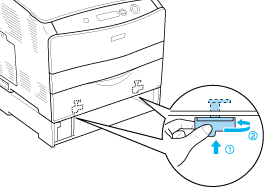
Push up the fixing tabs inside the optional paper cassette unit, then turn them in a clockwise direction to fix the unit and the printer together.
|

 |
Reinsert the paper cassette into the optional paper cassette unit.
|
 |
Reconnect the interface cable and power cord, then turn the printer on.
|
 |
Note for Windows users:
|
 | |
If EPSON Status Monitor 3 is not installed, you have to make settings manually in the printer driver. See Making Optional Settings.
|
|
 |
Note for Macintosh users:
|
 | |
When you have attached or removed printer options, you need to delete the printer using Print Setup Utility (for Mac OS X 10.3), Print Center (for Mac OS X 10.2 or below), or Chooser (for Mac OS 9), and then re-register the printer.
|
|

[Top]
Removing the optional paper cassette unit
Perform the installation procedure in reverse.

[Top]
| Version NPD0075-01, Copyright © 2005, SEIKO EPSON CORPORATION |
Handling precautions
Installing the optional paper cassette unit
Removing the optional paper cassette unit