 |
|
|||
 |
||||
Troubleshooting
Printer stops printing unexpectedly
Head cleaning, ink charging, or ink drying is in progress
During head cleaning, ink charging, and ink drying, CLEANING PLEASE WAIT, CHARGING INK, and INK DRYING appears on the LCD panel respectively. Wait until the printer resumes printing.
An error has occurred
Many common printer problems can be identified by the messages on the LCD panel.
You can also check the lights on the control panel for errors. See Lights.
For other messages not included in the following table, see Messages.
Error messages
|
Message
|
Description
|
What to do
|
|
REPLACE MAINTENANCE
CARTRIDGE SOON |
The maintenance cartridge is almost full.
|
Although you can continue printing, you need to replace the maintenance cartridge with a new one immediately. See Replacing the Maintenance Cartridge.
|
|
NOT ENOUGH
EMPTY SPACE REPLACE THE MAINTENANCE CARTRIDGE |
The maintenance cartridge is almost full.
|
Replace the maintenance cartridge with a new one. See Replacing the Maintenance Cartridge.
|
|
INK LOW
|
The ink cartridge is nearly expended.
|
Replacement of the ink cartridge is nearly needed.
Although you can continue printing in INK LOW situation, it may decline the print quality. |
|
MAINTENANCE REQUEST NNNN
|
A part used in the printer has nearly reached the end of its life. "NNNN" shows the code of the part.
|
Note the code and contact your dealer. See Contacting Customer Support.
|
|
CLEANING ERROR
PRESS THE DOWN BUTTON AND REMOVE THICK PAPER
|
Cleaning cannot be executed because thick paper is loaded.
|
Remove the thick paper.
|
|
PAPER REMOVE
REMOVE PAPER FROM THE REAR
|
The paper is removed from the rear manual feed slot.
|
Remove the paper from the rear manual feed slot.
|
|
PAPER FEED ERROR
LOAD PAPER CORRECTLY
PRESS THE DOWN BUTTON
|
Double-sided printing has been performed, and the printer could not feed the paper correctly.
|
Load the paper which just has been ejected, and then press the Paper Feed/Down
 button. button. |
|
PAPER EJECT ERROR
PRESS THE DOWN BUTTON AND REMOVE PAPER
|
The printer could not eject the printout.
|
Press the Paper Feed/Down
button, and then remove the printout. |
|
PAPER JAM
REMOVE PAPER
|
The paper is jammed.
|
Remove the jammed paper. See Clearing paper jams for details.
|
|
CLEANING ERROR
PRESS THE CANCEL/RESET BUTTON
|
The nozzles are still clogged.
|
Press the Cancel/Reset
 button. Then, run the Head Cleaning utility. For Windows, see Using the Printer Utilities. For Mac OS X, see Using Printer Utilities. button. Then, run the Head Cleaning utility. For Windows, see Using the Printer Utilities. For Mac OS X, see Using Printer Utilities. |
|
PAPER SENSOR ERROR
PRESS THE
BUTTON.LOAD THE CORRECT PAPER
|
The loaded paper does not match the paper type selected for the Auto Head Alignment.
|
Press the Cancel/Reset
button, and then load the paper that matches with the paper type selected for the Auto Head Alignment. See Aligning the print head automatically for details. |
|
PAPER SENSOR ERROR
PRESS THE
BUTTONLOAD DIFFERENT PAPER
|
The loaded paper does not match the paper type selected.
|
Press the Cancel/Reset
button, and then load the paper that matches with the paper type. See Aligning the print head automatically for details. |
|
PAPER SIZE ERROR
LOAD THE CORRECT SIZE PAPER
|
The loaded paper size does not match the data size.
|
Match the loaded paper size to the data size.
|
|
PAPER ERROR
LOAD PAPER
|
No paper is loaded in the printer.
|
Load paper correctly.
|
|
BORDERLESS ERROR
PRESS THE DOWN BUTTON.
LOAD THE CORRECT SIZE PAPER
|
The paper installed is not supported for borderless printing, or the PAPER SIZE CHECK setting is off.
|
Press the Paper Feed/Down
button, and then load a different size of cut sheet media. Also, select ON for PAPER SIZE CHECK on the printer’s control panel. See Borderless Printing. |
|
PAPER ERROR
PRESS THE DOWN BUTTON.
LOAD PAPER CORRECTLY
|
The printer cannot detect the loaded cut sheet media, because it is wavy or curled.
|
Flatten the cut sheet media.
|
|
The printer cannot detect the loaded cut sheet media, because the color of the paper is either transparent or black like the platen color.
|
Select OFF for PAPER SIZE CHECK on the printer’s control panel, or load the genuine Epson paper.
|
|
|
PAPER SKEW
PRESS THE DOWN BUTTON.
LOAD PAPER CORRECTLY
|
The paper is not loaded straight.
|
Press the Paper Feed/Down
button, and then load the paper straight. |
|
PAPER SETTING ERROR
CHECK PAPER SOURCE IN THE DRIVER SETTINGS AND LOAD PAPER CORRECTLY
|
The paper path is wrong.
|
Check the Paper Source setting in the printer driver, and load the paper correctly.
|
|
COMMAND ERROR
CHECK DRIVER SETTINGS
|
Damaged data has been sent to the printer.
|
Stop printing, and press the Cancel/Reset
button for 3 seconds. |
|
The printer receives data with a wrong command.
|
||
|
The installed printer driver is not correct for the printer.
|
Stop printing, and press the Cancel/Reset
button for 3 seconds. Then make sure that the installed printer driver is correct for the printer. |
|
|
INK CARTRIDGE
REPLACE INK CARTRIDGE
|
The ink cartridge is expended.
|
Install a new ink cartridge.
|
|
INK CARTRIDGE ERROR
CHECK CARTRIDGE
|
An ink cartridge with the wrong product code is installed.
|
Remove the ink cartridge, and install the ink cartridge with the correct product code. See Consumable Products.
|
|
INK CARTRIDGE ERROR
PLEASE INSTALL THE CORRECT CARTRIDGE
|
An ink cartridge that cannot be used with this printer is installed.
|
Remove the ink cartridge, and install an ink cartridge that can be used with this printer. See Consumable Products.
|
|
INK CARTRIDGE
PLEASE USE GENUINE EPSON INK CARTRIDGES
|
Non-genuine ink cartridge is installed.
|
Replace the ink cartridge with a genuine Epson ink cartridge. See Replacing Ink Cartridges and Consumable Products.
|
|
INK CARTRIDGE
NON-GENUINE CARTRIDGE!
QUALITY OF NON-GENUINE INK MAY VARY. INK CARTRIDGE
THIS MAY NOT
PERFORM AT OPTIMUM. CONTINUE? <ACCEPT DECLINE>
|
Non-genuine ink cartridge is installed.
|
Select DECLINE (press the Menu/Right
 button) to replace the ink cartridge with a genuine Epson ink cartridge. See Replacing Ink Cartridges. Otherwise, select ACCEPT (press the Back/Left button) to replace the ink cartridge with a genuine Epson ink cartridge. See Replacing Ink Cartridges. Otherwise, select ACCEPT (press the Back/Left  button). button). |
|
INK CARTRIDGE ERROR
REPLACE CARTRIDGE
|
An error has occurred while reading or writing data.
|
Remove the ink cartridge and reinstall it. If this message appears after reinstalling the ink cartridge, replace it. See Replacing Ink Cartridges.
|
|
NO INK CARTRIDGE
INSTALL INK CARTRIDGE
|
No ink cartridge is installed.
|
Install an ink cartridge.
|
|
FRONT SLOT CLOSED
OPEN THE FRONT MANUAL FEED SLOT
|
The front manual feed slot is closed during operation.
|
Open the front manual feed slot by pushing it. If necessary, remove the paper.
|
|
FRONT FEED SLOT OPEN
LOAD MEDIA AND
PRESS THE DOWN BUTTON
|
The front manual feed slot is open, but no paper is loaded.
|
Load a sheet of paper in the front manual feed slot, and then press the Paper Feed/Down
button. |
|
FRONT FEED SLOT OPEN
CLOSE THE FRONT MANUAL FEED SLOT
|
The front manual feed slot is opened during operation.
|
Close the front manual feed slot by pushing it.
|
|
FRONT FEED SLOT OPEN
PRESS THE DOWN BUTTON AND REMOVE PAPER
|
The front slot error has occurred.
|
Press the Paper Feed/Down
button, and then remove the paper from the front manual feed slot. |
|
MAINTENANCE CART.
REPLACE MAINTENANCE CARTRIDGE
|
The maintenance cartridge is full.
|
Replace the maintenance cartridge with a new one. See Replacing the Maintenance Cartridge.
|
|
MAINTENANCE
PLEASE USE GENUINE EPSON CARTRIDGES
|
Non-genuine maintenance cartridge is installed.
|
Replace the maintenance cartridge with a genuine Epson cartridge. See Replacing the Maintenance Cartridge and Consumable Products.
|
|
MAINTENANCE
NON-GENUINE MAINTENANCE CARTRIDGE INSTALLED. MAINTENANCE CAPACITY
TO ABSORB INK MAY VARY. CONTINUE? <YES NO>
|
Non-genuine maintenance cartridge is installed.
|
Select No (press the Menu/Right
button) to replace the maintenance cartridge with a genuine Epson maintenance cartridge. See Replacing the Maintenance Cartridge. Otherwise, select YES (press the Back/Left button). |
|
MAINTENANCE CARTRIDGE ERROR
REPLACE THE CARTRIDGE
|
The maintenance cartridge is not set in the printer.
|
Install the maintenance cartridge.
|
|
NOT ENOUGH INK
REPLACE INK CARTRIDGE WITH A NEW ONE
|
The ink cartridge is nearly expended.
|
Replace the ink cartridge with a new one. See Replacing Ink Cartridges for details.
|
|
CANNOT OPEN COVER
IS THERE ANYTHING ON THE PRINTER?
PRESS THE UP BUTTON
|
Something may be placed on the printer (ink cover).
|
Remove whatever is placed on the printer (ink cover). Then press the Ink Cover Open/Up
 button. button. |
|
PAPER FEED ERROR
LOAD PAPER CORRECTLY AND PRESS PAPER/FEED BUTTON
|
The printer could not feed the paper.
|
Set the paper correctly, and then press the Paper Feed/Down
button. |
|
PAPER FEED ERROR
REMOVE PAPER AND LOAD PAPER CORRECTLY
|
The printer could not feed the paper.
|
Remove the paper, and then load the paper correctly.
|
|
INK COVER OPEN
CLOSE THE INK COVER
|
The ink cover is open.
|
Close the ink cover.
|
|
MAINTENANCE COVER OPEN
CLOSE THE MAINTENANCE COVER
|
The maintenance cartridge cover is open.
|
Close the maintenance cartridge cover.
|
|
NO MAINTENANCE CART.
INSTALL THE MAINTENANCE CARTRIDGE
|
The maintenance cartridge is not set in the printer.
|
Install the maintenance cartridge.
|
|
PAPER JAM
CLEAR JAMMED PAPER
SEE PRINTER GUIDE FOR INSTRUCTIONS
|
The paper may be jammed.
|
Remove the jammed paper. See Clearing paper jams for details.
|
|
CARRIAGE LOCKED
RELEASE THE CARRIAGE LOCK
|
Print head is locked.
|
Remove the protective materials from the print head to release the print head.
|
|
PRINTER ERROR
RESTART THE PRINTER
|
Some errors have occurred.
|
Turn the printer off, and then turn it on again.
|
|
SERVICE CALL ERROR NNNN
PLEASE CONTACT TO THE REPAIR CENTER
|
Print head is locked.
|
Remove the protective materials from the print head to release the print head.
|
|
A fatal error has occurred.
|
Turn the printer off, leave it for a while, and turn the printer on again. If this message appears on the LCD panel again, note the code and contact your dealer. See Contacting Customer Support.
|

The printer does not turn on or stay on
When the Power light does not come on and mechanism initialization does not start even when the Power  button is pressed to turn on the printer, try the following solutions for the problem.
button is pressed to turn on the printer, try the following solutions for the problem.Turn off the printer and make sure the power cord is securely plugged into the printer.
Make sure your outlet works and is not controlled by a wall switch or timer.
Make sure the supplied voltage to the printer matches the rating voltage labeled on the printer. If not, turn off the printer and unplug the power cord immediately. Contact your dealer for assistance. See Contacting Customer Support.
 Caution:
|
If the supplied voltage and rating voltage do not match, do not plug the printer back in again, as damage may occur.
|
The printer prints nothing
The printer is not correctly connected to the computer
Try one or more of these solutions:
Turn off the printer and computer. Make sure the printer’s interface cable is securely plugged into the correct terminal of the computer.
Make sure the interface cable specifications match the specifications for the printer and computer.
Make sure the interface cable is directly connected to the computer without passing through any device, such as a printer switching device, or extension cable.
Your Epson printer is not selected as the default printer
Install the printer driver if it is not installed yet, and follow the steps below to select your Epson printer as the default printer.
For Windows XP x64 and XP
 |
Click Start, click Control Panel, and then click Printers and Faxes.
|
 |
Right-click EPSON Stylus Pro XXXX.
|
 |
Select Set As Default Printer, then close the window.
|
For Windows Vista
|
Click
 , click Control Panel, click Hardware and Sound, and then click Printers. , click Control Panel, click Hardware and Sound, and then click Printers. |
|
Right-click EPSON Stylus Pro XXXX.
|
|
Select Set As Default Printer, then close the window.
|
For Windows 2000
|
Click the Start button, point to Settings and select Printers.
|
|
Right-click EPSON Stylus Pro XXXX in the Printers window.
|
|
Select Set As Default, then close the Printers window.
|
For Mac OS X
Make sure that the printer driver Epson Stylus Pro XXXX is correctly added to the Printer Setup Utility (for Mac OS X 10.3.9 or later), or Printer & Fax (for Mac OS X 10.5 or later) and the correct one is selected.
Printer port setting does not match the printer connection port (for Windows only)
To select the printer port, follow the steps below.
For Windows XP x64 and XP
|
Click Start, click Control Panel, and then click Printers and Faxes.
|
|
Right-click EPSON Stylus Pro XXXX, then select Properties.
|
|
Click the Ports tab.
|
 |
Make sure that your printer port is selected.
|
For Windows Vista
|
Click
, click Control Panel, click Hardware and Sound, and then click Printers. |
|
Right-click EPSON Stylus Pro XXXX, then select Properties.
|
|
Click the Ports tab.
|
|
Make sure that your printer port is selected.
|
For Windows 2000
|
Click Start, point to Settings, and then select Printers.
|
|
Right-click EPSON Stylus Pro XXXX in the Printers window, then select Properties.
|
|
Click the Ports tab.
|
|
Make sure that your printer port is selected.
|
The printer sounds like it is printing, but nothing prints
Try one or more of these solutions:
Run the Head Cleaning utility. For Windows, see Using the Printer Utilities. For Mac OS X, see Using Printer Utilities.
If the Head Cleaning utility does not work, replace the ink cartridges. See Replacing Ink Cartridges.
Printouts are not what you expected
Incorrect, garbled characters, or blank pages print
Try one or more of these solutions:
For Windows, clear any stalled print jobs from the Progress Meter.
If the problem persists, turn off the printer and computer. Make sure the printer’s interface cable is plugged in securely.
Incorrect margins
Try one or more of these solutions:
Check the margin settings in your application.
Make sure the margins are within the printable area of the page. See Printable area.
For Windows, check the Borderless check box in the Main menu. Make sure they are correct for the paper size you are using. See Borderless Printing.
Make sure the paper set position is correct. See Using Cut Sheet Media.
Inverted image
For Mac OS X, turn off the Flip Horizontal setting in the Print Settings dialog. See the online help for more information.
Printed color differs from the color on the screen
Try one or more of these solutions:
Adjust the Color Density in the Paper Configuration dialog. See the online help for more information.
Make sure the media type setting matches the paper being used.
Since monitors and printers produce colors differently, printed colors will not always match on screen colors perfectly. However, the above color systems are provided to overcome color differences.
For Mac OS X, select ColorSync to color match your system in the Printer Color Management selected in the Print dialog. See the online help for more information.
For Mac OS X, select ColorSync to color match your system in the Printer Color Management selected in the Print dialog. See the online help for more information.
You can produce sharper images with more vivid colors.
For Windows, click Custom for the Mode in the Main menu, and select Photo Enhance, and then click Advanced to make the Photo Enhance setting. See the online help for more information.
For Windows, click Custom for the Mode in the Main menu, and select Photo Enhance, and then click Advanced to make the Photo Enhance setting. See the online help for more information.
For Windows, click Custom for the Mode in the Main menu, and select Color Controls, and then click Advanced to adjust color, brightness, etc. as required. See the online help for more information.
For Mac OS X, select Color Controls in the Printer Color Management selected in the Print dialog. See the online help for more information.
For Mac OS X, select Color Controls in the Printer Color Management selected in the Print dialog. See the online help for more information.
A ruled line shifts
Perform the print head alignment. If the problem persists, perform the print head cleaning. For Windows, see Using the Printer Utilities. For Mac OS X, see Using Printer Utilities.
Printout has smears on the bottom edge
Try one or more of these solutions:
If the paper is curled towards the printable side, flatten it or curl it slightly to the opposite side.
For Windows, if you use Epson special media, check the Media Type setting in the Main menu. See the online help for more information.
For Mac OS X, if you use Epson special media, check the Media Type setting in the Print Settings selected in the Print dialog. See the online help for more information.
For paper other than Epson’s, register and select paper thickness in Menu mode. Make sure it is correct for the paper you are using. See Making the paper settings.
Printouts are curled when they are ejected
If the printouts are curled on the output tray, remove the paper before the next sheet of paper is ejected.
Print Quality Could be Better
Click the caption under the illustration that best resembles your printout.
 |
 |
 |
 |
 |
If you are having print quality problems, try the solutions offered here.
Horizontal banding
Try one or more of these solutions:
For Windows, check the Media Type setting in the Main menu. Make sure it is correct for the paper you are using. See the online help for more information.
For Mac OS X, check the Media Type setting in the Print Settings selected in the Print dialog. Make sure it is correct for the paper you are using, see the online help for more information.
For Mac OS X, check the Media Type setting in the Print Settings selected in the Print dialog. Make sure it is correct for the paper you are using, see the online help for more information.
Make sure the printable side of the paper is face-up.
Run the Head Cleaning utility to clear any clogged ink nozzles. For Windows, see Using the Printer Utilities. For Mac OS X, see Using Printer Utilities.
You can also clean the print head nozzles using the control panel. To clean the print head nozzles, press the Menu/Right button for 3 seconds.
You can also clean the print head nozzles using the control panel. To clean the print head nozzles, press the Menu/Right
button for 3 seconds.Check the Paper Feed value. Reduce the value to improve light banding, and increase it for dark banding. See the online help for more information.
Check the ink status light. If necessary, replace ink cartridges. See Replacing Ink Cartridges.
Vertical misalignment or banding
Try one or more of these solutions:
For Windows, turn off the High Speed setting in the Quality Options dialog box. See the online help for more information.
For Mac OS X, turn off the High Speed setting in the Print Settings selected in the Print dialog. See the online help for more information.
For Mac OS X, turn off the High Speed setting in the Print Settings selected in the Print dialog. See the online help for more information.
Run the Print Head Alignment utility. For Windows, see Using the Printer Utilities. For Mac OS X, see Using Printer Utilities.
Faint printout or gaps
Try one or more of these solutions:
Make sure that the ink cartridges do not exceed the expiry date. The expiry date is labeled on the outside of the ink cartridge.
For Windows, check the Media Type setting in the Main menu. Make sure it is correct for the paper you are using. See the online help for more information.
For Mac OS X, check the Media Type setting in the Print Settings selected in the Print dialog. Make sure it is correct for the paper you are using. See the online help for more information.
For Mac OS X, check the Media Type setting in the Print Settings selected in the Print dialog. Make sure it is correct for the paper you are using. See the online help for more information.
Run the Head Cleaning utility to clear any clogged ink nozzles. For Windows, see Using the Printer Utilities. For Mac OS X, see Using Printer Utilities.
You can also clean the print head nozzles using the control panel. To clean the print head nozzles, press the Menu/Right button for 3 seconds.
You can also clean the print head nozzles using the control panel. To clean the print head nozzles, press the Menu/Right
button for 3 seconds.Check the ink status light. If necessary, replace ink cartridges. See Replacing Ink Cartridges.
Select Standard as Platen Gap in the Paper Configuration dialog box. See the online help for more information.
Blurry or smeared printout
Try one or more of these solutions:
For Windows, check the Media Type setting in the Main menu. Make sure it is correct for the paper you are using. See the online help for more information.
For Mac OS X, check the Media Type setting in the Print Settings selected in the Print dialog. Make sure it is correct for the paper you are using. See the online help for more information.
For Mac OS X, check the Media Type setting in the Print Settings selected in the Print dialog. Make sure it is correct for the paper you are using. See the online help for more information.
If the paper you are using is not supported by the printer driver, make the paper thickness setting in Menu mode. See CUSTOM PAPER.
Make sure your paper is dry and the printable side is face-up. Also, make sure you are using the correct type of paper. See Paper.
Ink may have leaked inside the printer; wipe the inside of the printer with a soft, clean cloth.
Run the Head Cleaning utility. For Windows, see Using the Printer Utilities. For Mac OS X, see Using Printer Utilities.
You can also clean the print head nozzles using the control panel. To clean the print head nozzles, press the Menu/Right button for 3 seconds.
You can also clean the print head nozzles using the control panel. To clean the print head nozzles, press the Menu/Right
button for 3 seconds.Color documents print in black only
Try one or more of these solutions:
Make sure the color data settings in your application are correct.
For Windows, make sure Color is set in the Main menu. See the online help for more information.
For Mac OS X, make sure Color is set in the Print Settings selected in the Print dialog. See the online help for more information.
For Mac OS X, make sure Color is set in the Print Settings selected in the Print dialog. See the online help for more information.
Printing could be faster
Try one or more of these solutions:
For Windows, select the High Speed check box in the Quality Options dialog box. See the online help for more information.
For Mac OS X, select the High Speed check box in the Print Settings selected in the Print dialog. See the online help for more information.
For Mac OS X, select the High Speed check box in the Print Settings selected in the Print dialog. See the online help for more information.
For Windows, select Quality Options for the Print Quality in the Main menu. In the Quality Options dialog box, move the slider towards Speed to increase print speed. See the online help for more information.
For Mac OS X, select Automatic mode and move the slider towards Speed in the Print Settings selected in the Print dialog to increase print speed. See the online help for more information.
For Mac OS X, select Automatic mode and move the slider towards Speed in the Print Settings selected in the Print dialog to increase print speed. See the online help for more information.
Do not run too many applications at the same time. Close any applications you are not using.
Change the interface card of your computer to USB 2.0.
Delete unnecessary files to make room on your hard disk drive.
Paper skew occurs when printing on A3 or larger plain paper
Use the edge guide located on the right side of the Auto Sheet Feeder to load the paper straight.
Paper feed or paper jam problems occur frequently
Try one or more of these solutions:
Make sure the paper is not folded or wrinkled.
Make sure the paper is flattened.
Make sure printing occurs within the operational temperature range.
Make sure the paper is not damp.
Make sure the paper is not too thick or too thin. See Paper.
Make sure no foreign objects are inside the printer.
For Windows, check the Media Type setting in the Main menu. Make sure it is correct for the paper you are using. See the online help for more information.
For Mac OS X, check the Media Type setting in the Print Settings selected in the Print dialog. Make sure it is correct for the paper you are using. See the online help for more information.
For Mac OS X, check the Media Type setting in the Print Settings selected in the Print dialog. Make sure it is correct for the paper you are using. See the online help for more information.
Make sure that the platen gap setting matches your paper. You can change the platen gap setting in the PRINTER SETUP of Menu mode. See PLATEN GAP.
For non-Epson special media, check the paper type selected in the CUSTOM PAPER of Menu mode. See Making the paper settings.
Whenever loading non-Epson special media, test if the paper can be loaded correctly before printing.
To clear Paper jams, see Clearing paper jams.
Whenever loading non-Epson special media, test if the paper can be loaded correctly before printing.
To clear Paper jams, see Clearing paper jams.
Clearing paper jams
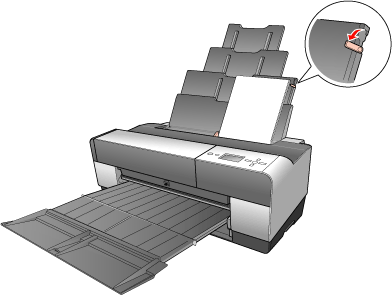
When paper loaded from the Auto Sheet Feeder is jammed
To remove jammed paper, follow the steps below.
|
Turn off the printer.
|
|
Carefully remove the jammed paper.
|
If necessary, open the top cover, and remove the jammed paper.

When paper loaded from the front manual feed slot is jammed
To remove jammed paper, follow the steps below:
|
Turn off the printer.
|
|
Remove the jammed paper from the front or rear side of the printer.
|
Front

Rear

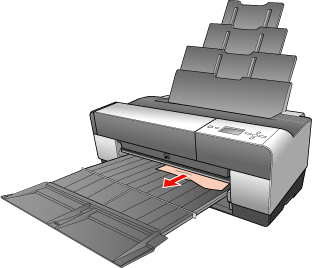
When paper loaded from the rear manual feed slot is jammed
To remove jammed paper, follow the steps below:
|
Make sure the printer is turned on.
|
|
Press the Paper Feed/Down
button to feed the paper back. |
|
Remove the jammed paper from the back.
|
