 |
 |
|
||
 |
||||
Using WCN (Windows Connect Now)
WCN (Windows Connect Now) allows you to set the wireless security automatically when using a USB flash drive in Windows XP with Service Pack 2 (SP2) or later or Windows Vista. Use the Wireless Network Setup Wizard to save the network settings to a USB flash drive, then use the printer’s control panel to load the settings from the USB flash drive to the printer.
Using the Windows Connect Now wizard in Windows Vista
 |
Click the Start button, select Network then Add a wireless device.
|
 |
Click I want to add a wireless device or computer that is not on the list, using a USB flash drive.
|
 |
Click Add the device or computer using a USB flash drive.
|
 Note:
Note:|
If Add a wireless device was previously used, the network selection screen appears. To use settings previously configured on the printer, select a network from the list, and click Next to go to Step 7. To configure new settings, select Create a New Wireless Network Profile, and then click Next.
|
 |
Enter the printer’s access point SSID in Network name (SSID), and then click Next.
|
 Note:
Note:|
If WPA-PSK (TKIP) is used as the encryption method (security), select the Use WPA encryption instead of WEP (WPA is stronger than WEP but not all devices are compatible with WPA) checkbox, and then click Next.
|
 |
Click Show advanced network security options.
|
 |
Select Security method.
|
 Note:
Note:|
If WPA-PSK (TKIP) is used as the encryption method (security), select WPA-Personal. If another method is used, select WEP.
|
 |
Enter your security key or passphrase in the Security key or passphrase field, and then click Next.
|
 |
Click Continue in the User Account Control dialog box.
|
 |
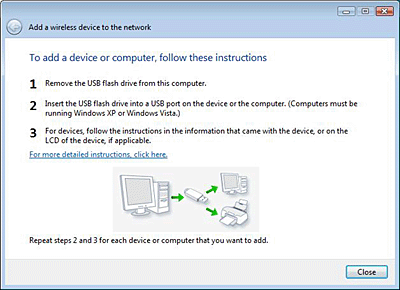
Follow the on-screen instructions. Connect the USB flash drive to an available USB port on the computer.
|

 |
Remove the USB flash drive from the computer when the instructions screen appears.
|
 |
Follow the instructions in the WCN setup on the printer section.
|
Using the Windows Connect Now wizard in Windows XP
 Note:
Note:|
Wireless Connect Now cannot be used if the wireless security type is set to WPA-PSK (AES). USB flash drives with built-in USB hub functionality cannot be used.
|
 |
Click Start then Control Panel.
|
 |
Click Network and Internet Connections then Wireless Network Setup Wizard.
|
 |
Click Next.
|
 Note:
Note:|
If the Wireless Network Setup Wizard was previously used, the Select a task screen appears. To use settings previously configured on the printer, select Add new computers or devices to the xxxxxxx network and go to step 7. To configure new settings, select Set up a new wireless network.
|
 |
Enter the printer’s access point SSID in Network name (SSID), select Manually assign a network key, and then click Next.
|
 Note:
Note:|
If WPA-PSK (TKIP) is used as the encryption method (security), select the Use WPA encryption instead of WEP (WPA is stronger than WEP but not all devices are compatible with WPA) checkbox, and then click Next.
|
 |
Enter the text set on the access point in Network key and Confirm network key, and click Next.
|
 |
Select Use a USB flash drive, and then click Next.
|
 |
Follow the on-screen instructions. Connect the USB flash drive to the computer.
|
 |
Remove the USB flash drive from the computer if the an instruction screen asks you to do so.
|
 |
Follow the instructions in WCN setup on the printer.
|
 |
Connect the USB flash drive to the computer again and click Next.
|
 |
Follow the on-screen instructions.
|
WCN setup on the printer
 |
Enter the Setup mode.
|
 |
Select Network Settings.
|
 |
Select Wireless LAN Setup.
|
 Note:
Note:|
When a memory card is inserted in the printer, a warning message may be displayed. If a message appears, check the message and then click OK.
|
 |
Select Advanced Setup.
|
 |
Select WCN Wireless LAN Setup and then press OK.
|
 |
Follow the instructions on the control panel. If a message appears prompting you to connect the USB flash drive, connect it into the front USB port on the printer.
|
 |
When Establishing the wireless connection with WCN appears on the control panel, disconnect the USB flash drive from the printer and press OK.
|
