 |
 |
|
||
 |
||||
Scanner Problems
The Scanner Does Not Turn On
For all models
Make sure your scanner’s power cord is securely connected to the scanner and a working electrical outlet.
Make sure the electrical outlet works. If necessary, test it by plugging in another electrical device and turn it on.
You Cannot Start Epson Scan
For all models
Wait until the Status light turns green to indicate that the scanner is ready to scan.
Make sure the scanner is turned on.
Turn off the scanner and computer, then check the interface cable connection between them to make sure it is secure.
Use the USB cable that came with your scanner.
 Note:
Note:|
A USB cable is not bundled with the scanner in some areas.
|
Connect the scanner directly to the computer’s USB port or through one USB hub only. The scanner may not work properly when connected to the computer through more than one USB hub.
Make sure your computer supports USB. See Checking For Windows USB Support for instructions.
If you are using any TWAIN-compliant program, such as Adobe Photoshop Elements, make sure that the correct scanner is selected as the Scanner or Source setting.
If you upgraded your computer’s operating system, you need to reinstall Epson Scan. Uninstall Epson Scan as described in Uninstalling Your Scanning Software, then reinstall it as described in the Start Here sheet.
For Windows only:
Make sure your scanner’s name appears under Imaging device without a (?) or an exclamation (!) mark in the Device Manager window. If the scanner’s name appears with one of these marks or as an Unknown device, uninstall Epson Scan as described in Uninstalling Your Scanning Software, then reinstall it as described in the Start Here sheet.
Checking For Windows USB Support
For all models
 |
Do one of the following.
|
Windows Vista: Click the start button icon and select Control Panel.
Windows XP: Click Start and select Control Panel.
Windows 2000: Click Start, point to Settings, and select Control Panel.
 |
Click System and Maintenance and then System (Windows Vista) or double-click the System icon (Windows XP and 2000).
|
 |
Do one of the following.
|
Windows Vista: Click Device Manager, then click Continue in the User Account Control window.
Windows XP and 2000: Click the Hardware tab, then click Device Manager.
 |
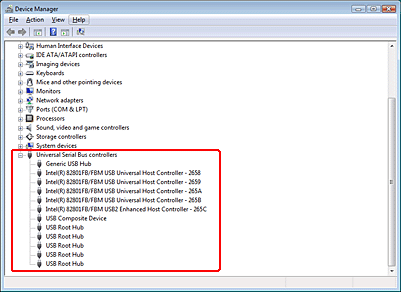
Scroll down and double-click Universal Serial Bus controllers.
|

If a USB Universal Host Controllers and USB Root Hub are listed, Windows supports USB.
 |
Try scanning again. If your scanner still is not recognized, contact your dealer or a qualified servicer for assistance.
|
Scanner Function on the Control Panel Does Not Work Correctly
For Office BX600FW/Office TX600F/SX600FW, Photo PX700W/Photo TX700W, and Photo PX800FW/Photo TX800FW
Make sure Epson Scan is installed correctly.
Windows Vista and XP: Click the Events tab in your scanner’s Properties window and make sure Take no action is not selected. Also, make sure the desired button is selected in the Select an event list box, and Start this program is selected. For details, see Assigning a Program With Windows Vista or Assigning a Program With Windows XP.
Windows 2000: Click the Events tab in your scanner’s Properties window and make sure the Disable device events check box is not checked. Also, make sure the desired button is selected in the Scanner events list box, and the desired application is selected in the Send to this application list. For details, see Assigning a Program With Windows 2000
Mac OS X: Make sure you are logged on as the user who installed the scanner software. Other users must first start Epson Scanner Monitor in the Applications folder and then press the Scan to PC button to scan.
Low Ink Reminder Screen Appears While Scanning
For Office BX600FW/Office TX600F/SX600FW, Photo PX700W/Photo TX700W, and Photo PX800FW/Photo TX800FW
Select Cancel function on the control panel and continue scanning.
