Printer Software
Using the Printer Driver with Windows NT 3.5x
 Accessing the printer driver from Windows applications
 Accessing the printer driver from the Control Panel
 Changing the Printer driver settings
You can access the printer driver from your Windows applications or from the Control Panel. When you access the printer driver from a Windows application, any settings you make apply only to the application you are using. See Accessing the printer driver from Windows applications. When you access the printer driver from the Control Panel, the printer driver settings you make can apply to all your applications. See Accessing the printer driver from the Control Panel. To check and change printer driver settings, see Changing the Printer driver settings.
 |
Note:
|
 | |
While many Windows applications override the settings made with the printer driver, some do not, so you must verify that the printer driver settings match your requirements.
|
|
Accessing the printer driver from Windows applications
To access the printer driver from a Windows application, follow the steps below.
 |
Note:
|
 | |
The steps below provide general guidelines on accessing the printer driver. How you access the printer driver may differ depending on your application. See your application manual for details.
|
|
 |
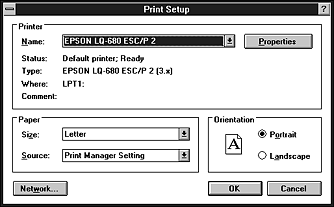
Select Print Setup or Print from the File menu of your application software. The Print or Print Setup dialog box appears.
|

 |
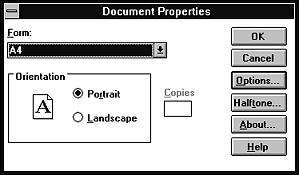
Make sure that your printer is selected and then click Printer, Setup, Properties, or Options. (You may need to click a combination of these buttons.) The screen displays the Document Properties dialog box, which contains the Form and Orientation printer driver settings. See Changing the Printer driver settings to change the settings.
|

 |
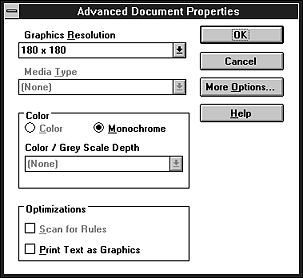
Click Options (or a similar button) to view the Advanced Document Properties dialog box, which includes the Graphics Resolution, Color, and Optimizations printer driver settings. See Changing the Printer driver settings to change the settings.
|


[Top]
Accessing the printer driver from the Control Panel
To access the printer driver from the Control Panel, follow these steps:
 |
In the Main window, double-click the Print Manager icon. The Print Manager window opens.
|
 |
Make sure your printer is highlighted, then click Printer and select Properties. The Printer Properties dialog box appears.
|
 |
Click the Details button, then click Job Default. You see the Document Properties dialog box, which includes the Form and Orientation printer driver settings. See Changing the Printer driver settings to change the settings.
|
 |
Click Options to open the Advanced Document Properties dialog box, which contains the Graphics Resolution, Color, and Optimizations printer driver settings. See Changing the Printer driver settings to change the settings.
|

[Top]
Changing the Printer driver settings
You can change printer driver settings in the Document Properties dialog box and the Advanced Document Properties dialog box. For an overview of the available settings, see Printer Driver Settings Overview. To open these dialog boxes, see the previous sections on accessing the printer driver.
When you finish making your printer driver settings, click OK to apply the settings, or click Cancel to cancel your changes.
Once you've checked your printer driver settings and changed them if necessary, you are ready to print.

[Top]
 Accessing the printer driver from Windows applications
 Accessing the printer driver from the Control Panel
 Changing the Printer driver settings
Accessing the printer driver from Windows applications
Accessing the printer driver from the Control Panel
Changing the Printer driver settings


