|

Reference Guide
|
|
Options and Consumables
Ribbon Cartridge
 Genuine EPSON ribbon cartridge
 Replacing the ribbon cartridge
Genuine EPSON ribbon cartridge
When printing becomes faint, you need to replace the ribbon cartridge. Genuine EPSON ribbon cartridges are designed and manufactured to work properly with your EPSON printer. They ensure proper operation and long life of the print head and other printer parts.
Your printer uses the following ribbon cartridge:
|
EPSON black ribbon cartridge
|
|
FX-880+:
FX-1180+:
|
#8750
#8755
|

[Top]
Replacing the ribbon cartridge
Follow these steps to replace the ribbon cartridge:
 |
Warning:
|
 |
You need to move the print head by hand to replace the ribbon cartridge. If you have just used the printer, the print head may be hot; let it cool for a few minutes before touching it.
|
 |
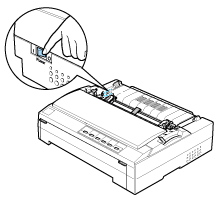
Make sure the printer is turned off. The printer is off when the power switch is pressed down to the  side. side.
|
 |
If the printer is connected to an electrical outlet, unplug it from the outlet.
|
 |
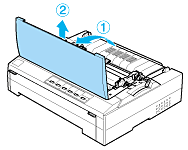
Open the printer cover to the upright position, then pull it up to remove it.
|
 |
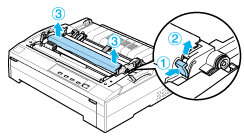
Press the tabs on each side of the paper tension unit upward, then lift the front of the unit and pull it up and out of the printer.
|
 |
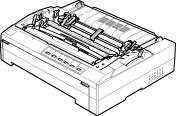
Make sure that the print head is not hot; if it is, let it cool for a few minutes before touching it. Then slide the print head to the middle of the printer by hand.
|
 |
Caution:
|
 |
Never move the print head while the printer is turned on; this can damage the printer.
|
 |
Grasp the used cartridge by its handle and pull it up and out of the printer.
|

 |
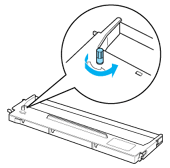
Remove the new ribbon cartridge from the package and turn the ribbon-tightening knob in the direction of the arrow to remove any slack from the ribbon so it is easier to install.
|
 |
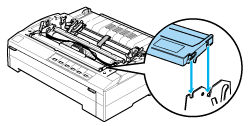
Hold the ribbon cartridge by its handle and insert it into the printer as shown below; then press both sides of the cartridge firmly to fit the plastic hooks into the printer slots.
|
 |
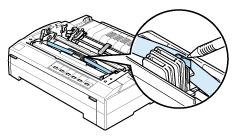
Use a pointed object, such as a ball point pen, to guide the ribbon between the print head and ribbon guide. Turn the ribbon-tightening knob to help feed the ribbon into place; it should not be twisted or creased.
|
 |
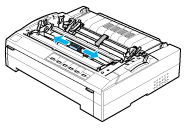
Slide the print head from side to side to make sure it moves smoothly.
|
 |
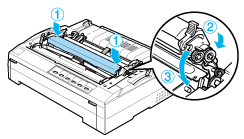
Reinstall the paper tension unit by lowering it onto the printer's mounting pegs. Then press down on both ends of the unit until it clicks into place.
|
 |
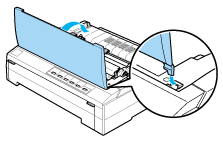
Replace the printer cover by inserting the front tabs into the slots on the printer and lowering the cover into place. Then push it down until it clicks.
|

[Top]
| Version 1.01E, Copyright © 2002, SEIKO EPSON CORPORATION |
Genuine EPSON ribbon cartridge
Replacing the ribbon cartridge