|
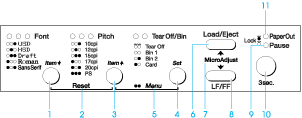
1
|
Font (Item ) button ) button
-
When the printer enters the default setting mode, the button works as an Item
 button. You can press the Item button. You can press the Item button to select the next menu. See Changing default settings. button to select the next menu. See Changing default settings.
Font lights
Indicate which font is selected.
|
|
2
|
Reset
When you press both the Font and Pitch buttons simultaneously, the printer clears buffer and returns to its default settings.
|
|
3
|
Pitch (Item ) button ) button
-
When the printer enters the default setting mode, the button works as an Item
 button. You can press the Item button. You can press the Item button to select the previous menu. button to select the previous menu.
Pitch lights
Indicate which pitch is selected.
|
|
4
|
Tear Off/Bin (Set) button
-
Feeds continuous paper forward to the tear-off position.
-
Feeds continuous paper backward from the tear-off position to the top-of-form position.
-
Selects a cut-sheet feeder bin when the cut-sheet feeder is installed.
-
When the printer enters the default setting mode, the button works as the Set button. You can press the Set button to select the next value of a setting menu.
Tear Off/Bin lights
-
Both of the two lights flash when continuous paper is in the tear-off position, and both of the lights are off when continuous paper is not in the tear-off position.
-
The left light is on when Card mode is selected.
-
Both the lights are off when bin 1 of the optional cut-sheet feeder is selected.
-
The right light is on when bin 2 of the optional cut-sheet feeder is selected.
|
|
5
|
Menu
-
When you press the Pitch and Tear Off/Bin buttons at the same time, the printer enters or exits the default setting mode and you can set the various printer settings. See About Your Printer's Default Settings.
-
When the printer is in the default setting mode, the Menu lights (both the Tear Off/Bin lights) stay on.
|
|
6
|
Load/Eject button
-
Loads a single sheet of paper.
-
Ejects a single sheet of paper if a sheet is loaded.
-
Loads continuous paper from the standby position.
-
Feeds continuous paper backward to the standby position if a sheet is loaded.
|
|
7
|
Micro adjust
When you hold down the Pause button for three seconds, the printer enters the micro adjust mode. In this mode, you can press the LF/FF and Load/Eject buttons to adjust the top of form or tear off position. See Using the Micro Adjust Function.
|
|
8
|
LF/FF button
-
Feeds paper line by line when pressing shortly.
-
Ejects a single sheet or advances continuous paper to the next top-of-form position when held down.
|
|
9
|
Pause light
-
On when the printer is paused.
-
Flashes when the printer is in the Micro Adjust mode.
|
|
10
|
Pause button
-
Stops printing temporarily, and resumes printing when pressed again.
-
When held down for three seconds, enters the Micro Adjust mode. When pressed again, exits the Micro Adjust mode.
|
|
11
|
Paper Out light
-
On when no paper is loaded in the selected paper source or paper is not loaded correctly.
-
Flashes when paper has not been fully ejected or a paper jam has occurred.
|


