![]()
Reference Guide
|
|
Index |
|
Search |
|
Glossary | |||||
|
|
Contents |
|
Help |
|
||||||
|
|
|
|||||||||||||||||||||||||||||||||
How to
Remove the moiré patterns from a scanned image
EPSON Scan provides you with a variety of settings to improve the quality of a scanned image to satisfy your needs. You can easily adjust the quality of the image by selecting the box in the setting window. In this section, you will get the information on what you can do and how you do it.
You can remove a wavy or ripped pattern called "moiré" which tends to happen in areas of halftone color such as skin color. Follow the steps below to remove these patterns.
| Note: |
|
|
|
|
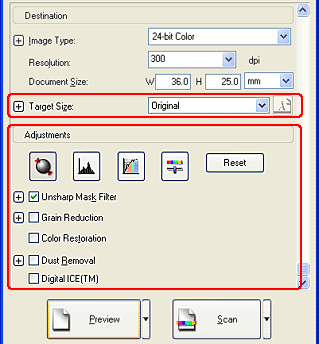
 | Select the Descreening Filter check box in the Adjustments section (you may need to scroll to the bottom of the screen). |
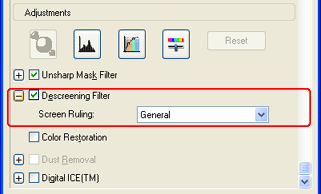
 | Click the + mark (Windows) or the arrow (Mac OS X) to the left of the section, and then select Screen Ruling appropriate for the image being scanned and your purpose. (In the Home Mode, this function is not available.) |
|
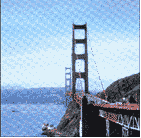
Descreening Filter not applied |
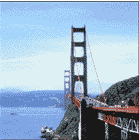
Descreening Filter applied |
 |
 |
If the outline of the original edge of the image is not sharp enough, you can improve the sharpness of the scanned image by using this feature in the Professional Mode. (This feature is automatically enabled in the Home Mode). Follow the steps below.
| Note: |
|
|
| Select the Unsharp Mask Filter check box in the Adjustments section (you may need to scroll to the bottom of the screen). |

|
| Click the + mark (Windows) or the arrow (Mac OS X) to the left of the section, then select the level of adjustment. |
|
Unsharp Mask Filter not applied |
Unsharp Mask Filter applied |
 |
 |
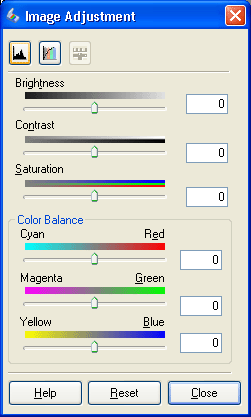
You can liven up the color of a scanned image by adjusting the brightness of color, contrast, or color balance. Follow the steps below.
| Note: |
|
|
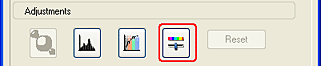
| Click the Image Adjustment button. |
|
| Adjust the items you want to change by sliding the tabs. |
|
Image Adjustment not applied |
Image Adjustment applied |
 |
 |
 | Close the Image Adjustment window by clicking the Close button. |
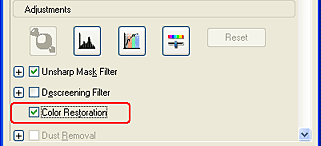
Color Restoration is a scanner software feature that restores faded color on films and photographs. Select the Color Restoration check box to restore color in the Adjustments section (you may need to scroll to the bottom of the screen).
| Note: |
|
|
EPSON Scan provides two features: Dust Removal and Digital ICE™.
Dust Removal
Dust Removal is a scanner software feature that removes dust on films. For the detailed scanning procedure using Dust Removal, see Dust Removal.
| Note: |
|
Digital ICE™
Digital ICE™ is a scanner hardware feature that removes dust and scratch on films and photographs. For the detailed scanning procedure using Digital ICE™, see Digital ICE™.
| Note: |
|
Compared with Dust Removal, Digital ICE™ gives you much higher correction quality in the scanned images. However, Digital ICE™ requires a large amount of system resources and a long scanning time. Therefore, try Digital ICE™ only when you cannot correct the scanned images using Dust Removal.
The following table lists the differences in functions between Dust Removal and Digital ICE™.
|
|
Dust Removal |
Digital ICE™ |
|
Correction quality |
Medium |
High |
|
Scanning time |
Short |
Long |
|
Required system resources |
Small |
Large |
The following table lists document types supported by Dust Removal and Digital ICE™.
|
|
Dust Removal |
Digital ICE™ |
|
Color negative film |
 |
|
|
Color positive film |
|
|
|
Monochrome negative film |
|
N/A |
|
Monochrome positive film |
|
N/A |
|
Photograph (Reflective) |
N/A |
|
|
: Supported
|
| Note: |
|
|
| Note on Digital ICE™: |
|
|
|
|
|
|
Windows |
|
|
OS |
Microsoft® Windows® XP Home Edition/XP Professional/ Me/98 SE/2000 Professional |
|
CPU |
Intel® Pentium® 233 MHz or higher (Pentium III 500 MHz or higher recommended) |
|
RAM |
128 MB or more of available memory (512 MB or more recommended) |
|
Interface |
USB 1.x, USB 2.0, IEEE 1394 with 6 pin-6 pin cable (USB 2.0 or IEEE 1394 recommended) |
|
Mac OS X |
|
|
OS |
Mac OS X 10.2 or later |
|
CPU |
Power Macintosh® G3 or higher (Power Macintosh G4 500 MHz or higher recommended) |
|
RAM |
128 MB or more of available memory (512 MB or more recommended) |
|
Interface |
USB 1.x, USB 2.0, FireWire with 6 pin-6 pin cable (USB 2.0 or FireWire recommended) |
The following table lists an example of the hard disk space and system memory required to scan photographs and films using the Digital ICE™ feature:
|
|
Resolution |
HDD space |
System Memory |
|
6 x 4 inch (152 x 102 mm) photograph |
600 dpi |
157 MB |
185 MB |
|
4800 dpi |
626 MB |
370 MB |
|
|
A4 size (210 x 287 mm) photograph |
600 dpi |
631 MB |
255 MB |
|
4800 dpi |
2524 MB |
510 MB |
|
|
35 mm film |
150 dpi |
1 MB |
8 MB |
|
300 dpi |
1 MB |
15 MB |
|
|
600 dpi |
4 MB |
30 MB |
|
|
1200 dpi |
16 MB |
59 MB |
|
|
2400 dpi |
63 MB |
117 MB |
|
|
3600 dpi |
142 MB |
175 MB |
|
|
12800 dpi |
251 MB |
233 MB |
|
|
Medium format (114 x 56 mm) film |
150 dpi |
4 MB |
34 MB |
|
300 dpi |
8 MB |
70 MB |
|
|
600 dpi |
29 MB |
139 MB |
|
|
1200 dpi |
116 MB |
277 MB |
|
|
2400 dpi |
464 MB |
553 MB |
|
|
3600 dpi |
1042 MB |
830 MB |
|
|
12800 dpi |
1853 MB |
1106 MB |
|
|
4 x 5 inches (94 x 118 mm) film |
150 dpi |
4 MB |
36 MB |
|
300 dpi |
13 MB |
72 MB |
|
|
600 dpi |
51 MB |
144 MB |
|
|
1200 dpi |
202 MB |
287 MB |
|
|
2400 dpi |
805 MB |
573 MB |
|
|
3600 dpi |
1811 MB |
859 MB |
|
|
12800 dpi |
3219 MB |
1145 MB |
Resolutions stated in the above table are actual scanning resolutions supported by Digital ICE™, which do not equal the resolutions that you specify in the scanner software. For example, if you specify 200 dpi in the scanner software, an image is scanned and processed by Digital ICE™ in 300 dpi, and then converted to an image of 200 dpi. Therefore, be sure that the system resources required to scan using Digital ICE™ is determined by the actual scanning resolutions supported by Digital ICE™ listed in the above table.
| Note: |
|
|
Follow the steps below to remove dust on films using Dust Removal in the Professional Mode.
|
| Place your films on the document table. |
 | Placing Films |
| Note: |
|
|
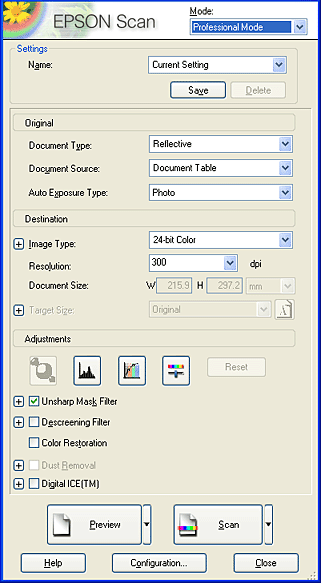
| Start EPSON Scan and then select the Professional Mode. For details on how to select the scanning mode, see Changing a scanning mode. |
The following window appears.
|
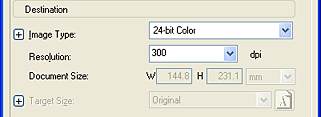
| Specify the Original and Destination settings to match your films. Be sure to select Film (with Film Holder) or Film (with Film Area Guide) for Document Type. |

 | Click Preview to preview the images. |
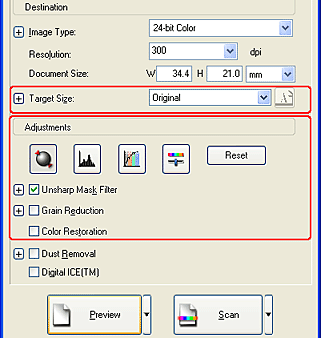
 | Specify the output size of the scanned image as Target Size and make adjustments using the image quality adjustment tools, if necessary. (You may need to scroll to the bottom of the screen.) |
 |
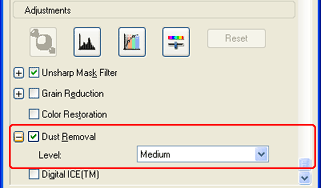
Select the Dust Removal check box. (You may need to scroll to the bottom of the screen.) Click the + mark (Windows) or the arrow (Mac OS X), and the Level list box appears. You can select one of the following level settings of the Dust Removal: Low, Medium or High. |
 | Click Scan. EPSON Scan starts scanning. |
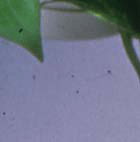
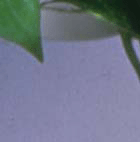
Dust on the films is removed from the scanned images.
|
Dust Removal not applied |
Dust Removal applied |
 |
 |
| Note: |
|
The scanned images are saved to the specified folder.
Follow the steps below to remove dust and scratch on films or photographs using Digital ICE™ in the Professional Mode.
|
| Place your materials on the document table. |
| Placing Films |
| Placing Documents and Photographs |
|
| Start EPSON Scan and then select the Professional Mode. For details on how to select the scanning mode, see Changing a scanning mode. |
The following window appears.
|
| Specify the Original settings to match your document. |
| Note: |
|
|
| Specify the Destination settings to match the resulting image file you desire. |
Specify an image type supported by Digital ICE™ listed in the table below:
|
Image Type |
48-bit Color, 24-bit Color, 16-bit Grayscale, 8-bit Grayscale |
|
| Click Preview to preview the images. |
|
| Specify the output size of the scanned image as Target Size and make adjustments using the image quality adjustment tools, if necessary. (You may need to scroll to the bottom of the screen.) |
|
|
Select the Digital ICE™ check box. (You may need to scroll to the bottom of the screen.) When you scan reflective document, click the + mark (Windows) or the arrow (Mac OS X), the Level list box appears. You can select one of the following level settings of the Digital ICE™: Standard or High. |
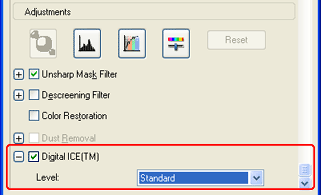
| Note: |
|
|
 | Click Scan. EPSON Scan starts scanning. |
| Note: |
|
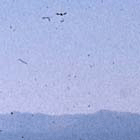
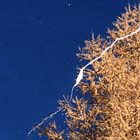
Dust and scratch on the films or photographs are removed from the scanned images.
|
Digital ICE™ not applied |
Digital ICE™ applied |
|
Film |
|
 |
 |
|
Photograph |
|
 |
 |
The scanned images are saved to the specified folder.
| Note: |
|
When grains appear in the scanned image, select the Grain Reduction check box and then click Scan again to reduce them. Selecting the higher Grain Reduction level makes the scanned image softer.
| Note: |
|
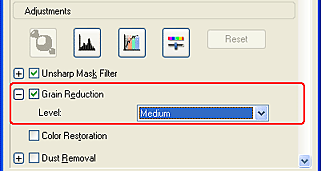
Check if the result of Grain Reduction appears on the scanned image.
|
Grain Reduction not applied |
Grain Reduction applied |
 |
 |
| Note: |
|
PRINT Image Matching is a standardized method of recording a wider range of color information to enhance the quality of your scanned images. Using a printer compatible with PRINT Image Matching, you can effortlessly achieve printouts that come to life with a dynamic range of brilliant colors.
| Note: |
|
Follow the steps below to enhance the quality of your scanned images using EPSON Scan.
|
| Click the arrow to the right of the Scan button and select File Save Settings. |
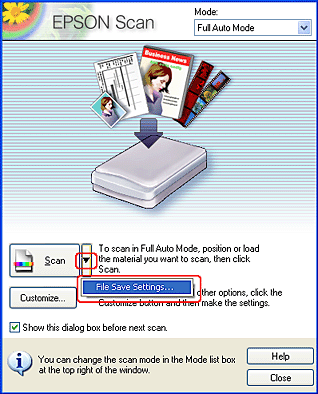
|
| On the File Save Settings dialog box, select PRINT Image Matching II for the Image Format Type setting and then click OK. |
|
PRINT Image Matching II (JPEG) (*.JPG) |
A compressed file format. The compression quality can be selected. The JPEG format enables relatively high compression ratio. However, the higher the compression ratio is, the lower the image quality becomes. (Note that the original data cannot be restored.) In addition, the quality deteriorates every time the data is saved. The TIFF format is recommended in cases where modification, retouch and the like are required. |
|
PRINT Image Matching II (TIFF) (*.TIF) |
A file format created for exchanging data among many applications, such as graphic and DTP software. When scanning black & white images, you can specify the compression type. |
|
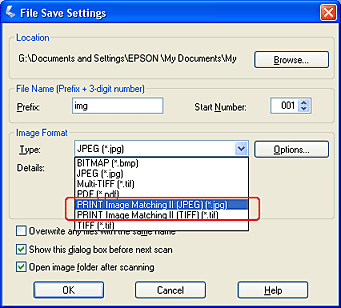
| Select the Professional Mode. For details on how to select the scanning mode, see Changing a scanning mode. |
The following window appears.
|
| Specify the Original and Destination settings to match your documents. |
|
| Click Preview to preview the images. |
|
| Specify the output size of the scanned image as Target Size and specify the Adjustments settings, if necessary. (You may need to scroll to the bottom of the screen.) |
|
| Click Scan. EPSON Scan starts scanning. |
The scanned image is saved to the specified folder.
 Previous |
 Next |
| Version NPD0918-00, Copyright © 2005, SEIKO EPSON CORPORATION |