|

Online Reference Guide
|
|
Troubleshooting / Problems and Solutions
Quality Problems
 Edges of the document are not scanned
 You cannot scan an image or you only get a few dots for the scanned image
 The image does not look the same as the original
 A line of dots is always missing from the scanned image
 Straight lines in the image come out jagged
 The entire image is distorted or blurred
 Part of the image is distorted or blurred
 Colors are patchy or distorted at the edges of the image
 The image is faint or out of focus
 The image is too dark
 Image is dark, with little or no detail
 Scanned image is too large
 Moiré (cross-hatch) patterns appear in the scanned image
 Poor character recognition during OCR scanning
 The printed image is larger or smaller than the original
 Scanned images cannot be printed or come out garbled when printed
 Colors on your monitor are different from those in the original image
 Colors differ from the original
Edges of the document are not scanned
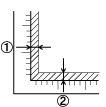
Place documents away from the edges of the document table to avoid unwanted image cropping.
The area with a width of maximum 5 mm from the horizontal guide and 5 mm from the vertical guide is not scanned.

1. Maximum unreadable area of 5 mm
2. Maximum unreadable area of 5 mm

[Top]
You cannot scan an image or you only get a few dots for the scanned image
Try one or more of these solutions:
-
Make sure a document is placed on the document table of the scanner.
-
In the Home Mode or the Professional Mode, select Black&White and change the Threshold setting.

[Top]
The image does not look the same as the original
Try one or more of these solutions:
-
Try different image setting combinations on your scanner software.
-
Your software may not have sufficient color matching and color management features, or these components may not be installed correctly. See the documentation that comes with your software and computer.
-
If you are importing an image file, make sure the file format is one your software can read. Also, make sure the image settings of your software are appropriate for the type of scanned image.

[Top]
A line of dots is always missing from the scanned image
Scanner sensor malfunction is indicated when a line is missing on both screen images and printouts. Contact your dealer.

[Top]
Straight lines in the image come out jagged
Make sure the document orientation is perfectly straight on the document table. Align vertical and horizontal lines with the scales at the top and side of the document table.

[Top]
The entire image is distorted or blurred
Try one or more of these solutions:
-
Make sure the document is flat against the document table.
 |  |
Caution:
|
 |  | |
Do not place heavy objects on the document table.
|
|
-
Make sure you do not accidentally move the document during scanning.
-
Make sure the scanner is on a flat, stable surface.

[Top]
Part of the image is distorted or blurred
Make sure the document is uniformly flat against the document table. A document that is wrinkled or warped may not scan well.
 |
Caution:
|
 | |
Do not place heavy objects on the document table.
|
|

[Top]
Colors are patchy or distorted at the edges of the image
Try one or more of these solutions:
-
A document that is very thick or warped at the edges can cause discoloration. Cover the edges of the document with paper to block outside light.
-
Make sure the document is flat against the document table.
 |  |
Caution:
|
 |  | |
Do not place heavy objects on the document table.
|
|

[Top]
The image is faint or out of focus
Try one or more of these solutions:
-
Make sure the document is flat against the document table.
 |  |
Caution:
|
 |  | |
Do not place heavy objects on the document table.
|
|
-
Adjust your software's Exposure setting using the
 Auto Exposure button in the Professional Mode.
-
Adjust your software's Gamma setting using the Histogram Adjustment dialog box in the Professional Mode.

[Top]
The image is too dark
Try one or more of these solutions:
-
Check your software's Brightness setting using the Image Adjustment tools in the Home Mode or the Histogram Adjustment dialog box and the Image Adjustment dialog box in the Professional Mode.
-
Check the brightness and contrast settings of your computer display.

[Top]
Image is dark, with little or no detail
Try one or more of these solutions:
-
Change the Display Gamma setting of the scanning image for your output device, such as monitor or printer, in the Configuration dialog box.
-
Change the Destination setting in the Home Mode or the Professional Mode main window.
-
In the Home Mode, select Screen/Web as the Destination. Selecting a printer may cause on-screen colors to be different from the colors of the original, however, colors will be reproduced correctly when the image is printed.

[Top]
Scanned image is too large
Change the Target Size setting of the Destination setting in the Home Mode or the Professional Mode main window.

[Top]
Moiré (cross-hatch) patterns appear in the scanned image
A moiré is a cross-hatch pattern that appears on the scanned images when scanning printed materials. It is a result of interference that occurs due to the difference between the pitches of the scanning and the halftone screens.

Try one or more of these solutions:
-
Check the Descreening Filter check box in the Home Mode or the Professional Mode main window.
-
In the Professional Mode, set the Screen Ruling of the Descreening Filter setting to the appropriate setting for your document.
-
Place a transparent sheet such as an overhead projector sheet, between the document and the document table.
-
Reposition the document slightly.
-
Make the image size slightly smaller.

[Top]
Poor character recognition during OCR scanning
Try adjusting the Threshold setting. See Scan Text for more information.

[Top]
The printed image is larger or smaller than the original
The image size and resolution settings of your software determine the size of the printed image. Do not use the size of the monitor image to judge the printed size.

[Top]
Scanned images cannot be printed or come out garbled when printed
Try one or more of these solutions:
-
Make sure your printer is properly connected to the computer, correctly set up, and maintained. See your printer manual for details.
-
Check that your software is properly installed and set up for your printer. See your software manual.

[Top]
Colors on your monitor are different from those in the original image
Try one or more of these solutions:
-
Check the image settings of your scanner software, especially data format (bits, pixel, color), gamma correction, and color correction. Try different combinations of these settings.
-
Check the color matching and color management capabilities of your computer, display adapter, and software. Some computers can change the color palette to adjust the colors on your screen. See your software and hardware manuals for details.
-
Use the color management system for your computer: ICM for Windows, or ColorSync for Macintosh. For Windows, add a color profile that matches your monitor.
-
Exact color matching is very difficult. Check your software and monitor documentation for information on color matching and calibration.

[Top]
Colors differ from the original
Try one or more of these solutions:
-
Change the Display Gamma setting of the scanning image for your output device, such as monitor or printer, in the Configuration dialog box.
-
Change the Image Type setting.
-
Printed colors do not exactly match the colors on your monitor, since printers and monitors use different color systems: monitors use RGB (red, green, and blue), while printers typically use CMYK (cyan, magenta, yellow, and black).

[Top]
| Version 1.00E, Copyright © 2003, SEIKO EPSON CORPORATION |
Edges of the document are not scanned
You cannot scan an image or you only get a few dots for the scanned image
The image does not look the same as the original
A line of dots is always missing from the scanned image
Straight lines in the image come out jagged
The entire image is distorted or blurred
Part of the image is distorted or blurred
Colors are patchy or distorted at the edges of the image
The image is faint or out of focus
The image is too dark
Image is dark, with little or no detail
Scanned image is too large
Moiré (cross-hatch) patterns appear in the scanned image
Poor character recognition during OCR scanning
The printed image is larger or smaller than the original
Scanned images cannot be printed or come out garbled when printed
Colors on your monitor are different from those in the original image
Colors differ from the original