|

Online Reference Guide
|
|
Maintenance and Troubleshooting
Maintenance
 Cleaning the scanner
Replacing the fluorescent lamp
Cleaning or replacing the paper path guide
Cleaning the scanner
To keep your scanner operating at its best, you should clean it periodically, as described below.
 |
Turn off the scanner and unplug the power cord.
|
 |
Clean the outer case with a cloth dampened with mild detergent and water.
|
 |
If the glass of the document table gets dirty, clean it with a soft dry cloth. If the glass is stained with grease or some other hard-to-remove material, use a small amount of glass cleaner and a soft cloth to remove it. Wipe off all remaining liquid.
|
Be sure that there is no dust on the glass of the document table. Dust can cause white spots in your scanned image.
 |
Caution:
|
 | -
Be careful not to scratch or damage the glass of the document table, and do not use a hard or abrasive brush to clean it. A damaged glass surface can decrease the scanning quality.
|
| -
Never use alcohol, thinner, or corrosive solvent to clean the scanner. These chemicals can damage the scanner components as well as the case.
|
| -
Be careful not to spill liquid into the scanner mechanism or electronic components. This could permanently damage the mechanism and circuitry.
|
| -
Do not spray lubricants inside the scanner.
|
| -
Never open the scanner case.
|

[Top]
Replacing the fluorescent lamp
The luminosity of the fluorescent lamp declines over time. If the lamp breaks or becomes too dim to operate normally, the scanner stops working and the indicator light rapidly flashes red. When this happens, the lamp assembly must be replaced. For details, contact your dealer.
|
Caution:
|
|
Never open the case of the scanner. If you think repairs or adjustments are necessary, consult your dealer.
|
[Top]
Cleaning or replacing the paper path guide
If you notice the quality of your scans have declined, or you simply want to keep the quality of your scans at their best, clean the Automatic Document Feeder paper path guide.
If the paper path guide gets badly scratched and cleaning the guide does not improve the quality of your scans, replace it with the spare one.
Follow the instructions below to remove, clean, and reattach the paper path guide.
Removing the paper path guide
|
|
Turn off the scanner.
|
|
|
Take off the paper support.
|
|
|
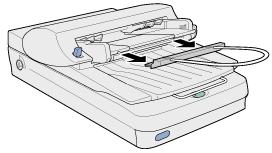
Disconnect the cable for the Automatic Document Feeder, and take the Automatic Document Feeder off the scanner.
|
 |
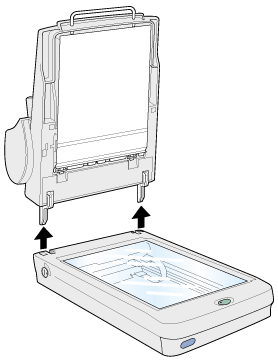
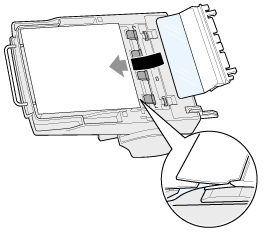
Put the Automatic Document Feeder on the table upside down.
|
 |
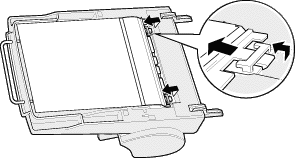
Unclip the two white hooks to release the paper path guide. Pull the hooks out of the through holes.
|
 |
Remove the paper path guide.
|
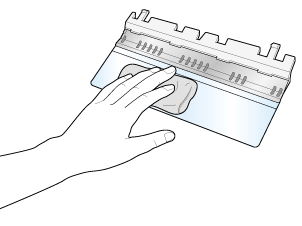
Cleaning the paper path guide
Gently wipe off dust from the transparent plastic sheet of the paper path guide with a soft dry cloth.
|
Caution:
|
| -
Be careful not to scratch or damage the paper path guide.
|
| -
Be careful not to touch the rollers or metal parts of the Automatic Document Feeder, as damage may occur.
|
Attaching the paper path guide
|
|
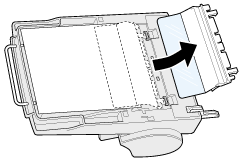
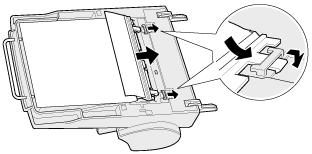
Insert the transparent plastic sheet of the paper path guide into the paper path of the Automatic Document Feeder.
|
|
|
Insert the hooks into the rectangular through holes until they clip into place.
|
[Top]
| Version 1.00E, Copyright © 2001, SEIKO EPSON CORPORATION |
