 |
 Starting EPSON Scan Settings Starting EPSON Scan Settings
 Scanning an Image Scanning an Image
Starting EPSON Scan Settings
Make sure your Epson scanner and Network Image Express Card are turned on and working properly. Then follow the steps below to use the EPSON Scan Settings program to enable network scanning.
 |
Note: |
 |
-
With Windows 2000, XP, and Mac OS X, you need to log on using administrator privileges to make changes to the settings. Any changes made to the settings by the administrator apply to all users.
|
|
 |
Obtain the IP address or host name of the Network Image Express Card from your network administrator.
|
 |
Start EPSON Scan Settings.
|
Windows:
Click Start > All Programs (Windows XP) or Programs (Windows Me, 98SE, and 2000) > EPSON Scan > EPSON Scan Settings.


 |
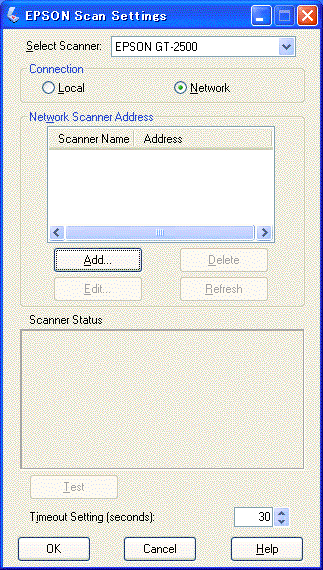
Select EPSON GT-2500 from the Select Scanner drop-down list.
|

 |
Click the Network radio button, then click the Add button.
|
 |
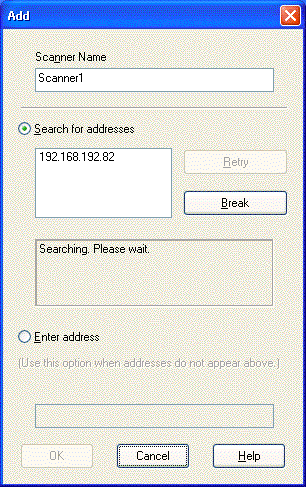
In the Add window, choose the Network Image Express Card's IP address under Search for addresses, or click the Enter address radio button and type in the address. Then click the OK button.
|

 |
In the EPSON Scan Settings window, click the Test button to check the connection. If everything works properly, you see a successful connection message in the Scanner Status box.
|

 |
Click OK to save the settings.
|
 |
Note: |
 |
|
You must set the IP address for your Network Image Express Card before you can scan using it. See Starting EPSON Scan Settings for instructions.
|
|
 |
Turn on your scanner and the client computer.
|
 |
On the client computer, double-click the EPSON Scan icon on the desktop (Windows) or open it from the Applications folder (Mac OS X).
|
 |
Select your desired mode and scanning settings, then do one of the following to start your scan:
|
 |
Note: |
 |
|
In a network environment, the  Start button on the scanner works the same way as clicking the Scan button in the EPSON Scan window. Start button on the scanner works the same way as clicking the Scan button in the EPSON Scan window.
|
|
|  |


