 |
|
|||
 |
||||
Setting Up the SCSI Interface
You can also connect the scanner and computer using the SCSI interface. Unless your computer already has a SCSI board installed, you need to install one, along with SCSI driver. Install the SCSI board according to the directions included with it.
Limitations of the interfaces:
The scanner is equipped with built-in USB and SCSI interfaces. If you have installed the optional Epson Network Image Express Card or a special card for a copy system in the optional interface slot, your scanner has a third additional interface. Simultaneous access with these different interfaces, however, is not guaranteed.
The scanner is equipped with built-in USB and SCSI interfaces. If you have installed the optional Epson Network Image Express Card or a special card for a copy system in the optional interface slot, your scanner has a third additional interface. Simultaneous access with these different interfaces, however, is not guaranteed.
 Note:
Note:|
Be sure to install the scanner software before connecting the scanner to your computer. See the Start Here sheet for instructions.
You will need to install the SCSI driver that is normally included with Windows or your SCSI board.
|
If your computer has a SCSI board up and running, see Setting the SCSI ID Number.
Setting the SCSI ID Number
The scanner’s default SCSI ID number is 2.
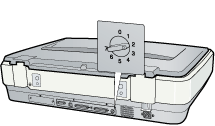
If you add the scanner to a system in which one of your SCSI devices already has a SCSI ID of 2, change the ID number to an unused number using the rotary switch. See the table below as a guide.
|
ID
|
Availability
|
Description
|
|
0, 1
|
Not recommended
|
Usually used for hard disk
|
|
2
|
Available
|
Factory setting of the scanner
|
|
3 - 6
|
Available
| |
|
7
|
May not be available
|
Usually used for the SCSI board
|
 Caution:
|
Do not set the SCSI ID to an ID number that is already assigned to another device; otherwise, the computer, scanner, and other devices will not operate normally.
|

Setting the Terminator Switch
The scanner has a built-in terminator, which allows SCSI devices to communicate properly with each other. You may need to change the terminator switch setting according to your computer system.
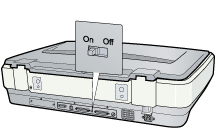 Note:
Note:|
Do not use an external terminator.
|
When you connect the scanner to the end of the daisy chain, turn the terminator switch to On; in other cases, turn the switch to Off.
Connecting the Scanner
Follow these steps to connect the scanner to your computer or to another SCSI device.
Note:|
The combination of connectors on the SCSI interface cable you need varies depending on the maker of your SCSI device and SCSI interface board.
|
 |
Make sure the scanner, computer, and all other SCSI devices are turned off as damage may occur.
|
 |
Connect one end of the interface cable to one of the scanner SCSI connectors until the locks on both sides snap in.
|

 |
Connect the other end of the cable to the SCSI port of your computer or another SCSI device.
|
 |
Plug in the power cords of your computer, scanner and other external SCSI devices. Before turning on your system, be sure to read Power-on sequence.
|
Power-on sequence
Keep the following in mind every time you turn on your computer and SCSI devices, including the scanner. Be sure to turn on the SCSI device which is connected at the farthest end of the daisy chain first, then the second farthest and so on, until finally your computer. If you attempt to use a SCSI device which has been turned on after the computer, it may not work properly, or the computer may not work properly.
Power-off sequence
Keep the following in mind every time you turn off your computer and SCSI devices, including the scanner.
When you are finished using your system, turn off your computer first, then the scanner and other SCSI devices.
While using your computer, do not turn off any SCSI device which has a terminator that is active (On).
Do not turn the scanner off and back on while using your computer, otherwise the scanner may not work properly.