|

Online Reference Guide
|
|
Using Options
Using the Automatic Document Feeder
 Unpacking the Automatic Document Feeder
 Installing the Automatic Document Feeder
 Loading documents in the Automatic Document Feeder
 Loading documents manually
 Scanning from the Automatic Document Feeder
 Fixing paper jams in the Automatic Document Feeder
 Document specifications
The Automatic Document Feeder (B81321 ) allows you to automatically load multi-page documents into your scanner. This document feeder is useful for OCR (optical character recognition) scanning, or for creating an image database or PDF files.
Unpacking the Automatic Document Feeder
When you unpack your Automatic Document Feeder, make sure you have all the parts shown below and that none is damaged. If you find any missing or damaged items, contact your EPSON dealer immediately.

1. Automatic Document Feeder
2. installation screws (2)
3. knobs (2)
4. screw driver
5. feet (2) for GT-15000
6. feet (2) for other models

[Top]
Installing the Automatic Document Feeder
Before installing the Automatic Document Feeder, be aware that:
-
The Automatic Document Feeder is heavy, so you may need to have someone help you lift it.
-
The Automatic Document Feeder is large, so you should clear sufficient space around the scanner.
 |
Make sure your scanner is turned off and unplug the power cord.
|
 |
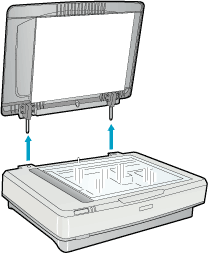
Open the scanner's document cover, then remove it by lifting the cover straight up.
|
 |  |
Warning:
|
 |  | |
Before removing the document cover, make sure to raise it to the upright position to prevent the hinges from snapping back on the springs.
|
|
 |
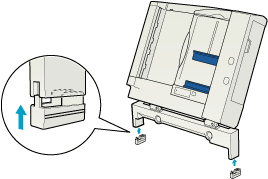
Attach the two smaller feet with a groove on the side as shown below.
|
 |  |
Note:
|
 |  | |
When removing the feet, turn and remove them as shown below:
|
|

 |
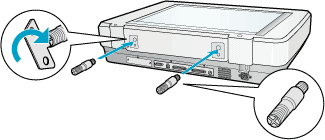
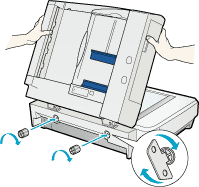
Insert the installation screws that come with the Automatic Document Feeder into the holes in the back of the scanner and secure them using the included screwdriver as shown below.
|
 |
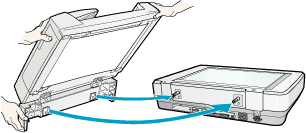
Align the installation screws with the holes in the Automatic Document Feeder. Slide the holes over the installation screws.
|
 |  |
Warning:
|
 |  | |
The Automatic Document Feeder is heavy. Ask for assistance when lifting it.
|
|
 |
Secure the knobs to the ends of the installation screws using the included screwdriver.
|
 |
Attach the Automatic Document Feeder's connector to the scanner's option interface.
|

 |
Close the Automatic Document Feeder.
|
 |
Connect the power cord to the scanner and turn on the scanner.
|

[Top]
Loading documents in the Automatic Document Feeder
Your Automatic Document Feeder can automatically load up to 100 sheets. See Document specifications for further information.
Follow the steps below to load documents in the Automatic Document Feeder.
 |
Slide the right edge guides all the way to the right.
|
 |
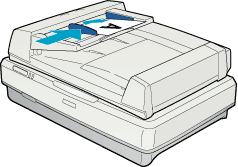
Insert the document stack face up in the Automatic Document Feeder until it meets resistance, then move the right edge guide so it is flush with the right edge of your documents.
|
 |
Note:
|
 | -
Be sure to insert documents face up.
|
|
 | -
If you load multiple pages in the Automatic Document Feeder, the pages will be fed from the top and will be ejected face-down.
|
|
 | -
To automatically scan both sides of a document, choose the Double-side setting in EPSON Scan.
|
|
 | -
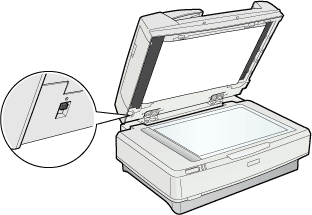
Be sure the switch on lower left corner of the underside of the Automatic Document Feeder is set with the switch towards the circular mark, as shown below.
|
|
To proceed to scan the loaded documents, see Scanning from the Automatic Document Feeder for details.

[Top]
Loading documents manually
You can load documents manually even when the Automatic Document Feeder is installed.
To load a document manually, lift the Automatic Document Feeder and place the document on the document table. Then lower the Automatic Document Feeder and scan the document.
 |
Note:
|
 | -
Opening the Automatic Document Feeder while scanning is in progress will result in an option error and may result in a paper feeding error.
|
|
 | -
Always close the Automatic Document Feeder and the middle cover before scanning or using the feeder.
|
|

[Top]
Scanning from the Automatic Document Feeder
The scanning instructions are divided into two sections; see Scanning a complete document to scan an entire document or image, and see Scanning part of a document to scan only a certain part of an image or document.
Scanning a complete document
You do not need to use the preview feature when scanning the full document or image. The scanner automatically finds and scans the whole image. Follow the steps below to scan an image or document.
 |
Load the document in the Automatic Document Feeder.
|
 |
Start EPSON Scan.
|
 |
Choose the Office Mode or Professional Mode from the list box at the top right of the window. We recommended to choose the Office Mode.
|

 |
In the EPSON Scan main window, make sure that ADF-Single-sided or ADF-Double-sided is selected from the Document Source list. Also choose the appropriate settings for scanning.
|

 |
Click Scan.
|
Scanning part of a document
To scan only a part of a document, follow the steps below.
 |
Load the document(s) in the Automatic Document Feeder.
|
 |
Start EPSON Scan.
|
 |
Choose the Office Mode or Professional Mode from the list box at the top right of the window. We recommended to choose the Office Mode.
|

 |
In the EPSON Scan main window, make sure that ADF-Single-sided or ADF-Double-sided is selected from the Document Source list.
|

 |
Click Preview. The document is ejected after previewing.
|
 |  |
Note:
|
 |  | |
The second page will be fed immediately after the first page is scanned and ejected without being scanned.
|
|
 |
Draw a marquee (a frame around a part of a document) to define the part of the image you want to scan by dragging the mouse pointer over that area.
|
 |
Set document(s) to be scanned in the Automatic Document Feeder including the ejected documents.
|
 |
Choose your settings and click the Scan button.
|

[Top]
Fixing paper jams in the Automatic Document Feeder
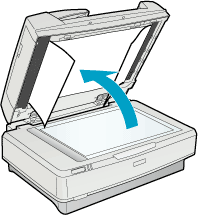
If a paper jam occurs, first open the Automatic Document Feeder's cover, remove any paper from the document table, then determine where the paper jam occurred.
If paper jams at the feeder position:
Open the left cover and carefully pull the jammed paper out of the feeder mechanism.
 |
Note:
|
 | |
Be careful not to pull too hard, otherwise the paper may tear, making it more difficult to remove.
|
|
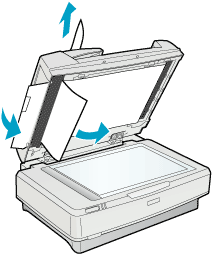
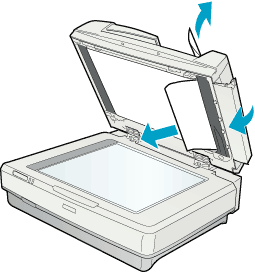
If paper jams at the paper eject position:
Open the right cover and carefully pull the jammed paper out of the feeder mechanism.
 |
Note:
|
 | |
Be careful not to pull too hard. If the paper tears, open the middle cover and remove the paper as shown below.
|
|
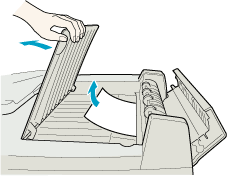
After removing the jammed paper, close the Automatic Document Feeder cover.

[Top]
Document specifications
|
Paper size
|
Direction
|
|
A3, Ledger, B4, Legal, A4, Letter, B5 or Executive, A5
|
Portrait
|
|
A4, Letter, B5 or Executive, A5,
|
Landscape
|
|
Weight:
|
50 to 127 g/m2
|
|
Paper quality:
|
High-quality bond or thermal paper
|
|
Document type:
|
Documents printed with impact printers, laser printers, or facsimile machines
|
Document conditions
Make sure of the following before feeding a document:
-
Ink on the document is dry.
-
The document has no holes, is not ripped or wrinkled, and has nothing attached to it.
-
The document has no staples or other objects attached that may damage the feeder mechanism.
-
The document has no folds closer than 8 mm to its edges.
-
The document is not a multi-part form or a bound document.
-
The document has no rear carbon coating.
-
The document has no cut-out areas.
Other precautions
Do not feed photographic sheets or particularly valuable original artwork into this Automatic Document Feeder; mis-feeding a document may result in accidental wrinkling or damage.
When scanning high-quality color or halftone documents, it is recommended that you open the Automatic Document Feeder and scan documents individually.

[Top]
| Version 1.00E, Copyright © 2003, SEIKO EPSON CORPORATION |
Unpacking the Automatic Document Feeder
Installing the Automatic Document Feeder
Loading documents in the Automatic Document Feeder
Loading documents manually
Scanning from the Automatic Document Feeder
Fixing paper jams in the Automatic Document Feeder
Document specifications
) allows you to automatically load multi-page documents into your scanner. This document feeder is useful for OCR (optical character recognition) scanning, or for creating an image database or PDF files.