|

Software Reference Guide
|
|
Understanding EPSON TWAIN Pro Features
Image Types
 Image Type list
Image Type button
Use the Image Type list or button to select the type of image to be scanned.
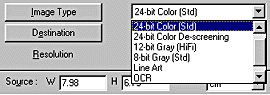
Image Type list
The Image Type list provides the following predefined settings. EPSON recommends you use the predefined settings first, then later improve the quality of the scanned image manually by making the detailed settings described in the following pages, if necessary. Click the arrows on the right to view all of the available settings.
36-bit Color (HiFi):
36-bit colors, best quality
 |  |
Note:
|
| |
This setting is available only with certain applications, such as Adobe® PhotoShop®.
|
24-bit Color (Std):
24-bit colors, high quality
24-bit Color De-screening:
24-bit colors, high quality with de-screening to remove moiré patterns
| |
Note:
|
| |
A moiré is a cross-hatch pattern that appears on scanned images when scanning printed material. It is a result of interference that occurs due to the difference between the pitches of the scanning and the halftone screens.
|
12-bit Gray (HiFi):
12-bit gray, best quality
| |
Note:
|
| |
This setting is available only in certain applications, such as Adobe PhotoShop.
|
8-bit Gray (Std):
256 grays, high quality, and de-screening
Line Art:
Black and white, draft quality
OCR:
Black and white, best quality, Text Enhancement Technology
Copy & Fax:
Black and white, hard halftone, draft quality, Auto Area Segmentation

[Top]
Image Type button
The Image Type button allows you to customize the Image Type settings. If you want to make detailed settings manually, use this feature.
Click the Image Type button. The following dialog box appears.
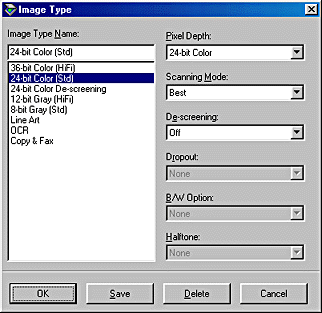
Image Type Name:
The names of predefined settings and any custom settings you have saved appear in the Image Type Name list.
Pixel Depth:
Select the scanning depth from:
36-bit Color, 24-bit Color, 12-bit Gray, 8-bit Gray, and Black & White.
Scanning Mode:
Use this setting to select between speed and quality. Best provides the best quality image, while Draft provides faster scanning with some loss of quality. Note that you can also change the scanning mode of the preview image using the procedure under "Configuration".
De-screening:
Select either On or Off. When On is selected, moiré patterns are automatically removed from scanned images, but scanning takes longer.
| |
Note:
|
| |
A moiré is a cross-hatch pattern that appears on scanned images when scanning printed material. It is a result of interference that occurs due to the difference between the pitches of the scanning and the halftone screens.
|
Dropout:
Select a color to subtract from a black and white scan of a colored original. Proper use of dropout can improve the quality of your black and white scans. Available dropout options are:
None, Red, Green, and Blue.
| |
Note:
|
| | -
Dropout is available only when Pixel Depth is set to 8-bit Gray or Black & White.
|
| | -
Depending on the image you scan, you may need to adjust the Threshold setting in the Image Controls dialog box to enable this feature.
|
B/W Options:
Select from:
Text Enhancement Technology, Auto Area Segmentation, or None.
Text Enhancement Technology
To improve recognition accuracy during OCR (Optical Character Recognition) scanning, select this option. This function eliminates the document background from scans.
Auto Area Segmentation
To make grayscale images clearer and text recognition more accurate, select this option. This function separates text from graphics.
| |
Note:
|
| | -
The B/W Option setting is available only when Black & White is selected as the Pixel Depth setting.
|
| | -
When you need neither TET nor AAS, select None.
|
To apply the settings you made, click OK. The Preview window displays the effects of the current settings except for TET (Text Enhance Technology) and AAS (Auto Area Segmentation) settings.
Halftone:
Select a halftone or dither setting to reproduce images using special dot patterns:
Mode A (Hard Tone), Mode B (Soft Tone), Mode C (Net Screen), Dither A (4 x 4 Bayer), Dither B (4 x 4 Spiral), Dither C (4 x 4 Net Screen), Dither D (8 x 4 Net Screen), or None.
| |
Note:
|
| |
Halftone is available only when Pixel Depth is set to Black & White.
|
To cancel the settings, click Cancel.
To save the settings you made as a group of custom settings, type a new name in the Image Type Name box, then click Save.
To delete an Image Type setting, select the setting name to be deleted in the Image Type Name menu, then click Delete.
[Top]
| Version 1.00E, Copyright © 2001, SEIKO EPSON CORPORATION |

