|

Reference Guide
|
|
Setup & Maintenance / Replacing the Consumable Product
Replacing the Imaging Cartridge
Handling precautions
Always observe the following handling precautions when replacing the imaging cartridge:
-
When handling the imaging cartridge, always place it on a clean smooth surface.
-
Do not install a used imaging cartridge into the printer.
-
If you move an imaging cartridge from a cool to a warm environment, wait for at least one hour before installing it to prevent damage from condensation.
 |
Warning:
|
 | -
Do not touch the toner. Keep the toner away from your eyes. If toner gets on your skin or clothes, wash it off with soap and water immediately.
|
|
| -
Keep the imaging cartridge out of the reach of children.
|
|
| -
Do not dispose of a used imaging cartridge in fire, as it may explode and cause injury. Dispose of it according to local regulations.
|
|
| -
If toner is spilled, use a broom and dustpan or a damp cloth with soap and water to clean it up. Because the fine particles can cause a fire or explosion if they come into contact with a spark, do not use a vacuum cleaner.
|
|
Replacing the imaging cartridge
Follow these steps to replace the imaging cartridge:
 |
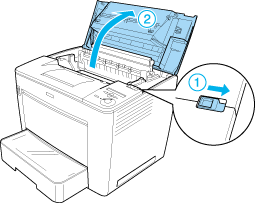
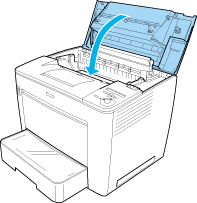
Slide the lock lever to the right, and then open the front cover.
|
 |
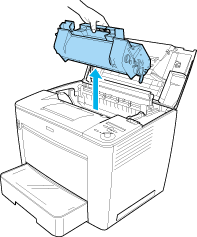
Hold the handle of the imaging cartridge, and lift it out of the printer.
|
|  |
Note:
|
| | -
Be careful not to spill toner remaining in the cartridge.
|
|
| | -
Put the used cartridge on a flat surface with the toner spout facing up to avoid spilling the toner.
|
|
| | -
Dispose of the used imaging cartridge by putting it into its disposal bag.
|
|
 |
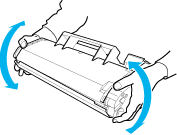
Take the new imaging cartridge out of its package, and remove the protective tape. Then gently shake it from side to side and front to back to distribute the toner evenly.
|
|  |
Caution:
|
| | -
Never open the protective cover of the imaging cartridge and touch the photosensitive print drum (green color) inside the cover. Otherwise, print quality may decline.
|
|
| | -
Do not hold the imaging cartridge by the protective cover while handling the cartridge.
|
|
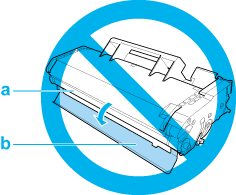
a. Photosensitive print drum
b. Protective cover
 |
Carefully insert the imaging cartridge into the printer, making sure that the pins on both sides of the cartridge are aligned with the grooves inside the printer.
Make sure to push the cartridge into the printer until it is firmly seated in its proper position.
|

| |
Caution:
|
| | |
Do not touch the roller or other parts inside the printer. Doing so may cause the printer to malfunction.
|
|
 |
Close the front cover by pressing it firmly until it clicks into place.
|
Replacing the imaging cartridge when the optional 4-Bin Mailbox is installed
Follow these steps to replace the imaging cartridge when the optional 4-Bin Mailbox is installed:
|
|
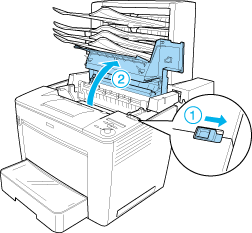
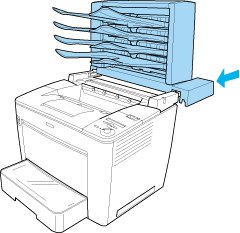
Move the main unit of the 4-Bin Mailbox toward the rear of the printer until it stops.
|

|
|
Slide the lock lever to the right, and then open the front cover.
|
|
|
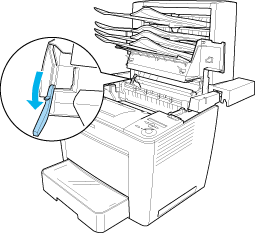
Pull out the stopper of the front cover to secure the cover.
|
|
|
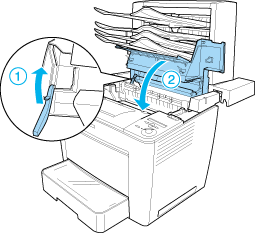
Push the stopper back to its original position, and then close the front cover by pressing it firmly until it clicks into place.
|
 |
Pull the main unit of the 4-Bin Mailbox back to its original position, so that it sits on the rear part of the printer.
|

[Top]
| Version NPD0173-00, Copyright © 2003, SEIKO EPSON CORPORATION |

