![]()
Reference Guide
|
|
Index |
|
Search |
|
Glossary | |||||
|
|
Contents |
|
Help |
|
||||||
|
|
|
|||||||||||||||||||||||||||||||||
Using the Standard Printer Software
About EPSON Status Monitor 3
EPSON Status Monitor 3 is a utility program that monitors your printer and gives you information about its current status. For example, you can find out the amount of remaining toner through this utility. If a print error occurs, the utility provides you with a message describing the error. EPSON Status Monitor 3 is accessed from within the printer driver. See the following section for more information.
| Note for Windows XP users: |
|
|
| Note for Netware users: |
|
|
|
Follow these steps to install EPSON Status Monitor 3.
 | Make sure that the printer is off and that Windows is running on your computer. |
 | Insert the printer software CD-ROM in the CD-ROM drive. |
| Note: |
|
|
 | Click Continue. When the software license agreement screen appears, read the statement and then click Agree. |
 | In the dialog box that appears, click Install Software. |
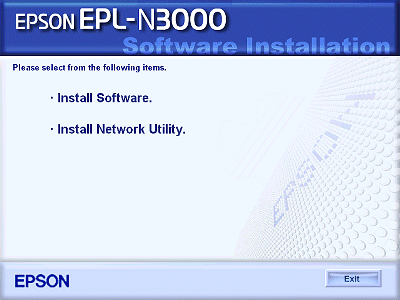
 | Click Custom. |
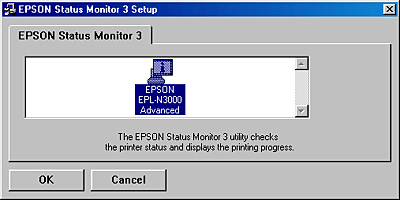
 | Select the EPSON Status Monitor 3 check box and click Install. |
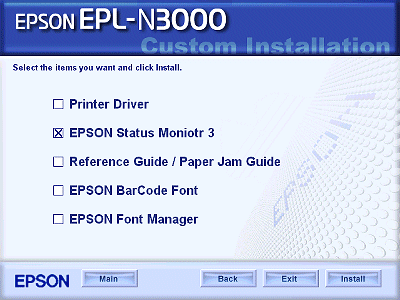
 | In the dialog box that appears, make sure that your printer's icon is selected, and click OK. Then follow the on-screen instructions. |
 | When the installation is complete, click OK. |
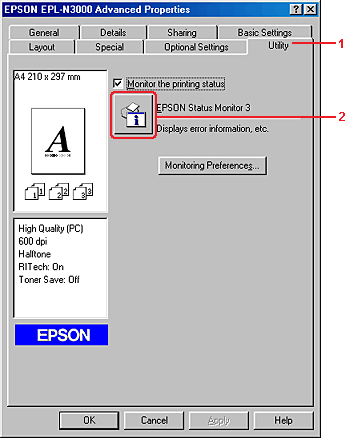
To access EPSON Status Monitor 3, open the printer software, click the Utility tab, then click the EPSON Status Monitor 3 button.
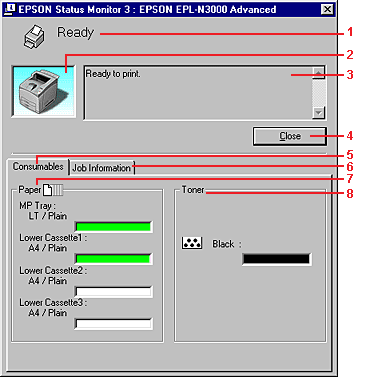
You can monitor printer status and obtain information on consumable products using the EPSON Status Monitor 3 dialog box.
| Note: |
|
|
1. |
Icon/Message: |
The icon and message show the printer status. |
|
2. |
Printer image: |
The image at the upper left shows the printer status graphically. |
|
3. |
Text box: |
The text box next to the printer image displays the current status of the printer. When a problem occurs, the most probable solution is displayed. |
|
4. |
Close button: |
Clicking this button closes the dialog box. |
|
5. |
Consumables: |
Displays information for the paper trays and toner. |
|
6. |
Job Information: |
Displays information for the print jobs. The Job Information menu is displayed when the Show job information check box on the Monitoring Preferences dialog box is on. |
|
7. |
Paper: |
Displays the paper size, paper type and the approximate amount of paper remaining in the paper source. Information for the optional cassette is displayed only if this option is installed. |
|
8. |
Toner: |
Indicates the amount of remaining toner. The toner icon flashes if the toner is low. |
To make specific monitoring settings, click Monitoring Preferences in the Utility menu of the printer driver. The Monitoring Preferences dialog box appears.
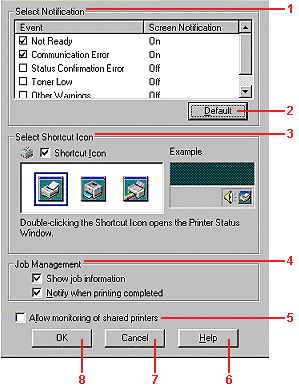
The following settings and buttons appear in the dialog box:
|
1. |
Select Notification: |
Use the check boxes in this area to select the types of error that you wish to be notified about. |
|
2. |
Default button: |
Restores default settings. |
|
3. |
Select Shortcut Icon: |
To use the shortcut icon, select the Shortcut Icon check box and choose an icon. The icon you select appears on the right side of the task bar. |
|
4. |
Job management: |
To display the job information menu in the EPSON Status Monitor 3 window, select the Show job information check box. To display the notification message when your print job is finished, select the Notify when printing completed check box. |
|
5. |
Allow monitoring of shared printers check box: |
When this check box is selected, a shared printer can be monitored by other PCs. |
|
6. |
Help button: |
Opens online help for the Monitoring Preferences dialog box. |
|
7. |
Cancel button: |
Cancels any changes. |
|
8. |
OK button: |
Saves new changes. |
The Status Alert window indicates what type of error has occurred and offers you a possible solution. The window closes automatically once the problem is cleared.
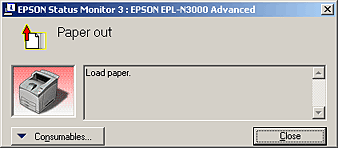
This window will also appear according to the selected notification in the Monitoring Preferences dialog box.
If you wish to see information about printer consumables, click the EPSON Status Monitor 3 button. Once this button is clicked, the Status Alert window will not disappear even after a problem is cleared. Click Close to close the window.
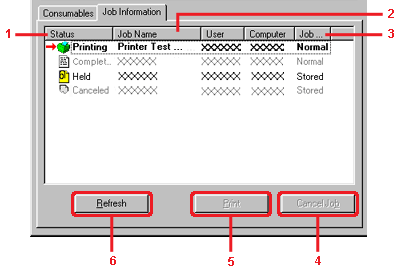
You can obtain information on the print jobs on the Job Information menu on the EPSON Status Monitor 3 dialog box.
To display the Job Information menu, select the Show job information check box on the Monitoring Preferences dialog box. (See Setting Monitoring Preferences for details.) Then click the Job Information tab on the EPSON Status Monitor 3 dialog box.
|
1. |
Status: |
Waiting: |
The print job which waiting to be printed. |
|
Printing: |
The print job which is printed currently. |
||
|
Completed |
Displays only your jobs that have finished printing. |
||
|
Canceled: |
Displays only your jobs that have been canceled printing. |
||
|
Held: |
Job is on held. |
||
|
2. |
Job Name: |
Displays the user's print job file names. Other user's print jobs are displayed as --------. |
|
|
3 |
Job Type: |
Displays the job type. When the Reserve job function is used, the jobs are displayed as Stored, Verify, Re-Print, and Confidential respectively. About the Reserve Job function, see Using the Reserve Job Function. |
|
|
4 |
Refresh button: |
Clicking this button refreshes the information on this menu. |
|
|
5 |
Print button: |
Display the dialog box to print the spooled and held status job. |
|
|
6 |
Cancel Job button: |
Selecting a print job and clicking this button, cancels the selected print job. |
|
Clicking the Print button on the EPSON Status Monitor 3 screen lets you print a spooled job.
Follow the steps below to re-print your job.
| Note: |
|
|
|
|
|
| Access EPSON Status Monitor 3. See Accessing EPSON Status Monitor 3 for details. |
|
| Click Job Information tab. |
|
| Select the job to re-print. |
|
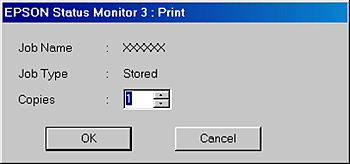
| Click the Print button. The following screen appears. |
|
| In the screen, confirm the job name and select a copy number from 1 to 999. |
|
| Click OK to reprint your job. |
The Job Management function is available when the following connections are used:
| Note: |
|
|
|
|
|
When the Notify when printing completed check box is selected, the Notify when printing completed function can be used.
To use this function, click the specified print job from the print job list on the Job Information menu in the EPSON Status Monitor 3 dialog box. When the target job is completed, the Notify when printing completed dialog box appears.
| Note: |
|
You can stop monitoring the printing status by clearing the Monitor the Printing Status check box in the printer driver's Utility menu if you don't need to monitor the printer at all.
| Note: |
|
|
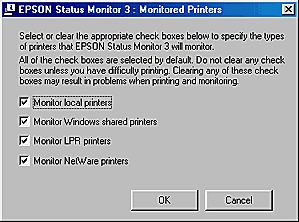
You can use the Monitored Printers utility to change the types of printers that EPSON Status Monitor 3 will monitor. When you install EPSON Status Monitor 3, this utility is also installed. Usually, it is not necessary to change a setup.
|
| Click Start, point to Programs, point to EPSON Printers, then click Monitored printers. |
|
| Clear the check box of the printers which you do not want to be monitored. |
|
| Click OK to accept the setting. |
 Previous |
 Next |
| Version NPD0274-00, Copyright © 2003, SEIKO EPSON CORPORATION |