|

Reference Guide
|
|
Using the PostScript Printer Software / For Macintosh
Using the PostScript Printer Driver with Macintosh
 Mac OS 8.6 or 9.x users
 Mac OS X users
Mac OS 8.6 or 9.x users
Installing the printer driver
The Installer program that is included in the printer software CD-ROM installs the PostScript printer driver. Before installing the printer driver, make sure that your hard disk has at least 3.1 MB of free space.
The installer program has two installation methods: Easy Install and Custom Install.
Easy Install installs all the files necessary to use the PostScript printer driver. Normally, you should use the Easy Install method since this ensures that all necessary files are copied and that your computer is set up to give you the full benefit of the PostScript printer driver.
Custom Install installs only the files that you specify. You might want to use the Custom Install method if you are low on hard disk space and want to install only those files that are absolutely required. However, if you have enough free disk space, it is recommended that you choose the Easy Install method.
Easy Install
If your Macintosh starts up any applications automatically (such as a virus checker) when the computer is turned on, quit the applications before running the Installer.
Follow these steps to install the PostScript printer driver:
 |
Turn on your Macintosh if it is not already on.
|
 |
Insert the printer software CD-ROM into your CD-ROM drive.
|
 |
Double-click the CD-ROM icon, and then double-click Adobe PS, Mac OS9, and English in this order.
|
 |
Double-click AdobePS 8.7, and then double-click AdobePS Installer.
|
 |
Follow the on-screen instructions until the install screen is displayed.
|
 |
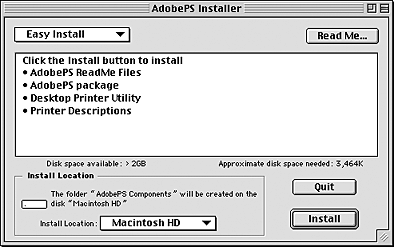
Select Easy Install, and then click Install.
|
 |
When installation is done, click Restart to restart your computer.
|
This completes the installation of the printer driver. You now need to select the printer driver as described in the next section.
If you are connecting two or more EPSON printers of the same model using AppleTalk, and you want to rename the printer, see the Network Guide that shipped with the printer.
Custom Install
If your Macintosh starts up any applications automatically (such as a virus checker) when the computer is turned on, quit the applications before running the Installer.
To perform a Custom Install, in which you specify which files to install, follow steps 1 to 5 of the Easy Install method (see previous section), and then do the following:
 |
Select Custom Install.
|
 |
Select the item(s) that you want to install.
|

 |  |
Note:
|
 |  |
If you want information on a particular item, click the  icon to the right of that item. icon to the right of that item.
|
|
 |
Click Install.
|
 |
When installation is done, click Quit.
|
 |
Restart your computer.
|
This completes the installation of the printer software. You now need to select the printer driver as described in the next section.
If you are not able to print after a Custom Install, perform the Easy Install installation to copy all necessary files to your computer.
If you are connecting two or more printers of the same model using AppleTalk, and you want to rename the printer, see the Network Guide that shipped with the printer.
Selecting the printer when it is connected via a USB connection
If the printer is connected to your computer via a USB port, you will not be able to select the printer from the Chooser. You will have to launch the Apple Desktop Printer Utility and register the printer as a Desktop Printer. The Desktop Printer Utility is automatically installed when you install the Adobe PostScript printer driver. The Desktop Printer is created through the following procedure:
 |
Note:
|
 | -
When printing via the USB port from a Power Macintosh running Mac 0S 8.6 or 9.x, the printer must be set to handle ASCII data. To specify this setting, select Print from the File menu of the application that you are using, and then select the name of the application from the options available in the Print dialog box. On the setup option page that appears, select ASCII for the data format setting. The actual setting name varies by application, but is often called Encoding or Data.
|
|
 | -
For best results, you should connect the printer directly to the computer's USB port. If you must use multiple USB hubs, we recommend that you connect the printer to the first-tier hub.
|
|
 | -
Manual duplex printing cannot be performed if the printer is connected to the Macintosh via a USB port. In this case, do not select Print on Both Sides on the Layout setup option page in the Print dialog box.
|
|
Follow these steps to select the printer:
 |
Launch the Desktop Printer Utility.
The Desktop Printer Utility is located in the AdobePS Components folder on your Macintosh HD after an Easy Install of the printer driver.
|

 |
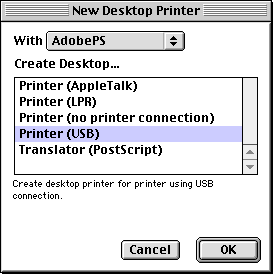
A dialog box like the one shown below will be displayed. Select AdobePS from the With pop-up menu, click Printer (USB) in the Create Desktop list, and then click OK.
|
 |
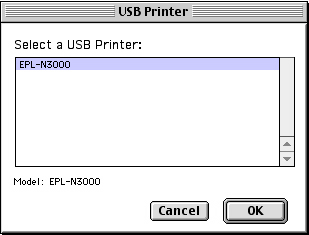
Click Change under USB Printer Selection in the dialog box that appears to select the printer. The dialog box shown below will be displayed, showing a list of connected USB printers. Select your printer from the list, and then click OK.
|
 |
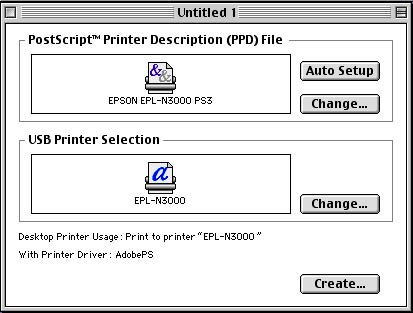
Click Auto Setup to select the PostScript Printer Description (PPD) file. When a PPD file is selected, the selected printer name will be displayed under the printer icon.
If the printer name is incorrect, click Change, and then select the correct PPD file. The PPD files are located in System Folder\Extensions\Printer Descriptions.
|

 |
After the USB printer and PPD file have been selected, click Create at the bottom of the dialog box. The USB printer icon will be displayed on the desktop.
|
You can now print using the printer connected to your computer via the USB port. Use the Chooser if you want to print to a printer using AppleTalk.
Selecting the printer in a networked environment
If the printer is connected through the Ethernet interface or an optional network card, select it from the Chooser as described below.
 |
Note:
|
Follow these steps to select the printer:
 |
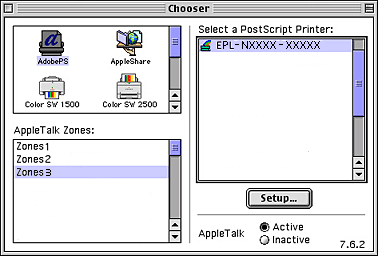
In the Apple menu, select Chooser. The Chooser dialog box appears.
|
 |
Make sure that AppleTalk is active.
|
 |
Click the AdobePS icon to select it. The name of your printer appears in the Select a PostScript Printer box.
|
 |  |
Note:
|
 |  | |
By default, the six-digit MAC address is displayed after the printer name if the printer is connected through an optional network card. Refer to your network card manual for details.
|
|
 |
Click on the name of your printer to select it. The Create button appears.
|
 |  |
Note:
|
 |  | |
If your computer is connected to more than one AppleTalk zone, click the AppleTalk zone your printer is connected to in the AppleTalk Zones list.
|
|
 |
Click Create.
|
A message will appear marking the completion of the setup. The Chooser dialog box will be displayed again.
(The Create button changes into the Setup button.)
To confirm that the setup completed successfully, click Setup in the Chooser dialog box, and then click Printer Info and Configure to check the settings.
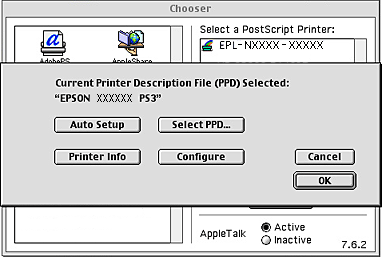
If the setup did not complete successfully, follow these steps:
 |
Return to the dialog box shown above.
|
 |
Click Select PPD. The PPD selection dialog box will be displayed.
|
 |
Select your printer model, and then click Select.
|
If you need to cancel the installation of the PPD you selected, click Cancel. To try to setup the printer again, repeat step 5 above.
 |
Note:
|
 | |
If QuickDrawGX is installed, you must turn it off in the Extensions Manager before you can use the Adobe PostScript printer driver.
|
|
Changing the printer setup settings
You can easily change or update the printer setup settings. They include the amount of installed memory and whether options such as the Duplex Unit and lower cassettes are installed on the printer or not.
Follow these steps to change the settings:
 |
Select the printer on the desktop.
|
 |
Click the Printing menu, and then select Change Setup.
|
 |
Change the settings using the pop-up menus.
|
Balloon Help using the printer driver
Balloon Help is available to help you with the printer driver settings.
Follow these steps to use Balloon Help when the Print or Page Setup dialog box is displayed:
 |
Click the Help menu, and then select Show Balloons.
|
 |
Place your cursor over the item that you need help with. Information on that item is displayed inside a floating balloon.
|
To end Balloon Help, click the Help menu, and then select Hide Balloons.
Printer driver settings
The printer driver enables you to change the settings for your print job. The printer driver settings can be accessed through the Page Setup and Print dialog boxes of the application that you are printing from. The various settings are grouped under the Page Setup and Print dialog boxes in the following manner:
-
Page Setup dialog box: Settings that affect the attributes of the page to be printed, such as the paper size, orientation, and margins are available here.
-
Print dialog box: All other print settings, such as the paper source, resolution, and other PostScript settings are available here.
The actual settings that are available might vary, depending on your application.
Page Setup dialog box
When you select Page Setup in the File menu of your application, the dialog box shown below appears. The dialog box you see might be slightly different, depending on your application. There are four setup option pages in this dialog box: Page Attributes, Watermark, PostScript Options, and Custom Page Default.
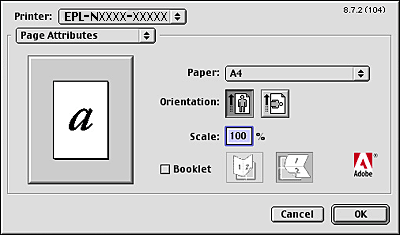
The settings and the buttons that appear in the Page Setup dialog box are explained below.
Cancel
Click this button to exit the dialog box without saving any changes you made.
Page Attributes
Paper
Select the desired paper size from the Paper pop-up menu. This setting must match the size of the paper loaded in the printer. The paper sizes that are available will differ according to the printer. The default setting is either A4 or Letter, depending on your country of purchase.
Orientation
Specify whether the page is to be printed in the portrait (vertical) or landscape (horizontal) orientation.
Scale
This setting enables you to shrink or enlarge the image to print. You can enter any percentage from 25% to 400%. The default is 100%. To shrink the image, specify a percentage that is lower than 100%. To enlarge the image, specify a percentage that is higher than 100%. However, if you can shrink or enlarge the image to print in the application that you are printing from, do so in the application and not through the printer driver.
Booklet
Select this check box to print out two document pages on a single sheet of paper. When the sheet is folded in half, it will form a booklet. You can set the page orientation for either left-right or top-bottom folds.
Watermark
None
This radio button is selected by default, and indicates that your print job will be printed without any watermark.
First
Select this radio button if you want the selected watermark to be printed only on the first page of your document.
All
Select this radio button if you want the selected watermark to be printed on all the pages of your document.
PICT
Select this radio button to show all available watermarks in the PICT format under the Watermark pop-up menu.
EPS
Select this radio button to show all available watermarks in the EPS format under the Watermark pop-up menu.
TEXT
Select this radio button to show all available watermarks in the TEXT format under the Watermark pop-up menu.
Foreground
Select this check box if you want the selected watermark to be printed in the foreground, i.e., over the document's text and/or graphics.
Save With Document
Select this check box if you want to save the watermark with the document for future printing.
Edit
Click this button to modify the contents of the selected watermark. Only watermarks in the TEXT format can be modified. This button is available only when the TEXT radio button is selected.
PostScript Options
Visual Effects
Flip Horizontal
Select this check box to flip the printed image horizontally on the page.
Flip Vertical
Select this check box to flip the printed image vertically on the page.
Invert Image
Select this check box to invert the image or text on the page so that black areas of the page become white and white areas become black.
Image and Text
Substitute Fonts
Select this check box to allow the printer to use substitute fonts during printing.
Smooth Text
Select this check box to improve the appearance of bitmap fonts.
Smooth Graphics
Select this check box to improve the appearance of printed graphics by smoothing jagged edges.
Precision Bitmap Alignment
Select this check box to reduce the printed document to correct for distortions that sometimes occur in printed bitmap graphics.
Unlimited Downloadable Fonts
Select this check box when using a large number of downloadable fonts in a document. This setting may slow down printing.
Custom Page Default
Units
Select the desired unit that you want to work in when customizing the page. The options are cm, inches, and pts.
Paper size pop-up menu
This pop-up menu automatically shows the paper size that is selected on the Page Attributes setup page. You can change the paper size by clicking on the menu and selecting the desired paper size to customize.
Paper Size
Enter the desired Width, Height, and Offset values for the custom page.
PPD Limits
Click the pop-up menu and select the various attributes to view the minimum and maximum values permitted by the selected PPD (PostScript Printer Description) file.
Margins
Specify the desired Top, Bottom, Left, and Right margin values.
Custom Page Name
Enter a name for the custom page that you are creating.
Remove
Click to delete the custom page selected in the paper size pop-up menu. This button is grayed out when a non-custom paper size is selected.
Add
Click to add the custom page that you are creating onto the list of selectable paper sizes. This button is grayed out if nothing is entered into the Custom Page Name text box.
Print dialog box
When you select Print in the File menu of your application, the dialog box shown below appears. The dialog box you see might be slightly different, depending on your application. There are several setup option pages in this dialog box, such as General, Background Printing, Cover Page, Layout, Error Handling, PostScript Settings, and Printer Setting.
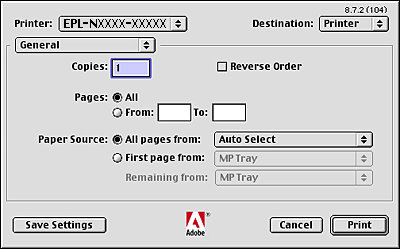
The settings and the buttons that appear in the Print dialog box are explained below.
Cancel
Click this button to exit the dialog box without saving any changes you made.
Save Settings
Click this button to save changes to the settings. Until you make additional changes and click this button again, the changes saved will be used as the default settings for this printer.
General
Copies
Specify how many copies of the document to print. Enter any number from 1 (default) to 32,000.
Select the Collate option when printing multiple copies of a multi-page document, so that each document copy will be printed out with the page in order.
Select the Reverse Order option to print the document with the pages in reverse order (i.e., starting with the last page).
Reverse Order
Select this check box to reverse the print order.
Pages
All
Select this radio button to print out all the pages of the document.
From, To
Specify the range of pages to print. The available numbers are 1 to 32,000.
Paper Source
All pages from
Select the paper source for your print job. The options are Auto Tray Select, MP Tray, Cassette 1, Cassette 2, Cassette 3, Manual Feed 1st Page, and Manual Feed EachPage. However, the actual paper sources that are available will vary depending on the options installed.
First page from
Select the paper source for printing the first page of the document.
Remaining from
Select the paper source for printing the rest of the document after the first page.
 |
Note:
|
 | -
Cassette 2 and Cassette 3 can be selected only if the corresponding optional cassette unit is installed on your printer.
|
|
 | -
If you are printing on a custom paper size created under the Custom Page Default setup option page on the Page Setup dialog box, the paper must be fed from the MP Tray. Only the Auto Tray Select and the MP Tray options can be selected.
|
|
Background Printing
Print in
Foreground (no spool file)
Select this radio button to print the document in the foreground. When this is selected, you cannot use your computer for other operations while printing.
Background
Select this radio button to print the document in the background. When this radio button is selected, you can use your computer for other operations while printing.
Print Time
Urgent
Select this radio button to give the document first priority among the print jobs in the print queue.
Normal
Select this radio button to place the document in the print queue in the order received.
Print at
Select this radio button to specify a date and time to print the document.
Put Document on Hold
Select this radio button to keep the document in the print queue without printing it.
Cover Page
Print Cover Page
None
Select this radio button if you do not want to print a cover page.
Before Document
Select this radio button to print the cover page as the first page of the document.
After Document
Select this radio button to print the cover page as the last page of the document.
Cover Page Paper Source
Select the paper source for the printing of the cover page. The options are Same as document, MP Tray, Cassette 1, Cassette 2, Cassette 3, Manual Feed 1st Page, and Manual Feed EachPage. However, the actual paper sources that are available will differ according to the options installed.
 |
Note:
|
 | |
Cassette 2 and Cassette 3 can be selected only if the corresponding optional cassette unit is installed on your printer.
|
|
Layout
Pages per sheet
Specify how many pages of your document to print on one sheet of paper.
Layout direction
Specify whether the document should be laid out from left to right or right to left.
Border
Specify whether the document prints with a border around the edges of the page. The options are none, Single hairline, Single thin line, Double hairline, and Double thin line.
Print on Both Sides
Select this check box to print on both sides of the paper.
 |
Note:
|
Binding
Allows you to select which edge of the document will be bound.
 |
Note:
|
 | |
This setting is available only when the Print on Both Sides option is checked.
|
|
Transverse
Allows you to specify rotation for custom paper.
 |
Note:
|
 | |
This setting is available only when the custom paper is selected.
|
|
Error Handling
If there is a PostScript error:
No special reporting
When this radio button is selected, PostScript errors will not be reported.
Summarize on screen
When this radio button is selected, a summary of the PostScript errors will be displayed on the screen.
Print detailed report
When this radio button is selected, a detailed report of the PostScript errors will be printed.
PostScript Settings
Format
Select the file format that you want the new file to have. The options are PostScript Job, EPS Mac Standard Preview, EPS Mac Enhanced Preview, and EPS No Preview.
PostScript Level
Select the PostScript compatibility level for the PostScript file that contains a description of your document. The options are Level 1, 2 and 3 Compatible, Level 2 Only, and Level 3 Only.
Data Format
ASCII
Select this radio button if you plan to later edit the document. The file will be saved as an ASCII or text file.
Binary
Select this radio button to save the file as a binary file. Binary files are typically smaller in size than ASCII files.
Font inclusion
Specify the type of fonts to include in the file. The options are None, All, All But Standard 13, and All But Fonts in PPD file.
Print Setting
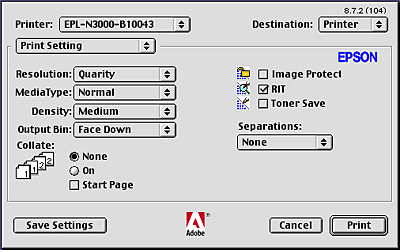
Resolution
Select the resolution that you want to print in. The options are Fast and Quality. The Quality setting prints at a higher resolution, but the printing time will be longer.
MediaType
Select the desired paper type to print on. The options are Normal, Thick, Transparency, and Extra Thick. Make sure to select the correct paper type to avoid smearing or wasting ink.
Collate
Select the On radio button to print multiple copies of the document in page order. If None is selected, each page is printed out the specified number of times before the following page is printed.
 |
Note:
|
 | |
If you enable the Collate option here (On is selected), do not set the Collate option in the application itself.
|
|
Start Side for Duplex
Select this check box to start printing from the second (back) page, leaving the first page blank. This setting is enabled only when the Print on Both Sides check box on the Layout setup option page is selected.
RITech
Select this check box to use RITech when printing. RITech improves the appearance of printed lines, text, and graphics.
Toner Save
Select this check box to use the Toner Save feature when printing. When the Toner Save feature is turned on, the printer uses about 50% less toner than normal.

[Top]
Mac OS X users
Installing the printer driver
The PS Installer program that is included in the printer software CD-ROM installs the PostScript printer driver.
Make sure that no applications are running on your Macintosh before installing the printer driver. If applications such as the Print Center is running, the printer driver cannot be installed properly.
Follow these steps to install the printer driver:
 |
Turn on your Macintosh if it is not already on.
|
 |
Insert the printer software CD-ROM into your CD-ROM drive.
|
 |
Double-click the CD-ROM icon, and then double-click Adobe PS.
|
 |
Double-click Mac OS X, and then double-click Adobe PS. The Authenticate window appears. Make sure to enter the user name and password for an administrator.
|
 |  |
Note:
|
 |  | |
You need to login to Mac OS X as an administrator in order to perform software installations.
|
|
 |
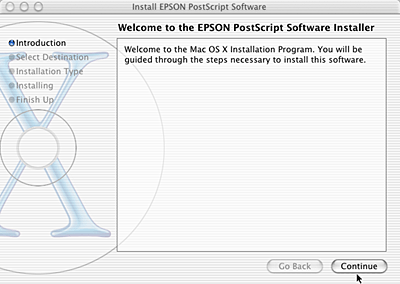
In the welcome screen that appears, click Continue, and follow the on-screen instructions.
|
 |
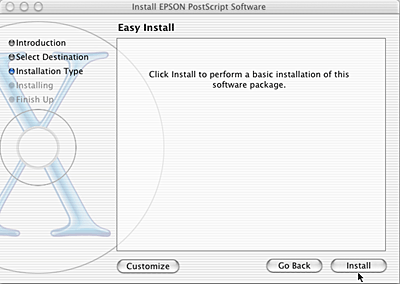
When the following screen appears, click Install.
|
 |
When installation is done, click Close.
|
This completes the installation of the PostScript 3 printer driver. You now need to select the printer as described in the next section.
Selecting the Printer
The procedure for selecting the printer varies depending on the protocol or interface used to connect the printer to your computer.
 |
Note:
|
 | -
You cannot use FireWire for printer connection in the PostScript 3 mode. Although EPSON FireWire appears in the interface pop-up list, it cannot be used with the PostScript 3 printer driver.
|
|
 | -
You need to make the settings for your installed options manually when the printer is connected using USB, IP printing, or Rendezvous. When the printer is connected using AppleTalk, the printer software automatically makes the settings.
|
|
AppleTalk
Follow these steps to select the printer when it is connected using AppleTalk:
 |
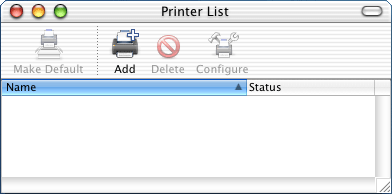
Go to the Utilities folder located inside the Applications folder, and then double-click Print Center.
The Printer List window appears.
|
 |  |
Note:
|
 |  | |
If you are launching the Print Center for the first time, or there is no printer added to the Print Center yet, the following screen appears:
|
|
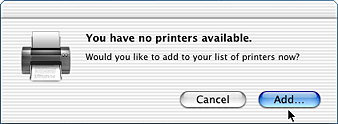
 |  | |
Click Add, and proceed to step 3.
|
|
 |
Click Add in the Printer List window. Alternatively, you can select Add Printer from the Printers menu.
|
 |
In the window that appears, choose AppleTalk from the pop-up list.
|
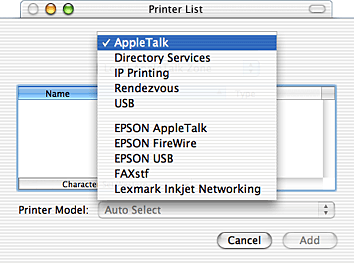
 |  |
Note:
|
 |  | |
Make sure to choose AppleTalk. Do not choose EPSON AppleTalk, because it cannot be used with the PostScript 3 printer driver.
|
|
 |
Select your printer name from the Name list, and then select Auto Select in the Printer Model pop-up list.
|
 |  |
Note:
|
 |  | |
By default, the six-digit MAC address is displayed after the printer name.
|
|
 |
Click Add. The installation program starts communicating with the printer.
When communication is established and configuration is completed, your printer is automatically added to the Printer List.
|
 |
Quit Print Center.
|
IP Printing
Follow these steps to select the printer when it is connected using IP Printing:
 |
Note:
|
 | |
Make sure to specify ASCII as the data format in the application. Binary data cannot be printed properly when using IP Printing.
|
|
 |
Go to the Utilities folder located inside the Applications folder, and then double-click Print Center.
The Printer List window appears.
|

 |  |
Note:
|
 |  | |
If you are launching the Print Center for the first time, or there is no printer added to the Print Center yet, the following screen appears:
|
|

 |  | |
Click Add, and proceed to step 3.
|
|
 |
Click Add in the Printer List window. Alternatively, you can select Add Printer from the Printers menu.
|
 |
In the window that appears, choose IP Printing from the pop-up list.
|
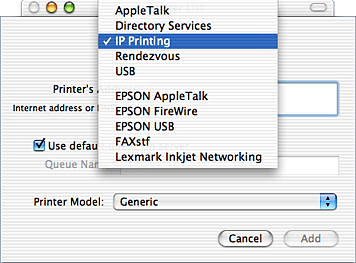
 |  |
Note:
|
 |  | |
Make sure to choose IP Printing. Do not choose EPSON TCP/IP, because it cannot be used with the PostScript 3 printer driver.
|
|
 |
Enter the IP address for the printer.
|
 |  |
Note:
|
 |  | |
See the Network Guide or consult your network administrator for information about the IP address for the printer.
|
|
 |
Make sure that the Use default queue on server check box is selected.
|
 |
Select Epson from the Printer Model pop-up list. The Model Name list box is displayed.
|
 |
Select your printer model from the Model Name list.
|
 |
Click Add. Your printer's IP address is automatically added as a printer name to the Printer List.
|
 |
Select your printer's IP address from the list, and then select Show Info from the Printers menu. The Printer Info dialog box appears.
|
 |
Select Installable Options from the pop-up list, and make the necessary settings.
|
 |
Click Apply Changes, and then close the Printer Info dialog box.
|
 |
Quit Print Center.
|
USB
Follow these steps to select the printer when it is connected using the USB interface:
 |
Note:
|
 | -
Make sure to specify PS3 as the printer mode on the printer's control panel for proper printing results.
|
|
 | -
Make sure to select the printer by using the procedure described below. The Plug and Play function automatically selects the printer when the printer is connected via the USB interface. However, this automated selection may not work properly.
|
|
 |
Make sure that the printer is properly connected to your computer with an USB cable, and that the printer is turned on.
|
 |
Go to the Utilities folder located inside the Applications folder, and then double-click Print Center.
The Printer List window appears.
|

 |  |
Note:
|
 |  | |
If you are launching the Print Center for the first time, or there is no printer added to the Print Center yet, the following screen appears.
|
|

 |  | |
Click Add, and proceed to step 3.
|
|
 |
Click Add in the Printer List window. Alternatively, you can select Add Printer from the Printers menu.
|
 |
In the window that appears, choose USB from the pop-up list.
Your printer name automatically appears in the Name list.
|
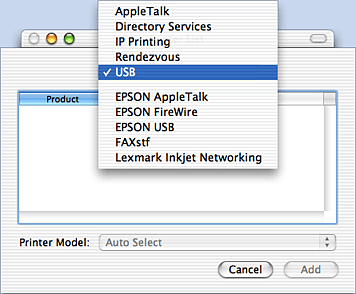
 |  |
Note:
|
 |  | |
Make sure to choose USB. Do not choose EPSON USB, because it cannot be used with the PostScript 3 printer driver.
|
|
 |
Make sure that your printer model is selected in the Printer Model list.
|
 |  |
Note:
|
 |  | |
If your printer model is not automatically selected in the Printer Model list, you need to reinstall the PostScript printer driver. See Installing the printer driver for instructions.
|
|
 |
Click Add. Your printer is automatically added to the Printer List.
|
 |
Click on your printer name on the list, and then select Show Info from the Printers menu. The Printer Info dialog box appears.
|
 |
Select Installable Options from the pop-up list, and make the necessary settings.
|
 |
Click Apply Changes, and then close the Printer Info dialog box.
|
 |
Quit Print Center.
|
Rendezvous
There are two ways to select the printer when it is connected using Rendezvous.
 |
Note:
|
 | |
Make sure to specify ASCII as the data format in the application. Binary data cannot be printed properly when using a Rendevous connection.
|
|
Selecting in the Print Center
Follow these steps to select the printer from the Print Center:
 |
Go to the Utilities folder located inside the Applications folder, and then double-click Print Center.
The Printer List window appears.
|

 |  |
Note:
|
 |  | |
If you are launching the Print Center for the first time, or there is no printer added to the Print Center yet, the following screen appears.
|
|

 |  | |
Click Add, and proceed to step 3.
|
|
 |
Click Add in the Printer List window. Alternatively, you can select Add Printer from the Printers menu.
|
 |
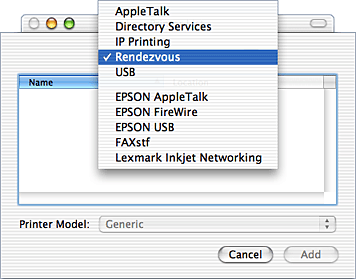
In the window that appears, select Rendezvous from the pop-up list.
|
 |
Select your printer from the Name list. The printer name should have (PostScript) attached to the end.
|
 |
Make sure that your printer model is selected in the Printer Model list.
|
 |  |
Note:
|
 |  | |
If your printer model is not automatically selected in the Printer Model list, you need to reinstall the PostScript printer driver. See Installing the printer driver for instructions.
|
|
 |
Click Add. Your printer is automatically added to the Printer List.
|
 |
Click on your printer name on the list, and then select Show Info from the Printers menu. The Printer Info dialog box appears.
|
 |
Select Installable Options from the pop-up list, and make the necessary settings.
|
 |
Click Apply Changes, and then close the Printer Info dialog box.
|
 |
Quit Print Center.
|
Selecting from an application
Follow these steps to select the printer from within an application:
 |
Start an application, and then select Print from the File menu.
|
 |
In the window that appears, select Rendevous Printer from the Printer pop-up list.
|
 |
From the list of printers that appears, select your printer model.
|
Changing the Printer Setup Settings
You can easily change or update the printer setup settings. They include the amount of installed memory and whether options such as the Duplex Unit and lower cassette units are installed on the printer or not.
Follow these steps to change the printer setup settings:
 |
Go to the Utilities folder located inside the Applications folder, and then double-click Print Center.
The Printer List window appears.
|
 |
Select the printer from the list.
|
 |
Select Show Info from the Printers menu. The Printer Info dialog box appears.
|
 |
Make necessary changes to the settings, and then close the dialog box.
|
 |
Quit Print Center.
|
Printer Driver Settings
The printer driver enables you to change the settings for your print job. The printer driver settings can be accessed through the Page Setup and Print dialog boxes of the application that you are printing from. The various settings are grouped under the Page Setup and Print dialog boxes in the following manner:
-
Page Setup dialog box: Settings that affect the attributes of the page to be printed, such as the paper size, orientation, and margins are available here.
-
Print dialog box: All other print settings, such as the paper source, resolution, and other PostScript settings are available here.
The actual settings that are available might vary, depending on your application.
Page Setup dialog box
When you select Page Setup in the File menu of your application, the Page Setup dialog box appears. There are three setup option pages in this dialog box: Page Attributes, Custom Page Default, and Summary.
The settings and the buttons that appear in the Page Setup dialog box are explained below.
Cancel
Click this button to exit the dialog box without saving any changes you made.
Page Attributes
Paper
Select the desired paper size from the Paper pop-up menu. This setting must match the size of the paper loaded in the printer. The paper sizes that are available will differ according to the printer. The default setting is either A4 or Letter, depending on your country of purchase.
Orientation
Specify whether the page is to be printed in the portrait (vertical) or landscape (horizontal) orientation.
Scale
This setting enables you to shrink or enlarge the image to print. You can enter any percentage from 25% to 400%. The default is 100%. To shrink the image, specify a percentage that is lower than 100%. To enlarge the image, specify a percentage that is higher than 100%. However, if you can shrink or enlarge the image to print in the application that you are printing from, do so in the application and not through the printer driver.
Custom Page Default
Paper Size
Enter the desired Width and Height values for the custom page.
 |
Note:
|
 | -
When you use custom paper size, make sure Width and Height that you specify do not exceed the custom paper size supported by your printer.
|
|
 | -
Image data may not be printed properly when you use custom paper size.
|
|
Margins
Specify the desired Top, Bottom, Left, and Right margin values.
Custom Page Name
Enter a name for the custom page that you are creating.
Summary
Displays all setting values in the Page Setup dialog box.
Print dialog box
When you select Print in the File menu of your application, the Print dialog box appears. The dialog box you see might be slightly different, depending on your application. There are several setup option pages in this dialog box, such as Copies & Pages, Layout, Duplex, Output Options, Error Handling, Paper Feed, Printer Features, and Summary.
The settings and the buttons that appear in the Print dialog box are explained below.
Cancel
Click this button to exit the dialog box without saving any changes you made.
Save Settings
Click this button to save changes to the settings. Until you make additional changes and click this button again, the changes saved will be used as the default settings for this printer.
Preview
Click this button to preview the printed image.
Save AS PDF...
Click this button to save the specified pages as a PDF file.
Copies & Pages
Copies
Specify how many copies of the document to print. Enter any number from 1 (default) to 32,000.
Select the Collate option when printing multiple copies of a multi-page document, so that each document copy will be printed out with the page in order.
Collated
Select this radio button to print multiple copies of the document in page order. If it is not selected, each page is printed out the specified number of times before the following page is printed.
 |
Note:
|
 | |
If you enable the Collated option here, do not set the Collate option in the application itself.
|
|
Pages
All
Select this radio button to print out all the pages of the document.
From, To
Specify the range of pages to print.
Layout
Pages per sheet
Specify how many pages of your document to print on one sheet of paper.
Layout direction
Specify whether the document should be laid out from left to right or right to left.
Border
Specify whether the document prints with a border around the edges of the page. The options are none, Single hairline, Single thin line, Double hairline, and Double thin line.
Duplex
Print on Both Sides
Select this check box to print on both sides of the paper.
 |
Note:
|
Binding
Allows you to select which edge of the document will be bound.
 |
Note:
|
 | |
This setting is available only when the Print on Both Sides option is checked.
|
|
Output Options
Save as File
Select this check box to create a PDF or PostScript file.
Format
Select the format of the file that you are creating. Options are: PDF and PostScript.
Error Handling
PostScript Errors
No special reporting
When this radio button is selected, PostScript errors will not be reported.
Print detailed report
When this radio button is selected, a detailed report of the PostScript errors will be printed.
Paper Feed
All pages from
Select the paper source for your print job. The options are Auto Tray Select, MP Tray, Cassette 1, Cassette 2, Cassette 3, Manual Feed 1st Page, and Manual Feed EachPage. However, the actual paper sources that are available will differ according to the options installed.
First page from
Select the paper source for printing the first page of the document.
Remaining from
Select the paper source for printing the rest of the document after the first page.
 |
Note:
|
 | -
Cassette 2 and Cassette 3 can be selected only if the corresponding optional cassette unit is installed on your printer.
|
|
 | -
If you are printing on a custom paper size created under the Custom Page Default setup option page on the Page Setup dialog box, the paper must be fed from the MP Tray. Only the Auto Tray Select and the MP Tray options can be selected.
|
|
Printer Features
Resolution
Select the resolution that you want to print in. The options are Fast and Quality. The Quality setting prints at a higher resolution, but the printing time will be longer.
RITech
Select this check box to use RITech when printing. RITech improves the appearance of printed lines, text, and graphics.
Toner Save
Select this check box to use the Toner Save feature when printing. When the Toner Save feature is turned on, the printer uses about 50% less toner than normal.
Image Protect
Select this check box to give priority to the quality of the printed image. When this is selected, lossy compression is not used even when memory runs low during printing. If this check box is left unselected, lossy compression is used when memory resources are too low.
MediaType
Select the desired paper type to print on. The options are Normal, Thick, Transparency, and Extra Thick. Make sure to select the correct paper type to avoid smearing or wasting ink.
Summary
Displays all setting values in the Print dialog box.

[Top]
| Version NPD0274-00, Copyright © 2003, SEIKO EPSON CORPORATION |
Mac OS 8.6 or 9.x users
Mac OS X users