|

Administrator's Guide
|
|
Settings by System / Settings for Windows 2000/NT
Printing with TCP/IP
 Configuring for TCP/IP using EpsonNet WinAssist
 Printing via Standard TCP/IP Port Monitor in Windows 2000
 Printing via LPR software in Windows NT 4.0
 Printing via LPR software in Windows NT 3.51
 FTP printing
To use the printer on a TCP/IP network in Windows NT (LPR), follow the steps below.
Configuring for TCP/IP using EpsonNet WinAssist
To use TCP/IP on the network, you need to set an IP address for the Internal Print Server.
See Setting the IP Address Using EpsonNet WinAssist/MacAssist to configure the Internal Print Server for TCP/IP.
 |
Note:
|
 |
Make sure you have installed TCP/IP in your operating system. For information on installing TCP/IP, see your operating system's online help.
|

[Top]
Printing via Standard TCP/IP Port Monitor in Windows 2000
When using the printer on a TCP/IP network in Windows 2000, follow the steps below to connect the network printer to your computer using Standard TCP/IP Port Monitor.
Setting up the printer in Windows 2000
 |
Make sure the printer is turned on.
|
 |
Click Start, point to Settings, and then click Printers.
|
 |
Double-click Add Printer to start the Add Printer wizard, and then click Next.
|
 |
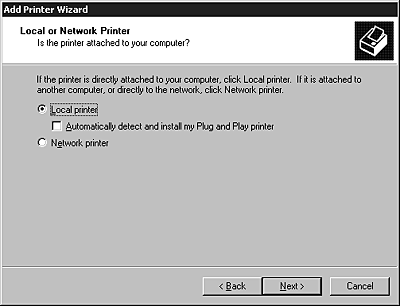
Click Local printer, clear the Automatically detect my printer check box, and then click Next.
|
 |  |
Note:
|
 |  |
You must clear the Automatically detect my printer check box because the printer is attached directly to the network, not to a Windows 2000 computer.
|
 |
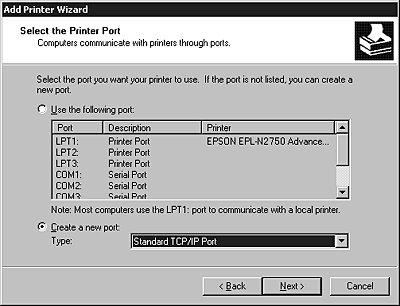
Click the Create a new port radio button, and then select Standard TCP/IP Port from the list. Then click Next.
|
 |
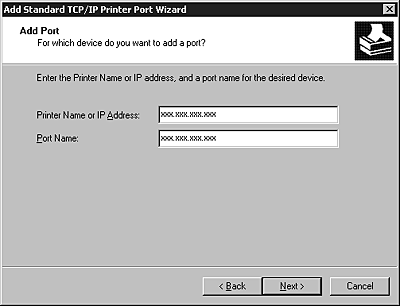
Enter the IP address of the Internal Print Server and click Next.
|
 |
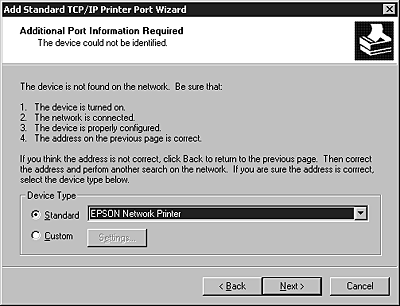
If there is some error, the following dialog box appears. Click the Standard radio button and then select EPSON Network Printer.
|
 |
Follow the on-screen instructions to finish setting up the printer.
|

[Top]
Printing via LPR software in Windows NT 4.0
Installing LPR software in Windows NT 4.0
Follow the steps below to install LPR software in Windows NT 4.0. If you have already installed Microsoft TCP/IP Printing, you can skip these steps.
 |
Double-click the Network icon in the Control Panel and click Add on the Services menu.
|
 |
Select Microsoft TCP/IP Printing and click OK.
|
 |
Follow the instructions on the screen.
|
For more information, see your Windows NT 4.0 documentation.
Setting up the printer in Windows NT 4.0
After configuring the Internal Print Server, you need to set up the network printer. Follow these steps to set up the printer in Windows NT 4.0.
 |
Double-click the My computer icon, then double-click the Printer folder.
|
 |
Double-click Add Printers, and select the My Computer radio button, then click Next.
|
 |
Click Add Port in the Add Printer Wizard dialog box.
|
 |
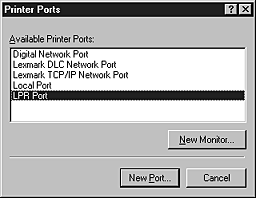
Select LPR Port from the Available Printer Port list, and click the New Port button.
|
 |
The Add LPR compatible printer dialog box appears. Type the IP address of the Internal Print Server in the first text box and an appropriate printer name in the second text box, and click OK.
|

 |
Follow the on-screen instructions to install the printer driver.
|
 |
Note:
|
 |
When you share the printer, announce the printer name and the location to clients so they will be able to know which printer to use on the network.
|

[Top]
Printing via LPR software in Windows NT 3.51
Installing LPR software in Windows NT 3.51
Follow the steps below to install LPR software in Windows NT 3.51. If you have already installed Microsoft TCP/IP Printing, you can skip these steps.
 |
Double-click the Network icon in the Control Panel to open the Network Settings dialog box.
|
 |
If Microsoft TCP/IP Printing is in the Installed Software list box, you can skip to the next section. Otherwise, click Add Software.
|
 |
Select TCP/IP Protocol and related components and click Continue.
|
 |
Select TCP/IP Network Printing Support. Then click Continue.
|
 |
Follow the instructions on the screen.
|
For more information, see your Windows NT 3.51 documentation.
Setting up the printer in Windows NT 3.51
After configuring the Internal Print Server, you need to set up the network printer. Follow these steps to set up the printer in Windows NT 3.51.
 |
Note:
|
 |
Install the correct printer driver before starting these steps.
|
 |
Click Print Manager in the Main program group.
|
 |
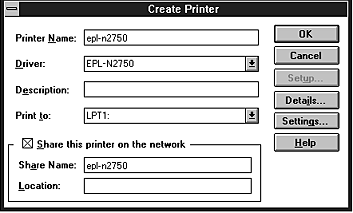
Choose Create Printer from the Printer menu.
|
 |
Type the printer name, and select the printer driver from the Driver pull-down menu.
|
 |
To share the printer on a network, select the Share this printer on the network check box. Type the share name and the location.
|
 |
Choose Other from the Print To pull-down menu. The Print Destinations dialog box appears.
|
 |
Select LPR Port from the Available Print Monitors list and click OK. The Add LPR compatible printer dialog box appears.
|
 |
Type the previously specified IP address of the Internal Print Server and the appropriate printer name. Then click OK.
|
 |
Verify that all your settings and are correct in the Create Printer dialog box. Make changes if necessary.
|
 |
Click OK to start installing the printer driver. Follow the on-screen instructions.
|
 |
Note:
|
 |
When you share the printer, announce the printer name and the location to the clients so they will be able to know which printer to use on the network.
|
Change the type of access of the spool directory
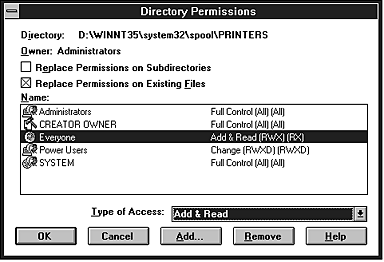
You need to change the access rights of the spool directory when you create a shared printer on the Windows NT 3.51 Server (if you have set up your computer to use an NTFS file system, rather than a FAT file system).
 |
Start the File Manager and point the cursor at
\WINNT35\SYSTEM32\SPOOL\PRINTERS.
|
 |
Choose Permissions from the Security menu.
|
 |
Change the type of access of Everyone to ADD & READ (RWX)(RX), and click OK.
|

[Top]
FTP printing
You can print using FTP command from Windows. First, you need to set the IP address for the Internal Print Server.
See Changing the IP address using EpsonNet WebAssist to configure the Internal Print Server for TCP/IP.
The following is an example of printing using the FTP command (Text after ">" is user input).
C:Windows>ftp 22.33.44.55
Connected to 22.33.44.55
220 FTP server (EPSON FTPD version 1.01) ready.
User (22.33.44.55:(none)):
230 VUser (none) logged in.
ftp>put c:\testdata\aa.txt
200 PORT command successful.
150 Opening ASCII mode data connection for EPL-N2750.
226 Transfer complete.
ftp> bye
221 Goodbye.

[Top]
| Version 1.00E, Copyright © 2001, SEIKO EPSON CORPORATION |
Configuring for TCP/IP using EpsonNet WinAssist
Printing via Standard TCP/IP Port Monitor in Windows 2000
Printing via LPR software in Windows NT 4.0
Printing via LPR software in Windows NT 3.51
FTP printing