|

Administrator's Guide
|
|
Settings by System / Settings for Macintosh
Configuring for AppleTalk Using EpsonNet WinAssist
Follow the steps to configure the Internal Print Server using EpsonNet WinAssist from Windows environment.
 |
Note:
|
 |
To configure for AppleTalk with EpsonNet WinAssist, the Internal Print Server must have a valid IP address or you must have logged in to the NetWare server or NDS context as an ADMIN.
|
 |
Turn on the printer.
|
 |
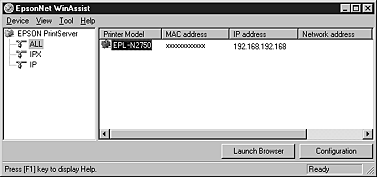
Start EpsonNet WinAssist.
|
Windows 98/95/2000/NT 4.0: Click Start, point to Programs, EpsonNet WinAssist, then click EpsonNet WinAssist.
Windows NT 3.51: Double-click the EpsonNet WinAssist icon in the EpsonNet WinAssist group.
 |
Select the printer you want to configure from the list, then click Configuration or double-click the printer.
|

 |  |
Note:
|
 |  | -
If you have connected more than one printer with the same type of print server to the network, you can distinguish between the printers by the MAC address on a status sheet.
|
 |  | -
If the IP address is set to the default, the printer model may not appear.
|
 |  | -
You can search printers in other segments by changing the Search Options in the Tool menu. See Optional settings for more information.
|
 |
Click the AppleTalk tab, and make the following settings.
|

Printer name:
Type the printer name (up to 32 characters). The following characters cannot be used; @ : * = ~
Zone name:
Type the network zone (up to 32 characters) in which you want the printer to appear. The following characters cannot be used; @ : * = ~
Entity type:
Displays the printer's entity type on an AppleTalk network.
Entity configuration:
Do not change these settings.
Network number set:
Select either Auto or Manual. Auto is usually preferred.
Network number for manual mode:
Type a value between 0 and 65534 when Manual is selected for the Network number setting.
 |
After making the settings, click OK. The Password dialog box appears.
|
 |
Type your password (up to 20 characters) and click OK to save settings. If you need to set a password, see About passwords.
|
Follow the on-screen message. After updating is complete, refresh the configuration by selecting Refresh from the View menu.
 |  |
Caution:
|
 |  |
Since it takes 2 or 3 minutes to send new settings to the Internal Print Server, you must wait to turn off your printer after the on-screen message appears.
|

[Top]
| Version 1.00E, Copyright © 2001, SEIKO EPSON CORPORATION |