|

Reference Guide
|
|
How To / Using the Printer Driver
Making Changes to Printer Settings
 Choosing the print quality
Resizing printouts
Modifying the print layout
Using a watermark
Using an overlay
Printing with the Duplex Unit
Choosing the print quality
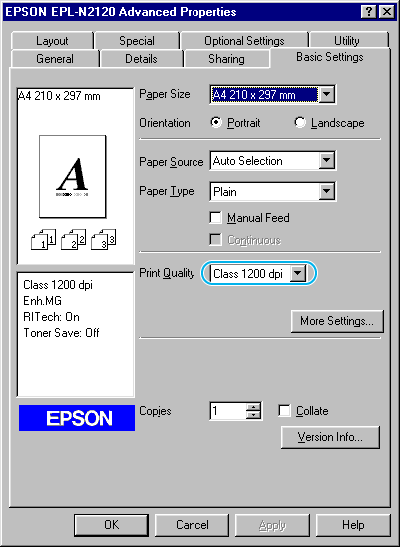
You can change the print quality or resolution of printouts to favor speed or detail. If you need high quality output, choose a higher number. Please note that doing so reduces the print speed.
There are three levels of print output, 600 dpi, Class 1200 dpi, and True 1200 dpi. True 1200 dpi provides high quality, precise printing, but requires more memory and slows the printing speed. Class 1200 dpi is actually a slightly lower resolution, however it provides high quality printing results on par with 1200 dpi with the Enh.MG and RITech functions. Printing speed is generally faster when Class 1200 dpi is selected than when True 1200 dpi is selected.
 |
Click the Basic Settings tab.
|
 |
Select the desired printing resolution from the Print Quality drop down list.
|
 |
Click the OK button to accept the setting.
|
 |  |
Note:
|
| | -
For details about the Enh. MG or RITech functions, see the Online Help.
|
| | -
If printing is unsuccessful or a memory-related error message appears, selecting a lower resolution may allow printing to proceed.
|

[Top]
Resizing printouts
You can have your document enlarged or reduced during printing.
To automatically resize pages to fit the output paper
|
|
Click the Layout tab.
|
|
|
Check the Zoom Options check box.
|

|
|
Select the desired paper size from the Output Paper drop-down list. The page will be printed to fit on the paper you have selected.
|
 |
Select Upper Left for Location to print reduced page image at upper left corner of the paper. Select Center to print reduced page image with centering.
|
 |
Click the OK button to accept the settings.
|
To resize pages by a specified percentage:
|
|
Click the Layout tab.
|
|
|
Check the Zoom Options check box.
|
|
|
Check the Zoom To check box.
|

|
|
Specify the magnification percentage in the box, then click OK. The percentage can be set between 50% and 200% in 1% increments.
|
If necessary, select the paper size to be printed from the Output Paper drop-down list.
[Top]
Modifying the print layout
"Layout printing" prints either two or four pages onto a single page and specifies the printing order, automatically resizing each page to fit the specified paper size. You can also choose to print documents surrounded by a frame.
|
|
Click the Layout tab.
|
|
|
Check the Print Layout check box, and click the Print Layout Settings button. The Print Layout Settings dialog box appears.
|

|
|
Select the Number of Pages you want to print on one sheet of paper.
|

|
|
Select the Page Order in which the pages are printed on each sheet.
|
| |
Note:
|
| |
The Page Order choices depend on the Pages selected above, and the paper orientation (Portrait or Landscape) selected on the Basic Settings tab.
|
|
|
Click OK to close the Print Layout Settings dialog box.
|
 |
Click the OK button on the Layout menu to accept the settings.
|
Duplex and Layout printing functions are combined in the Printing for Binding feature.
[Top]
Using a watermark
Follow the steps to use a watermark on your document. In the Watermark dialog box, you can select from a list of predefined watermarks, or you can select a bitmap (.BMP) file as your own custom watermark. The Watermark dialog box also allows you to make a variety of detailed watermark settings. For example, you can select the size, intensity, and position of your watermark.
|
|
Click the Special tab.
|
|
|
Check the Watermark check box.
|

|
|
Click the Watermark Settings button. The Watermark dialog box appears.
|
|
|
Select a watermark from the Watermark Name drop-down list.
|

|
|
Select the location on the page where you want to print the watermark from the Location list box.
|
|
|
Adjust the horizontal or vertical Offset position.
|
 |
Adjust the image intensity of the watermark with the Intensity slider bar.
|
 |
Adjust the size of the watermark with the Size slider bar.
|
 |
Select Front (to print the watermark on the face of the document) or Back (to print the watermark on the backside of the document) for the Position setting.
|
 |
Click OK to accept the settings.
|
Making a new watermark
You can make a new watermark as follows:
|
|
Click the Special tab.
|
|
|
Check the Watermark check box.
|
|
|
Click the Watermark Settings button. The Watermark dialog box appears.
|
|
|
Click the New/Delete button. The User Defined Watermarks dialog box appears.
|
|
|
Select Text or BMP and type a name for the new watermark in the Name box.
|
|
|
If you select Text, type the watermark text in the Text box. If you select BMP, click the Browse button, select the BMP file you want to use, then click OK.
|
| |
Note:
|
| |
Before making a custom watermark, you should prepare a bitmap (.bmp) file.
|
|
|
Click the Save button to close the User Defined Watermarks dialog box. Your watermark will appear in the list box.
|
|
|
Click OK to register the new watermark settings.
|
[Top]
Using an overlay
The Overlay settings dialog box allows you to print form data overlaid with data made by another application.
|
Note:
|
|
The overlay function is available only when the High Quality (Printer) is selected for the Graphic Mode in the Extended Settings dialog box from the Optional Settings Menu.
|
Creating an overlay
You can create form data and save it as a file.
|
|
Open the application that you will use to create the overlay.
|
|
|
From the application, access the printer driver. Open the File menu and choose Print or Print Setup. Then click Printer, Setup, Options, or Properties, or click a combination of these buttons, depending on the application you use.
|
|
|
Select the Special tab.
|
|
|
Check the Form Overlay check box, and click the Overlay Settings button to open the Overlay Settings dialog box.
|

|
|
Click the Create Overlay Data button.
|

|
|
Click the Settings button.
|
|
|
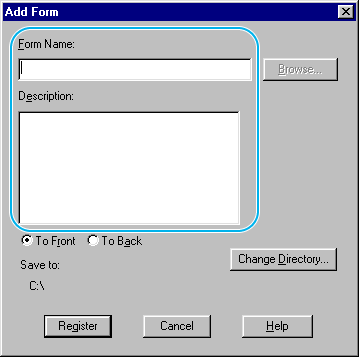
Check the Use Form Name check box. Then click the Add Form Name button. The Add Form dialog box appears.
|
|
|
In the Add Form dialog box, input the form name in the Form Name box and its description in the Description box.
|
|
|
Click the To Front (to print the overlay on the face of the document) or To Back (to print the overlay on the back side of the document) button.
|
|
|
In the Add Form dialog box, click the Register button.
|
 |
In the Form Settings dialog box, click OK.
|
 |
In the Overlay Settings dialog box, click OK. If you want to stop the procedure, click Cancel.
|
| |
Note:
|
| |
The file you send to the printer after step 10, from an application program such as Windows Notepad or Word, will be saved as an overlay using the form name you entered at step 8.
|
 |
Print the file saved as overlay data. It is possible to save any kind of file as an overlay. The overlay data is created.
|
Printing with an overlay
Follow the steps to print a document with overlay data.
|
|
Open the file to print with overlay data.
|
|
|
From the application, access the printer driver. Open the File menu and choose Print or Print Setup. Then click Printer, Setup, Options, or Properties, or click a combination of these buttons, depending on the application you use.
|
|
|
Select the Special tab.
|
|
|
Check the Form Overlay check box, and click the Overlay Settings button to open the Overlay Settings dialog box.
|
|
|
In the Overlay Settings dialog box, choose the form from the Form list, then click OK.
|
|
|
Click OK to print the data.
|
Different printer settings overlay data
The overlay data is made with the current printer settings (such as Resolution: 600 dpi). If you want to make the same overlay with different printer settings (such as 300 dpi), follow the instructions below.
-
Re-access the printer driver as described in step 2.
-
Make the printer settings and exit the printer driver.
-
Send the same data that you made by application to the printer like step 12.
This setting is available only for Form Name data.
[Top]
Printing with the Duplex Unit
Duplex printing prints on both sides of the paper. When printing for binding, the binding edge can be specified as required to produce the desired page order.
To use Printing for Binding, the Duplex Print Unit must be installed and enabled in the Duplex Print Unit check box on the Optional Settings dialog box. However, this check box is checked automatically if the printer is connected to a bi-directional port and EPSON Status Monitor 3 is running.
As an ENERGY STAR® partner, EPSON recommends the use of the double-sided printing function. Refer to ENERGY STAR® Compliance for more information on the ENERGY STAR® program.
|
|
Select the Layout tab.
|
|
|
Check the Duplex check box.
|
|
|
Select a Binding position from Left, Top, or Right.
|
|
|
Click the Duplex Settings button to open the Duplex Settings dialog box.
|
|
|
Specify the Binding Margin for the front and back sides of the paper.
|
|
|
Select whether the front or back side of the paper is to be printed as the Start Page.
|
|
|
Click OK to close the Duplex Settings dialog box.
|
|
|
Click OK on the Layout menu to accept the settings.
|
[Top]
| Version 1.00E, Copyright © 2002, SEIKO EPSON CORPORATION |

