|

Reference Guide
|
|
How To / Installing and Removing Options
Optional 250-Sheet Lower Paper Cassette Unit
 Installing the 250-Sheet Lower Paper Cassette Unit
 Removing the Optional 250-Sheet Lower Paper Cassette Unit
Installing the optional 250-Sheet Lower Paper Cassette Unit increases the paper-feeding capacity of your printer. For information on the paper sizes and types supported by the optional 250-Sheet Lower Paper Cassette Unit, see Paper Sources.
 |
Caution:
|
 |
Before installing an option, carefully read the manual that comes with the option.
|
Installing the 250-Sheet Lower Paper Cassette Unit
The installation procedure for both the optional 250-Sheet Lower Paper Cassette Unit and 500-Sheet Lower Paper Cassette Unit is the same. Refer to the instructions below for the installation of both units.
Follow these steps to install the optional 250-Sheet Lower Paper Cassette Unit or 500-Sheet Lower Paper Cassette Unit:
 |
Note:
|
 |
The illustrations show the 250-Sheet Lower Paper Cassette Unit.
|
 |
Make sure the printer is turned off.
|
 |
Unplug the printer's power cord from the electrical outlet and from the printer.
|
 |
Remove all interface cables.
|
 |
Place the unit in the location where the printer will be installed.
|
 |  |
Note:
|
 |  |
When you install two optional lower paper cassette units, put one unit upon the other unit in order before you put the printer.
|
 |
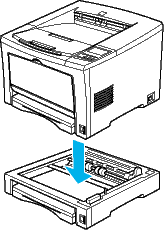
Lift up the printer. Make sure the printer and unit are facing the same direction. Aligning the pins on the unit with the holes on the bottom of the printer, lower the printer until it rests securely on the unit.
|

 |  |
Caution:
|
 |  |
Two or more people should carry the printer, lifting it by the correct positions as shown below.
|

 |  |
Note:
|
 |  |
When you install two optional lower paper cassette units, put one unit upon the other unit in order, then put the printer on top of them.
|
 |
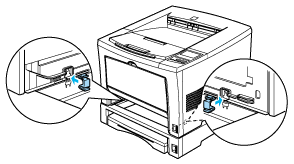
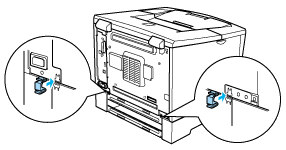
Secure the printer to the unit with the provided fittings. Install four fittings at the locations noted below.
|


 |  |
Note:
|
 |  |
When you install two optional lower paper cassette units, secure both units with the same procedure.
|
 |
Reconnect any interface cable you removed.
|
 |
Make sure the printer's power switch is turned off, then plug the power cord into the printer and into an electrical outlet.
|
 |
Turn on the printer.
|
To confirm that the 250-Sheet Lower Paper Cassette Unit or the 500-Sheet Lower Paper Cassette Unit is installed correctly, print a status sheet by pressing the Enter button two times when the printer is online. The 250-Sheet Lower Paper Cassette Unit or the 500-Sheet Lower Paper Cassette Unit will be listed under Other Options on the status sheet as one of the available options. If the unit is not listed on the status sheet, try reinstalling it.
When printing on paper loaded in the optional 250-Sheet Lower Paper Cassette Unit or 500-Sheet Lower Paper Cassette Unit, be sure to select the option as the paper source in your application program. Since the selection method varies from application to application, see your software documentation for more information.
 |
Note:
|
 |
The paper-loading procedure for the optional 250-Sheet Lower Paper Cassette Unit is the same as that for the standard lower paper cassette. See Loading Paper for a detailed description of the procedure.
|

[Top]
Removing the Optional 250-Sheet Lower Paper Cassette Unit
To remove the unit, do the installation procedure in reverse order.

[Top]
| Version 1.00E, Copyright © 2002, SEIKO EPSON CORPORATION |
Installing the 250-Sheet Lower Paper Cassette Unit
Removing the Optional 250-Sheet Lower Paper Cassette Unit