|

Reference Guide
|
|
How To / Using the Printer Driver
For Macintosh
 About the Printer Driver
Accessing the printer driver
Making changes to printer settings
Monitoring your printer (EPSON Status Monitor 3)
Canceling printing
Uninstalling printer software
About the Printer Driver
The printer driver lets you choose from a wide variety of settings to get the best results from your printer. The printer driver also includes the EPSON Status Monitor 3, which is accessed through the Apple menu. The EPSON Status Monitor 3 lets you check the status of your printer. See Monitoring your printer (EPSON Status Monitor 3) for more information.

[Top]
Accessing the printer driver
To control your printer and change its settings, use the printer driver. The printer driver allows you to easily make all the print settings, including paper source, paper size, and orientation. To access the driver menus, see below.
To access the printer driver from Macintosh, Choose Chooser from the Apple menu. Then click the EPL-5900L icon and click Setup.
-
To open the Paper Setting dialog box, select Page Setup from the File menu on any application.
-
To open the Basic Settings dialog box, select Print from the File menu on any application.
-
To open the Layout dialog box, click the Layout icon on the Basic Settings dialog box.
Accessing Online Help
You can access the Online Help from the printer driver. The Online Help provides you with detailed information and instructions on the printer driver that controls your printer. It is automatically installed when you install the printer driver.
[Top]
Making changes to printer settings
Choosing the print quality
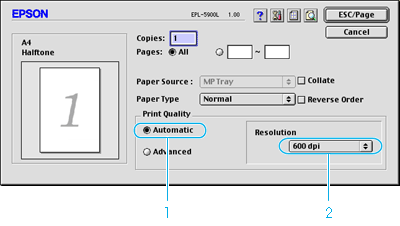
You can change the print quality or resolution of printouts to favor speed or detail. If you need high quality output, choose a higher number. Please note that doing so reduces the print speed.
There are four levels of print output, 300 dpi, Class 600 dpi, 600 dpi, and Class 1200 dpi. Class 1200 dpi provides high quality printing results on par with 600 dpi with the Enh.MG and RITech functions.
 |
Open the Basic Settings dialog box.
|
 |
Select Automatic on Print Quality, and select the desired printing resolution from the Resolution drop down list.
|
 |
Note:
|
 | -
If printing is unsuccessful or a memory-related error message appears, selecting a lower resolution may allow printing to proceed.
|
| -
For details of the Enh.MG or RITech functions, see the Online Help.
|
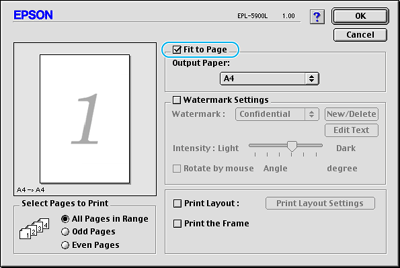
Resizing printouts
The Fit to page function in the Layout dialog box allows you to have your documents enlarged or reduced during printing according to the specified paper size.
|
Note:
|
| -
The enlarging or reducing rate is automatically specified according to the paper size selected in the Paper Setting dialog box.
|
| -
The modifying or reducing rate selected in the Paper Setting dialog box is not available.
|
|
|
Open the Layout dialog box.
|
|
|
Check the Fit to Page check box.
|
 |
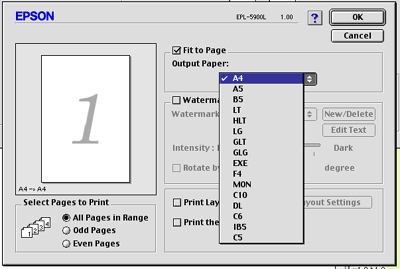
Select the desired paper size from the Output Paper drop-down list. The page will be printed to fit on the paper you have selected.
|
 |
Click OK to accept settings.
|
Modifying the print layout
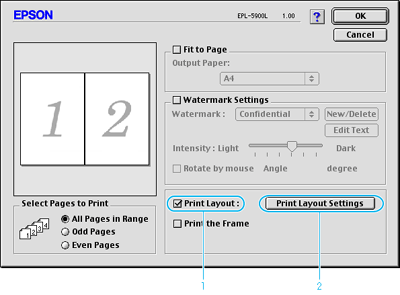
"Layout printing" prints either two or four pages onto a single page and to specify the printing order, automatically resizing each page to fit the specified paper size. You can also choose to print documents surrounded by a frame.
|
|
Open the Layout dialog box.
|
|
|
Select the Print Layout check box, then click Print Layout Settings. The Print Layout Settings dialog box appears.
|
|
|
Select the number of pages you want to print on one sheet of paper.
|
|
|
Select the page order in which the pages are printed on each sheet.
|
| |
Note:
|
| |
Page Order choices depend on Pages selected in Orientation.
|
 |
Click OK to close the Print Layout Settings dialog box.
|
 |
Select Print the Frame in the Layout dialog box when you want to print the pages surrounded by a frame.
|
 |
Click OK in the Layout dialog box to accept the settings.
|
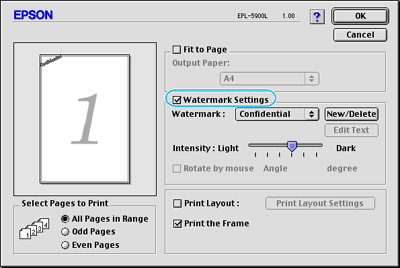
Using watermarks
Follow the steps to use a watermark on your document. In the Layout dialog box, you can select from a list of predefined watermarks, and you can make your original watermark with text or a bitmap (PICT) file. The Layout dialog box also allows you to make a variety of detailed watermark settings. For example, you can select the size, intensity, and position of your watermark.
|
|
Open the Layout dialog box.
|
|
|
Check the Watermark Settings check box, and then select a watermark from the Watermark drop-down list.
|
|
|
Select the location on the page where you want to print the watermark by dragging the watermark image on the preview window. Also, when you want to resize the watermark, drag its handle.
|
|
|
Adjust the image intensity of the watermark with the Intensity slider bar.
|
|
|
For a text watermark, you can rotate it by inputting the degrees in the Angle box. Or, check the Rotate by mouse check box, and rotate the text watermark with the pointer on the preview window.
|
|
|
Click OK to accept the settings.
|
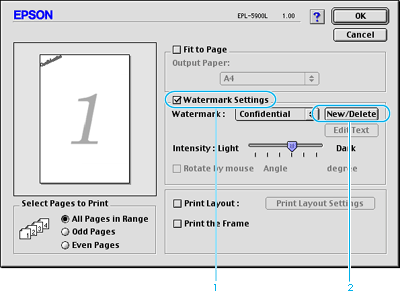
Making a new watermark
To make a text watermark, follow the instructions below:
|
|
Open the Layout dialog box.
|
|
|
Check the Watermark Settings check box, and then click New/Delete.
|
|
|
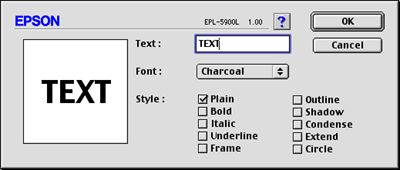
Select Add Text.
|
|
|
Enter the watermark text in the Text box, and select the Font and Style, and then click OK.
|
|
|
Enter the file name in the Name box, and click Save.
|
| |
Note:
|
| | -
To edit the saved text watermark, select it from List, and click Edit Text. After editing, be sure to click OK to close the dialog box.
|
| | -
To remove the saved text watermark, select it from List, and click Delete. After editing, be sure to click Save to close the dialog box.
|
|
|
Click OK on the Layout dialog box. The saved watermark is displayed on the preview window.
|
To make a bitmap watermark, follow the instructions below:
| |
Note:
|
| |
Before making a custom watermark, you should prepare a bitmap (PICT) file.
|
|
|
Open the Layout dialog box.
|
|
|
Check the Watermark Settings check box, and then click New/Delete.
|
|
|
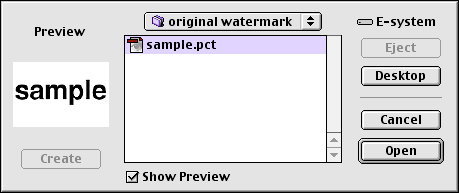
Click Add PICT.
|
|
|
Select the PICT file and click Open. When you click Create, the watermark is displayed on the preview window.
|
|
|
Enter the file name in the Name box, and click Save.
|
| |
Note:
|
| |
To remove the saved watermark, select it from List, and click Delete. After removing it, be sure to click Save to close the dialog box.
|
|
|
Click OK on the Layout dialog box. The saved watermark is displayed on the preview window.
|
[Top]
Monitoring your printer (EPSON Status Monitor 3)
About the EPSON Status Monitor 3
The EPSON Status Monitor 3 is a utility program that monitors your printer and gives you information about its current status. For example, you can find out the amount of remaining toner through this utility. If a print error occurs, the utility provides you with a message describing the error. The Status Monitor 3 is accessed from within the printer driver. See the following section for more information.
Accessing the EPSON Status Monitor 3
You can access the EPSON Status Monitor 3 by selecting the EPSON Status Monitor 3 alias in the Apple menu.
|
Note:
|
| -
The EPSON Status Monitor 3 appears automatically when an error occurs.
|
| -
The appropriate printer port must already be selected in the Chooser so that necessary information can be received from the selected printer driver when the EPSON Status Monitor 3 starts. If the printer port is not correct, an error will occur.
|
| -
If you change the printer driver in the Chooser while the spool file is printing in the background, output to the printer may be disrupted.
|
| -
Printer and consumable products status information appears in the status window only if the Chooser is acquiring status normally.
|
Getting printer status details
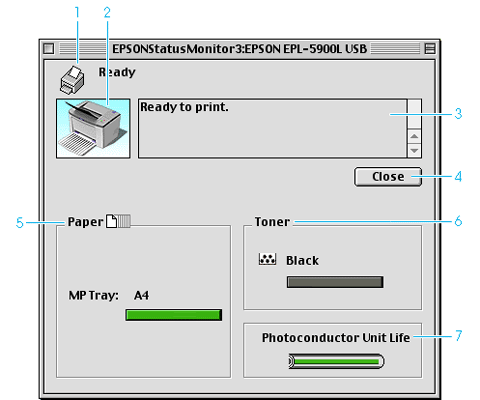
You can monitor printer status and obtain information on consumable products using the EPSON Status Monitor 3 dialog box.
|
1.
|
Icon/Message:
|
The icon and message shows the printer status.
|
|
2.
|
Printer image:
|
The image at the upper left shows the printer status graphically.
|
|
3.
|
Text box:
|
The text box next to the printer image displays the current status of the printer. When a problem occurs, the most probable solution is displayed.
|
|
4.
|
Close button:
|
Clicking this button closes the dialog box.
|
|
5.
|
Paper:
|
Displays the paper sources, paper size and the approximate amount of paper remaining in a paper source.
|
|
6.
|
Toner:
|
Indicates the amount of remaining toner. The toner icon flashes if toner is low (10 percent or less) or out.
|
|
7.
|
Photoconductor unit life:
|
Indicates the remaining functional life of the photoconductor unit.
|
Setting Monitoring
To make specific monitoring settings, select Monitor Setup from the File menu. The Monitor Setup dialog box appears.
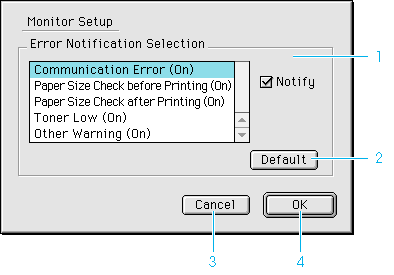
The following settings and buttons appear in the dialog box.
|
1.
|
Error Notification Selection:
|
Select the types of error that you wish to be notified about.
|
|
2.
|
Default button:
|
Restores default settings.
|
|
3.
|
Cancel button:
|
Cancels any changes.
|
|
4.
|
OK button:
|
Saves new changes.
|
Status Alert window
The Status Alert window appears automatically when an error occurs. It indicates what type of error has occurred and offers you a possible solution. It closes automatically once the problem is cleared.
If you wish to see information about printer consumables, click Show Details. If you click this button, the Status Alert Window will not disappear even after the problem is cleared. To close the box you need to click OK or Close.
[Top]
Canceling printing
|
|
Press the Period (.) key while pressing the Command key to cancel printing. Depending on applications, the message shows the procedure to cancel printing during printing. If this appears, follow the message.
|
|
|
During background printing, open the EPSON Monitor 3 from the Application menu. Then stop printing from the EPSON Monitor 3, or delete the file which is in standby mode.
|
[Top]
Uninstalling printer software
When you wish to reinstall or upgrade the printer driver, be sure to uninstall the current printer software beforehand.
|
|
Quit all applications, and restart your Macintosh.
|
|
|
Insert the EPSON printer software CD-ROM in your Macintosh.
|
|
|
Open the Printer Driver Installer folder, and then the folder of the printer being used.
|
|
|
Double-click the Installer icon.
|

|
|
Click Continue, and then click Accept.
|
|
|
Select Remove from the menu at the upper left, and then click Remove.
|
|
|
Follow the on-screen instructions.
|
[Top]
| Version 1.00E, Copyright © 2002, SEIKO EPSON CORPORATION |

