|

Reference Guide
|
|
How To / Installing and Removing Options
500-Sheet Lower Paper Cassette Unit A4
 Installing the 500-Sheet Lower Paper Cassette Unit A4
 Removing the 500-Sheet Lower Paper Cassette Unit A4
The optional 500-Sheet Lower Paper Cassette Unit A4 gives you a second paper source in addition to the MP tray. This section describes how to install the cassette unit and load paper.
Installing the 500-Sheet Lower Paper Cassette Unit A4
Follow the instructions below to install the 500-Sheet Lower Paper Cassette Unit A4:
 |
Turn off the printer.
|
 |
Unplug the printer's power cord from the electrical outlet and from the printer.
|
 |
Remove all interface cables from the interface connectors.
|
 |
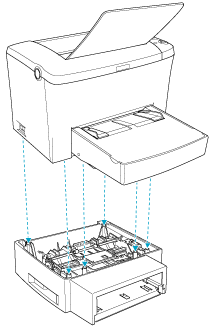
Make sure that the printer and the cassette unit are facing the same way. Lift the printer and align the pins on the cassette unit with the holes on the bottom of the printer, then lower the printer until it rests securely on the cassette unit.
|
 |
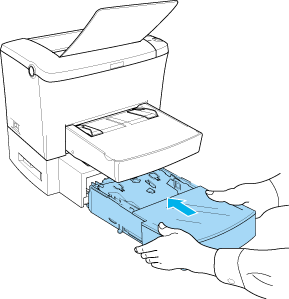
Install the paper-tray.
|
 |
Reconnect any interface cables you removed.
|
 |
Make sure that the printer's power switch is turned off before plugging the power cord into the printer and into an electrical outlet.
|
 |
Turn on the printer.
|
To confirm that the 500-Sheet Lower Paper Cassette Unit A4 is installed correctly, print a status sheet. See Printing a Status Sheet to print a status sheet.
To use the 500-Sheet Lower Paper Cassette Unit A4 as the paper source, be sure to choose Lower Cassette in the printer driver or Lower Cassette in the Remote Control Panel utility as the Paper Source setting.
 |
Note:
|
 |
If your computer is running Windows 98/95 or Windows NT 4.0, you can also confirm that the 500-Sheet Lower Paper Cassette Unit A4 is correctly installed by checking the information displayed in the printer driver's Optional Settings menu.
|
Loading Paper
Follow the steps below to load paper into the 500-Sheet Lower Paper Cassette Unit A4:
 |
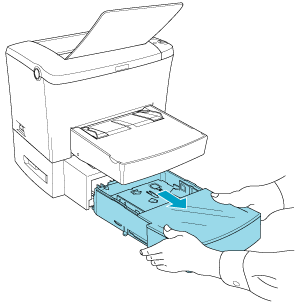
Pull the paper-tray out from the cassette unit.
|
 |
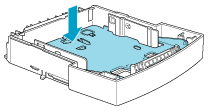
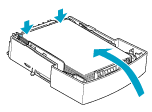
Lift off the tray cover, then press down on the plate in the paper-tray until it locks into position.
|
 |
Fan a stack of paper and tap it on a flat surface to even the edges. Make sure that the paper loaded is under the triangle marks on the inside of the paper-tray.
|
 |  |
Note:
|
 |  |
Load letterheads printable side up and with the letterhead portion at the top.
|
 |
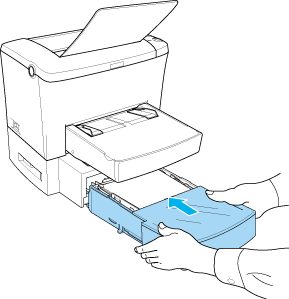
Replace the tray cover, then insert the loaded paper-tray back to the unit.
|

[Top]
Removing the 500-Sheet Lower Paper Cassette Unit A4
Follow the instructions below to install the 500-Sheet Lower Paper Cassette Unit A4:
 |
Turn off the printer.
|
 |
Unplug the printer's power cord from the electrical outlet and from the printer.
|
 |
Remove all interface cables from the interface connectors.
|
 |
Carefully lift the printer off the 500-Sheet Lower Paper Cassette Unit A4 and place it on a flat stable surface.
|
 |
Reconnect all interface cables.
|
 |
Plug the printer's power cord into the electrical outlet.
|
 |
Turn on the printer.
|

[Top]
| Version 1.00E, Copyright © 2002, SEIKO EPSON CORPORATION |
Installing the 500-Sheet Lower Paper Cassette Unit A4
Removing the 500-Sheet Lower Paper Cassette Unit A4