|

Reference Guide
|
|
How To / Setting Up Your Printer on a Network
Setting up Your Printer as a Shared Printer
When the printer server's OS is Windows Me/98/95, follow these steps to set the printer server:
 |
Click Start, point to Settings, and click Control Panel.
|
 |
Double-click the Network icon.
|
 |
Click File and Print Sharing on the Configuration menu.
|
 |
Select the I want to be able to allow others to print to my printer(s). check box, then click OK.
|
 |
Click OK to accept the settings.
|
 |  |
Note:
|
| | -
When "Insert the Disk" appears, insert the Windows Me/98/95 CD-ROM in the computer. Click OK and then follow the on-screen instructions.
|
For users restarting the computer
|
|
Double-click the Printers icon on the control panel.
|
|
|
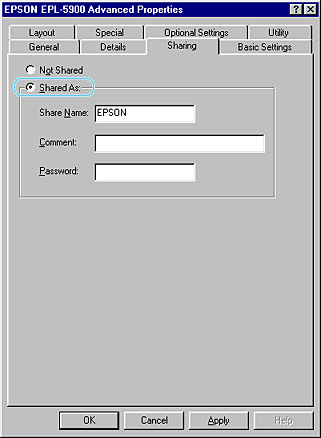
Right-click the EPSON EPL-5900 Advanced icon, and click Sharing in the menu that appears.
|
|
|
Select Shared As, type the name in the Share Name box, and click OK. Type Comment and Password if needed.
|
| |
Note:
|
| | -
Do not use spaces or hyphens for the share name, or an error may occur.
|
| | -
When sharing the printer, be sure to set the EPSON Status Monitor 3 so that the shared printer can be monitored on the printer server. See Setting Monitoring Preferences.
|
You need to set the client computers so that they can use the printer on a network. See the following pages for details:

[Top]
| Version 1.00E, Copyright © 2002, SEIKO EPSON CORPORATION |

