|

Reference Guide
|
|
How To / Using the Printer Software with Macintosh
Making Changes to Printer Settings
 Resizing printouts
 Modifying the print layout
 Using Watermarks
 Avoiding Insufficient Memory Error
Resizing printouts
The Fit to page function in the Layout Settings dialog box allows you to have your documents enlarged or reduced during printing according to the specified paper size.
 |
Note:
|
 | -
The enlarging or reducing rate is automatically specified according to the paper size selected in the Paper Setup dialog box.
|
|
 | -
The modifying or reducing rate selected in the Paper Setup dialog box is not available.
|
|
 |
Open the Layout Settings dialog box.
|
 |
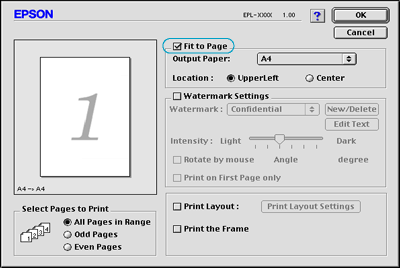
Select the Fit to Page check box.
|
 |
Select the desired paper size from the Output Paper drop-down list. The page will be printed to fit on the paper you have selected.
|

 |
Click OK to accept the settings.
|

[Top]
Modifying the print layout
"Layout printing" prints either two or four pages onto a single page and to specify the printing order, automatically resizing each page to fit the specified paper size. You can also choose to print documents surrounded by a frame.
 |
Open the Layout Settings dialog box.
|
 |
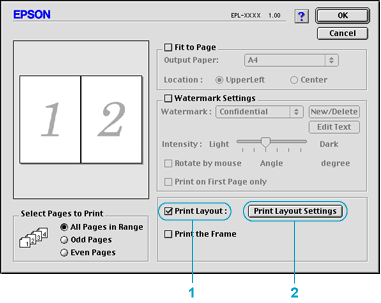
Select the Print Layout check box, then click Print Layout Settings. The Print Layout Settings dialog box appears.
|
 |
Select the number of pages you want to print on one sheet of paper.
|
 |
Select the page order in which the pages are printed on each sheet.
|
 |  |
Note:
|
 |  | |
Page Order choices depend on Pages selected in Orientation.
|
|
 |
Click OK to close the Print Layout Settings dialog box.
|
 |
Select Print the Frame in the Layout Settings dialog box when you want to print the pages surrounded by a frame.
|
 |
Click OK in the Layout Settings dialog box to accept the settings.
|

[Top]
Using Watermarks
Follow the steps to use a watermark on your document. In the Layout Settings dialog box, you can select from a list of predefined watermarks, and you can make your original watermark with text or a bitmap (PICT) file. The Layout Settings dialog box also allows you to make a variety of detailed watermark settings. For example, you can select the size, intensity, and position of your watermark.
 |
Open the Layout Settings dialog box.
|
 |
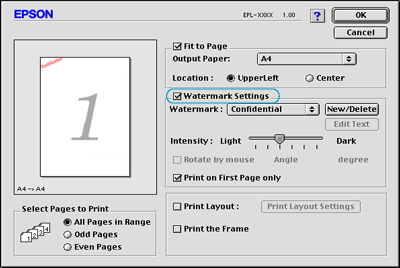
Select the Watermark Settings check box, and then select a watermark from the Watermark drop-down list.
|
 |
Select the location on the page where you want to print the watermark by dragging the watermark image on the preview window. Also, when you want to resize the watermark, drag its handle.
|
 |
Adjust the image intensity of the watermark with the Intensity slider bar.
|
 |
For a text watermark, you can rotate it by inputting the degrees in the Angle box. Or, select the Rotate by mouse check box, and rotate the text watermark with the pointer on the preview window.
|
 |
Click OK to accept the settings.
|
Making a new watermark
To make a text watermark
 |
Open the Layout Settings dialog box.
|
 |
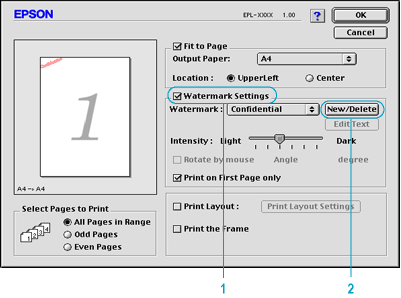
Select the Watermark Settings check box, and then click New/Delete.
|
 |
Select Add Text.
|
 |
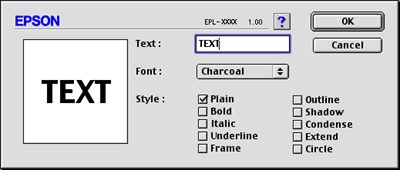
Enter the watermark text in the Text box, and select the Font and Style, and then click OK.
|
 |
Enter the file name in the Name box, and click Save.
|
 |  |
Note:
|
 |  | -
To edit the saved text watermark, select it from List, and click Edit Text. After editing, be sure to click OK to close the dialog box.
|
|
 |  | -
To remove the saved text watermark, select it from List, and click Delete. After editing, be sure to click Save to close the dialog box.
|
|
 |
Click OK on the Layout Settings dialog box. The saved watermark is displayed on the preview window.
|
To make a bitmap watermark
 |  |
Note:
|
 |  | |
Before making a custom watermark, you should prepare a bitmap (PICT) file.
|
|
 |
Open the Layout Settings dialog box.
|
 |
Select the Watermark Settings check box, and then click New/Delete.
|

 |
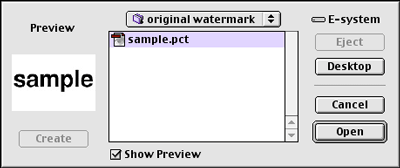
Click Add PICT.
|
 |
Select the PICT file and click Open. When you click Create, the watermark is displayed on the preview window.
|
 |
Enter the file name in the Name box, and click Save.
|
 |  |
Note:
|
 |  | |
To remove the saved watermark, select it from List, and click Delete. After removing it, be sure to click Save to close the dialog box.
|
|
 |
Click OK on the Layout Settings dialog box. The saved watermark is displayed on the preview window.
|

[Top]
Avoiding Insufficient Memory Error
When you print graphics or a large amount of data, the printer may stop due to insufficient memory. Follow the steps below to avoid memory errors and continue printing.
 |
Note:
|
 | |
Print quality will decrease when you use this function.
|
|
 |
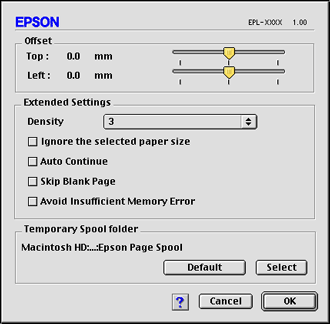
Click the Extended Settings icon on the Basic Settings dialog box. The following dialog box appears.
|
 |
Select the Avoid Insufficient Memory Error check box.
|
 |
Click OK to accept the settings.
|

[Top]
| Version 1.10E, Copyright © 2003, SEIKO EPSON CORPORATION |
Resizing printouts
Modifying the print layout
Using Watermarks
Avoiding Insufficient Memory Error