|

Network Guide
|
|
How To / Installing the Printer Driver
Windows Me/98/95
 LPR printing
Internet printing (Windows 98/95)
Internet printing (Windows Me)
Microsoft Network Shared printing
Using the NET USE command
For Windows Me/98/95, the printer driver installation procedure differs depending on the printing method you prefer.
LPR printing
Since Windows Me/98/95 does not support LPR, standard TCP/IP printing cannot be used. However, you can print via TCP/IP using the EpsonNet Print utility included on the Software CD-ROM. First, install EpsonNet Print. Then, install the printer driver. See About EpsonNet Print for more details.

[Top]
Internet printing (Windows 98/95)
Internet printing is possible by using the EpsonNet Internet Print utility included on the Software CD-ROM. First, install EpsonNet Internet Print. Then, install the printer driver and set the printer port. See About EpsonNet Internet Print for more details.
[Top]
Internet printing (Windows Me)
Installing the IPP client
The IPP client must be installed on your computer. Follow the steps below to install it.
 |
Insert the Windows Me CD-ROM.
|
 |
Select the add-ons folder, and then select the IPP folder.
|
 |
Double-click wpnpins.exe. Then follow the on-screen instructions.
|
 |
Click OK to restart your computer.
|
Setting up the printer
Connect your computer to a printer through IPP.
|
|
Click Start, point to Settings, and then select Printers.
|
|
|
Double-click Add Printer, and then click Next.
|
|
|
Select the Network Printer radio button, and then click Next.
|
|
|
Type the URL of the printer, and then click Next.
|
http://IP address of network interface:631/printer name
Example: http://192.168.100.201:631/EPSON_IPP_Printer
[Top]
Microsoft Network Shared printing
|
|
Click Start, point to Settings, and then select Printers.
|
|
|
Double-click Add Printer, and then click Next.
|
|
|
Select the Network Printer radio button, and then click Next.
|
|
|
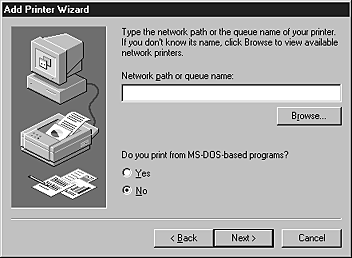
Click Browse, and then select the network path from the list. If you cannot browse, enter the following in the Network path or queue name box.
|
\\NetBIOS name of network interface\
Device name of network interface
 |
The Add Printer wizard appears. Click Next.
|
Installing a printer driver
|
|
Insert the Software CD-ROM shipped with the printer.
|
|
|
Close the Software Installation screen if it appears.
|
|
|
Click the Have Disk button. The Install From Disk dialog box appears.
|
|
|
Click Browse.
|
|
|
Select the CD-ROM drive for Drives, and then double-click the WIN9X folder. Click OK.
|
 |
Click OK in the Install From Disk dialog box.
|
 |
Select the model name of the printer, and then click Next.
|
 |  |
Note:
|
| | |
If the Add Printer wizard prompts you to select either Keep existing driver or Replace existing driver, be sure to select the Replace existing driver radio button.
|
|
 |
Click Finish and follow the on-screen instructions to complete the setup.
|
When you print using Microsoft Network Shared printing in the Windows XP/Server 2003/2000/NT environment, see Using the NET USE command for more details.
[Top]
Using the NET USE command
If you are running Windows XP/Server 2003/2000/NT and using NetBIOS to connect to the printer, we recommend that you use the NET USE command, as follows:
|
|
Right-click the Network Neighborhood icon or My Network Places icon and then select Properties.
|
|
|
Check that Client for Microsoft Networks is in the Components list. If it is not installed, click Add to install it.
|
|
|
Run the command prompt and enter the following command.
|
NET USE printer port: \\NetBIOS name of network interface\Device name of network interface
Selecting the port
|
|
Click Start, point to Settings, and then select Printers.
|
|
|
Right-click the printer icon and select Properties.
|
|
|
Click the Details tab and select the port you have set with the NET USE command.
|
[Top]
| Version NPD0752-00, Copyright © 2004, SEIKO EPSON CORPORATION |

